
Make your artwork look like they're from an alternate universe. These Cyberpunk presets work with Photoshop (via the Camera Raw filter) and Lightroom. Download all 788 presets for 90% off.

Step 46
Create another line but change the color to #2c1b2c<

Step 47
Add this drop shadow

Step 48 Shoe strings
Now depending on whichever you prefer make your shoe string shapes in Photoshop or Illustrator. Grab your pen tool and start making your shoe laces.

Step 49
Add thses layer styles


Step 50
Create a new layer and with a small soft round brush #6e6e6e darken in the areas of the laces. Play around with different opacities too to get the right look.

Step 51
Create a new layer and highlight some of the areas with #ffffff change the Opacity of this layer to 74%

Step 52
It is best to place all of the files pertaining to shoe laces in a folder to keep it organized. Now create a new layer and with your Elliptical marquee tool and make a oval. Fill it with white

Step 53
Add a Drop Shadow

Step 54
Change the opacity of this layer to 53%. Create a new layer and with a small round brush #6e6e6e darken the edge of this shape

Step 55
Now create the rest of the laces and repeat the above steps

Step 56
Create a new layer and with a #5d5d5d 8px soft round brush paint inside the holes where the laces are. Just darken in those areas. Change this layer to Multiply with an Opacity of 72%

Step 57
Create a new layer and with a medium size soft round paint brush #5d5d5d darken the area on the tip of the shoe

Step 58
Create a new layer repeat the last step but use this color #6a506b with a Fill of 72%

Step 59
Now go back down to your 'shoe' layer (it should be underneath your pattern layer) and 'convert it to a smart object' and 'rasterize it.' Then take your burn tool and use a combination of Ranges and different size brushes to darken your shoe

Step 60
Now on your pattern layer go to Filter>Liquify and distort the pattern a bit. Brush size: 71 Brush Density: 100 Brush Pressure: 52 Brush Rate: 80

Step 61
Now take all of your layers pertaing to your converse shoe and put it in a folder. Duplicate this folder and 'convert it to a smart object' and 'rasterize' it. Change the Color overlay to black #ffffff. Next, blur it.

Step 62
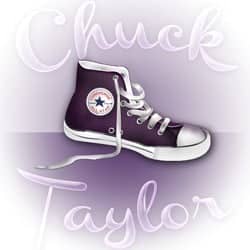
Now we are done with the shoe and time for the text. The text that I will be using is called Channel. Type out 'Chuck'
2 comments on “How to Draw a Converse “Chuck Taylor” Shoe in Photoshop”
Awesome I love it so much :D
so nice