
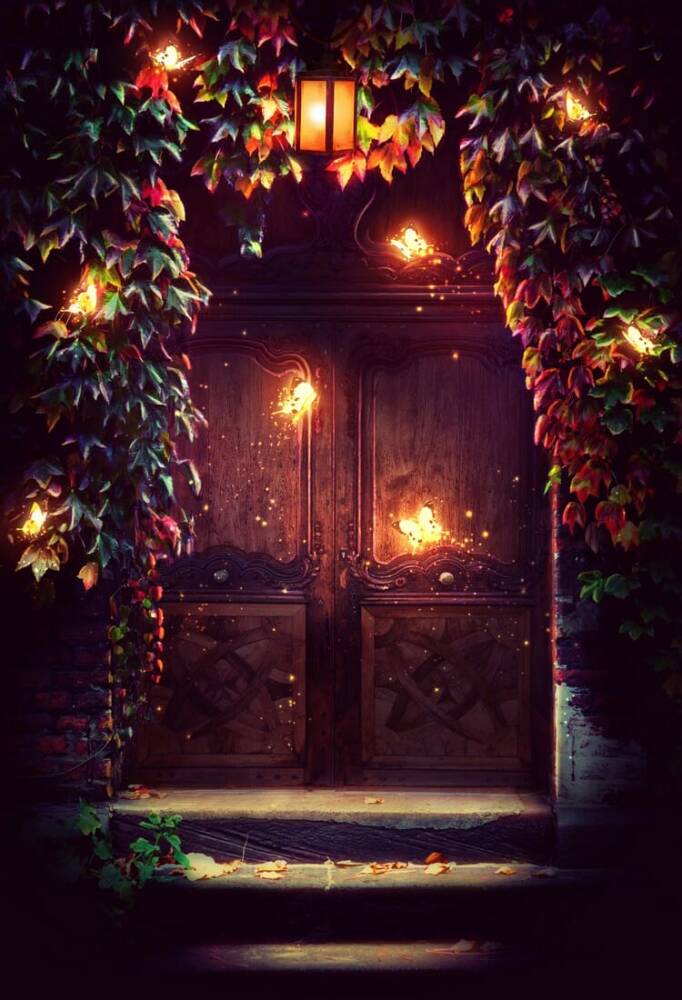
In this tutorial, I’ll show you how to create a fantasy artwork featuring magical butterflies. First, we’ll combine two door images using adjustment layers, masking and brushes. Later, we’ll enhance the color, light, shadow, and contrast using several adjustment layers. After that, we’ll add the lamp and butterflies and paint the lighting effect. We’ll paint some magical dots and refine the light to complete the final result.
Preview of the Final Result
Tutorial Resources
Step 1
Create a new 1500×2200 px document in Photoshop and fill it with white. Open the door 1 image and drag it into the white canvas using the Move Tool (V).

Step 2
Hit Ctrl+Shift+N to make a new layer and activate the Clone Tool (S). Use this tool to remove the part of the iron part on the wall beside the door.

Step 3
Go to Layer > New Adjustment Layer > Curves and increase the contrast and shadow of the door. On this layer mask, activate the Brush Tool (B) and select a soft round one with black color. Use this brush with the variable opacity to mask off the middle and the steps of the door.


Step 4
Make another Curves adjustment layer to darken the sides and corners of the scene more. On this layer mask, use a soft black brush to erase the middle so it won’t be affected by this adjustment layer.

Step 5
Open the door 2 image and drag it into our main canvas Use the Free Transform Tool (Ctrl+T) to resize the door to fit the size and position of the existing door.

Click the second icon at the bottom of the Layers panel to add a mask to this layer. Use both hard and soft black brushes to blend the door with the steps and carefully mask off the details of the ivies on the door.


Step 6
Make a Curves adjustment layer above the door 2 layer and set it as Clipping Mask. On this layer mask, use both soft and medium-hard black brushes to reduce the dark effect on the lower of the door and both sides of the ivies.


Step 7
Create a Gradient Map adjustment layer on top of the layers and pick the colors #e10019 and #00601b. Lower the opacity of this layer to 20%.

Step 8
Make a Color Balance adjustment layer and change the Midtones and Highlights settings:
3 responses to “How to Create a Magical Butterflies Scene Photo Manipulation with Adobe Photoshop”
-

Awesome Work…
-
Awesome Tutorial.
Thank you very much!
Love you … -
This is really nice! Thank you!
Leave a Reply to Su HallCancel reply