
Step 1 – Preparing the Document
Open an image to edit.

Step 2
Duplicate the layer (Layer> Duplicate Layer or Ctrl+J) and change the blending mode of the new layer to Screen.

- Add a layer mask to the top layer (Layer> Layer Mask> Reveal All). Make sure that the layer mask is selected.


Creating the Mask
In this section, we’ll be editing the layer mask to mask out the effect from the shadows.
Step 3
Use the Apply Image tool to apply the Background layer to the layer mask. To do this, open the Apply Image tool (Image> Apply Image) and change the Layer to Background and click OK.

Step 4
Hold the Alt key and click on the thumbnail of the layer mask.

Step 5
With the layer mask still activated, use the Threshold tool (Image> Adjustments> Threshold) and adjust the slider to define where the bloom Photoshop effect will be visible.

Adjusting the Effect
We’re now ready to edit the effect. This section is where we’ll see the bloom effect in action.
Step 6
Click on the thumbnail of the layer (not its layer mask) to deactivate the layer mask.

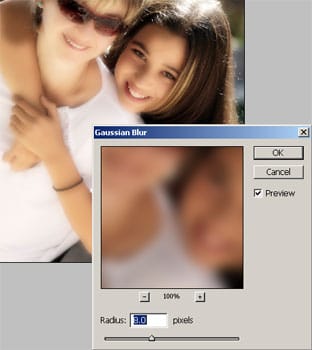
Step 7
Open the Gaussian Blur filter (Filter> Blur> Gaussian Blur). Ensure that Preview is enabled and increase the radius to achieve your desired effect.
Step 8
Inside the Layers pallet, click on the thumbnail of the layer mask to activate. Use the eraser tool (E) to erase the bloom Photoshop effect wherever you do not want the effect to appear. Use the brush tool (B) to add areas where you would like the effect to appear. To start, use a brush or eraser with a low hardness and an opacity of around 50%.
Press the “[” and “]” keys to adjust the size of the brush quickly.


Final Results


This effect creates a similar glow effect as the diffusion effect. The diffusion effect is more natural while the bloom effect is stronger and has more noticeable edges between the shadows and highlights. If you feel the Bloom effect is too strong for your photo and you want to preserve more details, try using the classic diffusion effect.
5 responses to “Bloom”
-

where are you
-
where’s the other steps man!!!!
-
Wow, great resource. I’m gonna glean everything I can from this site, if that’s alright with you all.
-
am not able to go to third page… pls help
-
Fixed… thank you!
-
Leave a Reply to divakarCancel reply