How to Create a Comic Book Styled Photo Manipulation

How to Create a Comic Book Styled Photo Manipulation

Learn how to create this scene in space using photographs. The author will show you how you can photograph objects around your house to create this photo manipulation then finish it off with a comic book effect.

Preview of Final Results


final_600w

Comic Book Styled Photo Manipulation Photoshop Tutorial

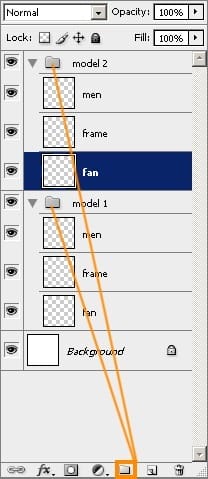
Before we get started, make sure that you keep your images in layers and groups. For example, each model in the image would have one group with several layers inside the group.
0

Step 1

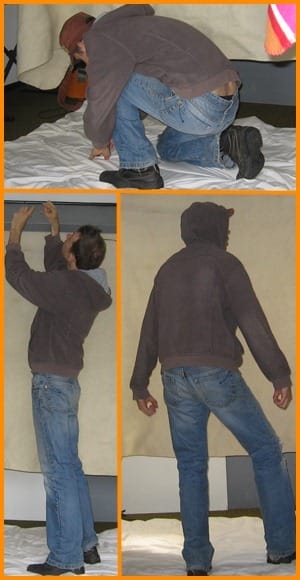
Start by getting photographs of the models. For this, I photographed pictures of myself in different poses. The background and floor is covered with some sheets to make it easier to create a cutout of myself in Photoshop.
models

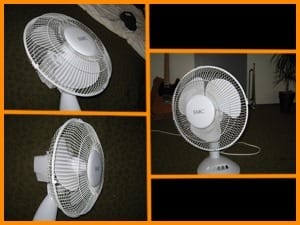
I also photographed a fan in different perspectives. These fans will be used to create the space outfit. Make sure that the perspective of the fan is similar to the photos of the model so that you can put them on the models back.
fan

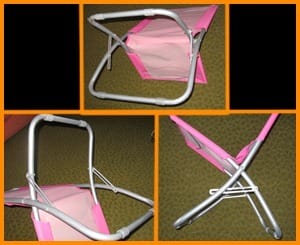
I also photographed this foldable chair. Like the fan, photograph it in the same perspective as the model.
tipupseat

Step 2

Create cutouts of the model using any method you like. This can be with the selection tools or with the Pen tool. I used the Pen tool to create a path around the model.
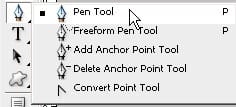
penTool

Once you’ve created a path around the model, right click on the path then choose Make Selection. This will turn the path into a selection.
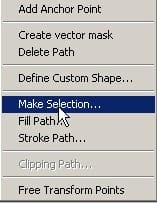
make_selection_pen_tool

Choose Select > Inverse to inverse the selection so that it is selecting the area around the model. Press Delete on your keyboard to remove the selected area (which should be the background of the photo). Repeat this step for the rest of the images. For the image of the fan, I used the Color Range tool (Select > Color Range) to create a selection of the fan.
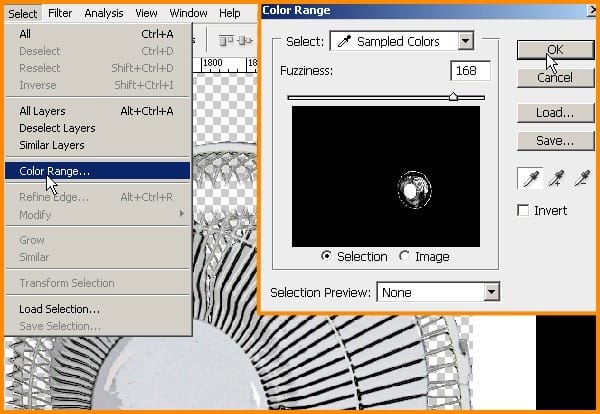
fan_transparant

Here’s how to put the images together to create the explorer. Remember, keep the images on their own separate layer then put all three images into a group. Rename this group to “model”.

model1

Make sure that the layer with the fan is on the top of the group. Add a layer mask to this layer (Layer > Add Layer Mask > Reveal All). In the layer mask, delete the area where the foldable chair is so that the fan looks like it is held inside the foldable chair. Add a layer mask to the layer with the foldable chair then erase the area around the models hand so that it looks like it is behind the hand.

1

Step 3

I’ll give this model a special device. Only for this model because the others are turned away and you cannot see it. For this special device, I photographed my heater.

2

I made a cutout of the display and placed it into the group with the model. It is positioned in front of the models body. Use the Free Transform tool (Ctrl+T or Edit > Free Transform) to resize the special device so that it is the right dimension. I also used the Burn tool (O) to make the edges darker.

3

Step 4

Select the layer with the fan then choose Filter > Artistic > Poster Edge. Use the settings shown below to give it a comic book effect.

4

Step 5

Photograph a picture of a mountain landscape like the image below. The image I took below was shot by accident. I was on vacation with my Fujifilm Finepix S602Z when I accidently reset the settings. Since I always photograph in Manual mode, the white balance was set to the default which gave this image a bluish tint. You can experiment with different white balance settings to get the color that you like.

background

Place the landscape photo into the current document then position the model so that it is standing on the land. Pay attention to his feet and place him on a spot where it looks correct.

5

Erase some areas around the bottom of his shoe so that some of the rocks appear to be behind his shoe.

6

Step 6

Now we will repeat the previous steps to create the second and third model. Here’s some tips for cutting out the models. When you create a cutout, you may have tiny pixels left over that you may not see. To make it visible, right click on the layer, choose Blending Options, then add a 1-2px red stroke. This will show you the areas with leftover pixels that need to be erased. Once you’re done, you can remove this layer style.

7

After you deleted those leftover pixels, your cutout should look clean like this image.

8

For the fan, use the Color Range tool (Select > Color Range) to create a selection of the fan. Choose Select > Inverse then press delete to delete the background from the fan.

9

Same idea for the frame. Cut it out and use the technique to ensure it is properly cut out.

10

Put the three images together like this.

11

Like what you did with the first model, erase parts of the fan, foldable chair, and model so that you get results similar to the image below.

12
13

Step 7

Give the fan a Poster Edges filter (Filter > Artistic > Poster Edges).

14

Repeat the same process for the third person in the picture. Place the picture of the fan behind the third model.

15

Cut out the foldable chair and place it over the fan.

16

Make sure the layer with the metal frame is over the fan. Then add a layer mask and use the Eraser tool to erase over parts of the frame shown in the image below.

17

Select the layer with the cooling fan and delete the area on the bottom.

18

Step 8

When you’re done creating the two models, you can position them in the landscape.

19

Look for a stone in the landscape and duplicate it into a new layer. Move it so that it is in one of the models hand. This is to make him look like he is inspecting the stone. To make this stone stand out, use the Exposure tool (Image > Adjustments > Exposure).

20

Step 9

Now we are going to create the oxygen meter machine on the top left of the final image. For this, I photographed a pipe from a heater.

21b

I also used a photo of the heaters display.

21a

Here’s how to create the oxygen box. First I placed the meter in the middle then cut out the rest of the heater and rearranged them into the box like shown in the image below. To remove the circle on the box, I just created a gradient to cover it.

21

Step 10

To add more realism to the final image, I’ll add some pipes and tubes. For this, I photographed some gas and water pipe from my house to use the in the project.

23a

I took this section of the pipe to put on the right side of the oxygen box. I used the Clone Stamp tool to clone out the white paint on the pipe. I also used the Clone Stamp tool to create a new shackle on the side of the oxygen box.

23

I photographed this washing machine hose to use on the bottom of the oxygen box. Create a cutout of the tube then place it under the spaceships oxygen meter. Use the Free Transform tool (Ctrl+T or Edit > Free Transform) to rotate the pipe.

24

I also photographed these pipes, cut them out, rotate them 45°, then placed them on the bottom left corner of the image.

25

Step 11

Here’s a hot water tank that I photographed to be used in the project.

26

I placed it on the landscape near some rocks then I deleted the area around the rock.

27

Step 12

Finally, I cut out some of these copper pipes to put on the bottom right side of the image.

28

Step 13

Create a new layer on top of the other layers. Use the Rectangular Marquee tool to create borders like shown in the image below.:

42a

Step 14

Now we are going to add some shadows. Realistic shadows are important because they show the light source; and there’s always a light source! So without shadows in the project, it won’t look real. Add shadows one by one. Start with the first model and duplicate it into a group. Then go to Layer > Merge Layer Set.

29

Create a selection of the merged layer by holding down the Ctrl button and clicking on the layer thumbnail. You’ll now have a selection of the model. Fill the selected area with a blue color shown below.

30

Use the Distort tool (Edit > Transform > Distort) to transform the shadow.

31

Here’s how the shadow should be transformed.

32

Step 15

Now reposition the layer with the shadow under the model. Then go to Filter > Blur > Gaussian Blur. Apply a slight blur of around 6 pixels then reduce the opacity of the layer.

33

Step 16

Repeat this to create a shadow for the tank.

34

Step 17

Now we will colorize the pipes and tubes. Start by making selections of the tube that you’d like to change the color for. Use the Hue/Saturation tool (Ctrl+U or Image > Adjustments > Hue/Saturation) to colorize the tubes. Make sure that the colorize option in the Hue/Saturation tool is checked.

35
36

For the digital display, I changed it from red to green by changing the hue without the colorize option checked.

37

Here’s the settings I used for the oxygen meter.

38

For the explosive tank, I used these settings to turn it from red to teal.

39

I also used these settings to change the color of the model.

40

Step 18

Next, I applied a Shadows/Highlights tool (Image > Adjustments > Shadows/Highlights) on all three of the models so that they blend in with the landscape.

41

Step 19

Now we’ll add the name for the spaceship. Here’s what I typed.

41a

Right click on the layer then choose Rasterize Type.

41b

Step 20

Then choose Edit > Transform > Warp.

41c

Try to reposition and shape the text so that it fits in the beam.

41d

Change the blending mode of the layer to Color Burn and reduce the opacity or fill.

41e

Step 21

To complete the effect, create a new layer then press Ctrl+Alt+Shift+E. This command is called “Stamp Visible”. It is similar to merging all the layers down but instead, it will copy the merged image into your new layer. Duplicate this new layer by pressing Ctrl+J. Select the top one then go to Filter > Artistic > Poster Edges. Apply the settings shown below.

42

Select the second layer that you just duplicated from then go to Filter > Artistic > Dark Strokes and apply the settings shown below.

43

Step 22

Create a new layer then call it “text balloon”. Use the Pen tool to create a chat box like shown in the image below.

44

Right click on the path then choose Make Selection.

45

Choose Edit > Stroke.

46

Give it a black stroke about 8 px.

47

Step 23

For the finishing touches, I gave the display for the first model some color. Select the display for the first model then use the Hue/Saturation tool to increase the saturation.

48

Step 24

Fill the text balloon with white using the Paint Bucket tool (G) to give it a white background. Reduce the opacity or fill to 51%. I also added some text to the oxygen box.

49

Final Results

final_600w[1]

Leave a Reply

Your email address will not be published. Required fields are marked *

cross