Learn how manipulate a regular portrait photo into a mystic lady photo manipulation! This Photoshop tutorial will teach you the steps to retouching skin, adding eye and lip makeup, warping a gown over the subject, and finishing it up with many mystical effects.
Preview of Final Results

Tutorial Resources
- Model – Randomacts, Deviantart
- Robe – Randomacts, Deviantart
- Cosmos – Funerium in Resurgere, Deviantart
- Eyelash Brushes – Obsidiandawn
Step 1
Open the model image in photoshop and duplicate (Ctrl+J) the image two times. We can name the duplicates as we want. I, myself, named the duplicates as background copy and inverted background copy 2. NOTE: the original model image is quite large with size of 2304 x 3456 at 300 pxls/inch. We can reduce the the image size to 768 x 1152 at 100 pxls/inch. The psd file of this tutorial that we can download here is the one with the reduced size as mentioned above. There will be some different setting for certain filters used because of the reduction as we can see in the psd file.

Step 2
Select the inverted background copy 2 layer in the layer panel and hit Ctrl+I to invert the layer.

With the layer still selected, go to Layer > Smart Objects > Convert to Smart Object. This will change the layer into a smart object later indicated by a small smart object thumbnail at lower left corner..

Then, change this smart object layer’s blending option from normal to overlay at 100% opacity.

The result should look like this:

Step 3
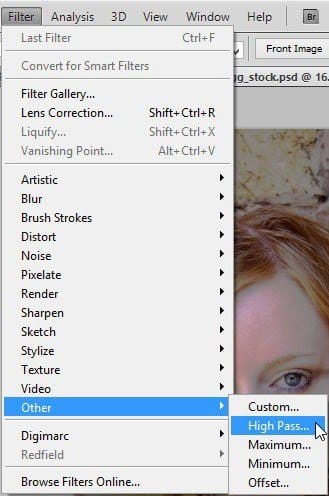
In this step, we will give some high pass filter for the smart object layer by going to Filter > Others > High Pass.

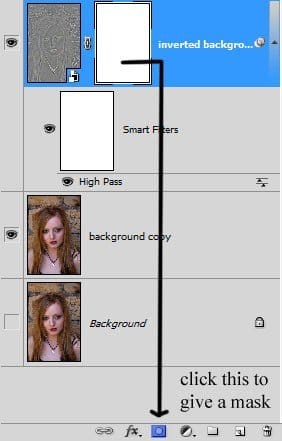
Here is the setting of the high pass filter. After applying this filter, it will be a smart filter shown below the smart layer with a white mask thumbnail. Note: the amount of the high pass filter shown in the screenshot is the one for the image with original size (2304 x3456 pxl at 300 resolution). If we reduce the resolution to 100 pxls/inchs (a third of 300), we should set the amount of the filter to 11,5 pxl (a third of 34,5). This will give the same result.

Give this layer a layer mask by clicking the layer mask icon in the bottom of the layer panel.

Then, mask the areas around the eyes, nose, lips and upper hair as shown in the selection in the screenshot. Use a very soft round brush at 20% opacity for this purpose.
18 responses to “How to Create a Mystic Lady Photo Manipulation”
-
She is beautiful. Fantastic tutorial thank you
-
Amazing, thanks a lot but i got a few things to say:There is no way u gonna resize and warp and get that. Where is d ice queen’s necklace??? I thought u wld cut all that out before moving d image. I dnt knw if am d only one but after moving d cut part of d ice queen, no way am getting d next stop by warping n resizing.
-
nice explanation. What does Filter> Others> Custom do ? PSD file would have helped a lot.
-
It lets you change the brightness of pixels.
https://helpx.adobe.com/photoshop-elements/using/filters-1.html#custom_filters
-
-
wow! you have done a excellent work,thanks for sharing…..
-
Wow, these are really creative! They remind me of those Chip Fosse drawings from Overhauling’. Great work!
-
Thanks for the great tutorial, this is what I created out of this tutorial. (edit: I used a picture of my own wife, so some things might be a little off like colors and stuff)
http://helldog2004.deviantart.com/art/Ellen-robe-410515125?ga_submit_new=10%253A1383173051
-
Xosssssssssss
-
I like
-
très bon tutoriel,merci pour le partage
-
wow, is there any way to make that into a video tutorial so we can see how you do it too? Please?
AWESOME!!!! -
Awesome!! This is really cool Photoshop tutorial, thanks for sharing.
-
WOW so amazing!!! nice one
-
Very nice and creative job u have done, keep it up
-
very creative
-
Metamorphosis. Fantastic.
-
Amazing…
Plz give PSD download too…
this help us to feel your great creativity…plz
-
sayeper fri
-


Leave a Reply