
Download Lightroom presets and LUTs, absolutely free. Use the presets to add creativity and style to your photos.

Once the Gradient Map menu opens, choose the following gradient:

Now, you’ll see that your image is Black and White, what we do now is we change the Blending mode and Opacity to the following:
- Blending Mode: Color
- Opacity: 15%

Next, let’s create a Photo Filter adjustment layer.

When the box opens, input the following:
- Warming Filter (81)
- Density: 25%
- Preserve Luminosity: Checked

Next, let’s create a Curves adjustment layer.

When it opens, input the following:
- Input: 109
- Output: 135

Next, create another Solid Color adjustment layer and input the following:
- #: dca145
Then use the following:
- Blending Mode: Hard Light
- Opacity: 40%
Finally, create another Photo Filter adjustment layer and then use the following filter:
- Cooling Filter (LBB)
- Density: 25%
- Preserve Luminosity: Checked
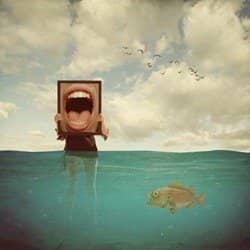
The final image should be similar to this:

Author’s Comment
 This is where my head goes a lot of times. I hope you’d enjoy creating this tutorial and I hope this would help you in whatever you’re doing. Anyway, thank you for visiting this page and using my tutorial, if you want to see more of my art works, give me a shout at my website:https://www.wix.com/theflickerees/michaelVmanalo
- Michael Vincent Manalo
5 comments on “How to Create a Retro Surreal Photo Manipulation using Photoshop”
I know this tutorial is an old tutorial and that some of the stock photos are gone, but I really like the tutorials on this website by Michael Manalo. I can follow along using other stocks and the artworks are beautiful.
It would have been much more helpful as a beginner if I could see what the layers looked like on the right side of the screen. As it was, the lasso tool at the very beginning working with the water lost me. Please don't assume you're dealing with experts when directing these tutorials!
koji si ti bumbar?????? ke je slika ud une pičke???? mamu ti jebem!!!
The pic of the woman got deleted :(
I'm beginner , so I'm stuck on sky. When I put them on main picture (canvas) they are so small , and when I resize sky, resolution is changed and it looks really ugly. Any help ?