How to Create a Night Jungle Scenery in Photoshop

How to Create a Night Jungle Scenery in Photoshop

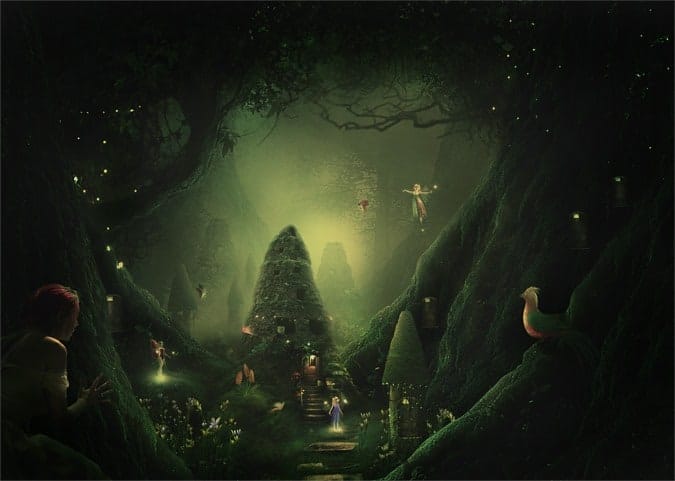
Learn how to create a mossy jungle scene with fairies flying around. This tutorial will show you how to creatively create your own jungle background, manipulate a stone building into a tower, and add doors to create a miniature village for fairies.

Preview of Final Results


Tutorial Resources


Step 1 (Creating the background’s base)

Start by creating a new document (Ctrl+N) of 1500 pixels wide and 1000 pixels high:
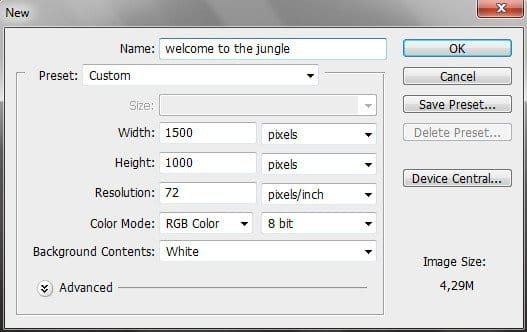
step1a

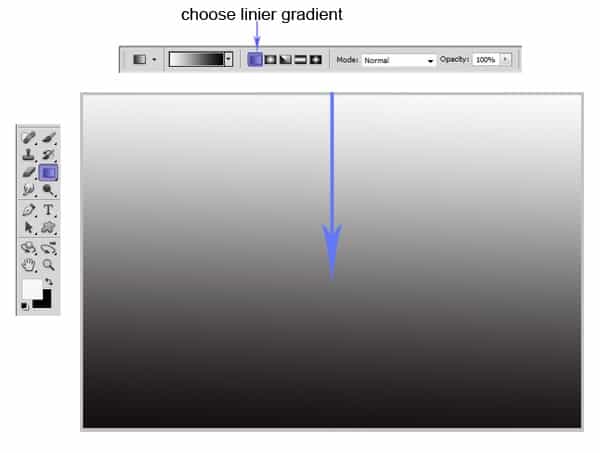
Hit G on the keyboard to activate Gradient Tool. Set the foreground color to white and background to black. Choose Linier Gradient. Fill the white document with gradient by clicking on the top and dragging to the bottom of it.
step1b

Step 2 (Creating foreground)

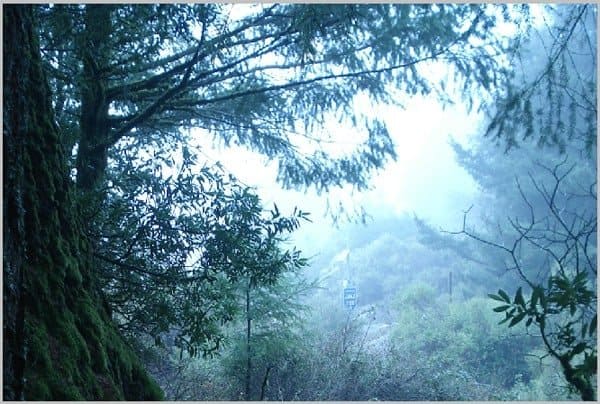
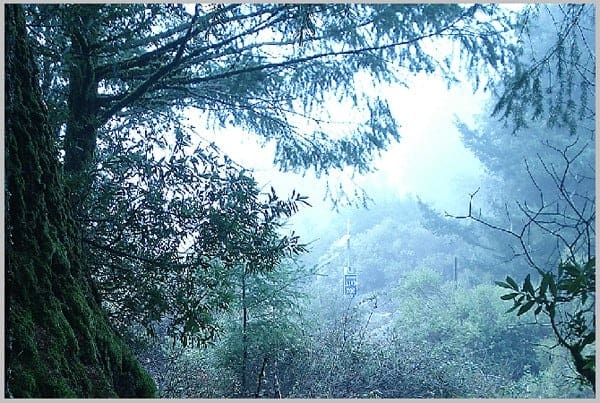
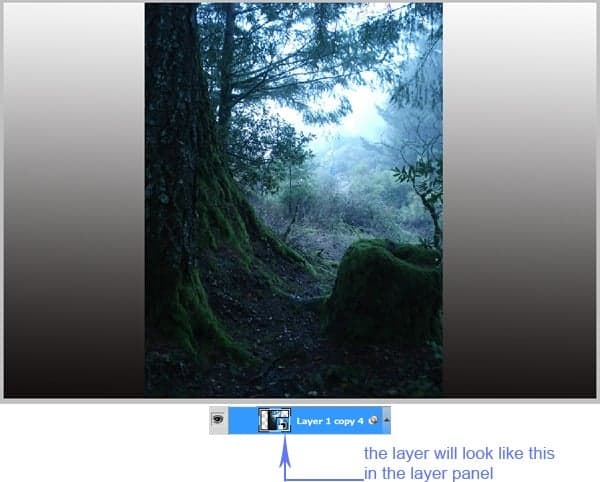
Open the tree stock image in the document. Hit Ctrl+G to place the image in a group. Name this group foreground 1. Then, with the tree layer selected, go to Layer > Smart Objects > Convert To Smart Object. This will change the layer into a smart object layer.
step2a

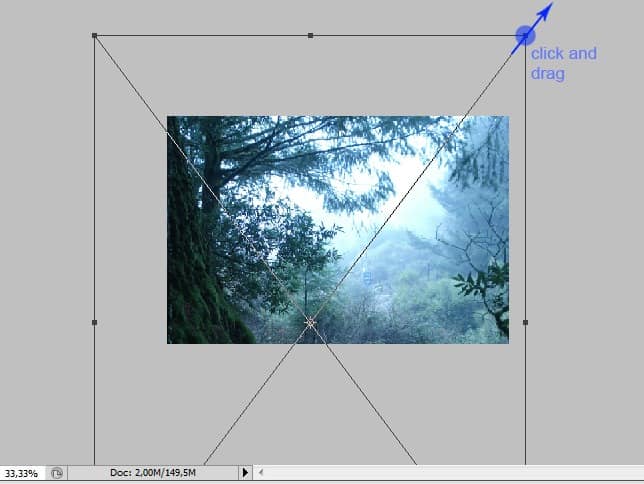
Now scale up the image to cover the document. Use Free Transform Tool to do this. Hit Shift on the keyboard along with clicking and dragging one of the dragging point marked in blue in the screenshot. Place and arrange its position in a such way that the stem of the tree fill the left foreground.
step2b

This is the result should look like:

step2c

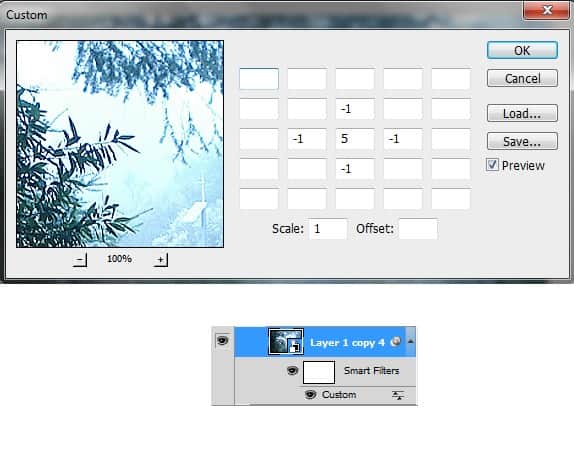
Now give this layer filter: Custom. To achieve this, go to Filter > Others > Custom. Take a look at the screenshot below to figure out the setting of the custom filter:
step2d

Here is the result should be:

step2e

We just need the stem of the tree as the foreground of the scene. We will hide the rest of image so that only the stem is visible. To achieve this, we will mask the background of the image. Go to Layer > Layer Mask. There will be a white layer mask thumbnail next to the layer. Now make selection around the background. Use Lasso Tool to achieve this. With the layer mask thumbnail is activated, hit Shift+F5 to fill it. Fill the mask with black. This will mask hide the background.
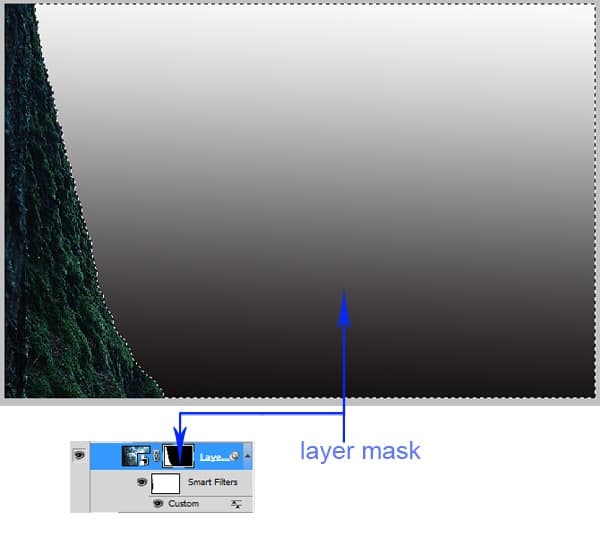
step2f

Step 3 (The other foregrounds)

Duplicate (Ctrl+J) the tree image layer used as the previous foreground. Group this layer and name the group foreground 2. With this duplication layer, we will add another foreground on the other side. Do almost the same steps as the ones taken in creating the previous foreground. One thing to remember is try to alter the shape, position and size of the the second foreground so it does not look uniform:

step3a

Create another group for another foreground. Name the new group more foreground. Place the group under the previous foregrounds. We still do almost the stem steps as the previous ones.

step3b

Again, create another group for the last foreground. Name this group another foreground.

step3c

Step 4 (Adding background image)

Open the background stock image to the document. Convert this image into a smart object. Place it under the foreground groups in the layer panel. With the Free Transform Tool, scale the image up. Arrange its position where needed. Please take a look at the screenshot below for your inspiration:

step4a

Give this smart object a smart filter: Custom. Apply the same setting of the previous step 2 for the custom filter. Here is the result will look like:

step4b

Next, give this layer another smart filter: Surface Blur. To achieve this, go to Filter > Blur > Surface Blur.

step4c

Give this background layer a mask and mask some areas on the red marked ones. Try to use a very soft round brush at 10-20% opacity. The screenshot below will guide you the areas to be masked:

step4d

This is the result should be:

step4e

Click on the filter effect mask thumbnail and mask the red marked areas. Use a very soft round brush to mask the areas.

step4f

Step 5 (Adding twigs to the background)

Open another tree stock image. Crop part of the tree. Use Lasso tool to select the part and crop it into a single layer.

step5a

Add the cropped part to the main document. Place it above the background layer in the layer panel. Mask some unneeded parts.

step5b

Step 6 (Creating ground)

In this step we are going to create ground. Open the fairy house stock image on the document. Convert it to a smart object. Scale and locate it where needed. Place this fairy house layer between the first two foreground groups and the second two groups.

step6a

Duplicate the fairy house layer (Ctrl+J). Give this duplication layer of the smart object some filters by going to Filter > Filter Gallery

step6b
step6c

The result should look like this:

step6d

Give another smart filter:

step6e

Set the duplication layer’s blending to normal at 55% opacity:

step6f

Duplicate the second fairy house layer and set it to soft light layer at 30% opacity. Select all the fairy house layers and hit Ctrl+G to group them. Name this group ground

step6g

Step 7 (Adjustment layer)

Now go to Layer > New Adjustment Layer > Hue/Saturation to give an adjustment layer above all the fairy house layers within the ground group layer.

step7a

Mask on the red marked parts of the hue/saturation layer and set its blending to normal at 80% opacity:

step7b

Step 8 (masking part of the ground)

We need to hide the upper part of the fairy house images in the ground group. We just need the ground of it. To achieve this, we will mask the ground group. As we can see the red marked part is the area to be masked (hidden). Use a very soft round brush to mask the area.

step8a

Here is the result should look like.

Type your instructions here.

step8b

Step 9 (Preparing a stone house)

Open again the fairy house stock image. Crop the stone house of the image from its background. Place the house between the foregrounds on the ground having been created earlier. Convert the house layer to a smart object. Take a look at the screenshot below for your inspiration:

step9a

Step 10 (Smart filter on the house)

We also will give this house some smart filters as we have given ones to the other objects in this scene. Here are the smart filter should be given:

step10a

again, the same amount of Custom:

step10b

Give this smart object surface blur as well

step10c

This is the result will look like:

step10d

We need to hide the effect of the smart filters on the stone house building by masking them. Click the smart filter mask thumbnail and mask the red marked part of the house area:

step10e

Finally, give the stone house layer a layer mask and mask the edges of the image to make it blended well with the surrounding:

step10f

Step 11 (Creating the top part of the house building)

In this step we will add more shape on the top of the stone building. To achieve this, cut out the top of the guiding. Then, alter the shape of the cut out by warping it. .

step11a

Add the shape to the top of the building:

step11b

Mask the edges of the shape to make it blended well with the main building. After finding a good result, group the layers. Name the group main stone house.

step11c

Step 12 (Adding a door)

In this step, we will add a front door to the stone building we have created. Open the witch house stock image to the document. Place it where needed and also scale its size. Make sure to locate this image layer above the stone house layer within the main stone house group in the layer panel.

step12a

Mask unneeded parts of the house to hide them and only the door part of the house is revealed.

step12b

The door is a little bit dark. We need to lighten it a bit more. Here is what to do: create a new layer (Shift+Ctrl+N) above the door layer within the group. Make sure to create a clipping mask to this layer. Fill this new layer with 50% grey and set its blending to overlay at 100% opacity. With a very soft round brush, stroke white color to the areas to be lightened. Here is the normal blending of this layer will look like:

step12c

And here is the result after the layer is set to overlay at 100% opacity:

step12d

Step 13 (Giving highlight to the stone house)

Now processed to give some highlight to the edges of the stone house. Create another new layer above the main building layer within the stone house group. Give this layer a clipping mask. Make sure to choose white color for the foreground. Hit B on the keyboard to activate brush tool. With a very soft round brush set to 10-20% opacity, stroke the edges of the building to give it highlight. Here is the result should be:

step13a

We are almost done with the stone house. Finally, to make the house blended better, reduce the opacity of the house group layer to just 75-80% opacity:

step13b

Step 14 (Adding path)

Now we will add a path to the scene. Open the garden stock image on the document. scale the size and locate it in front of the stone house.

step14a

Mask the rest of the image so that only the path is revealed:

step14b

Step 15 (adding highlight to the foregrounds)

By consideration that the light comes intensely from the back centered source, it will be casted on some areas in the foregrounds. To define this phenomenon, we will add some highlight on the areas where the light should be casted. Go back to the foreground 1 group. Then, create a new layer above the foreground layer within the group. Remember to create a clipping mask for this layer and name it highlight. Choose a very soft round brush set to 10-20% opacity. now, with the highlight layer selected, paint soft white color on the edges of the foreground which is marked in blue as shown in the screenshot:

step15a

Proceed to create some highlight on the other foregrounds:

step15b

Step 16 (preparing a tree house)

We will add a tree house to the main document. Here are the step we should do to prepare the house. Firstly, open again the fairy house stock image. Cut out the stem part featured in the image. Use Lasso Tool for this purpose.

step16a

Also, open the garden stock image and cut out one of the shape (marked in blue) featured in the image:

step16b

Open another stock image. Cut out the door of the image. Try to create the shape of the door as the one shown in the screenshot:

step16c

Step 17 (creating a tree house in the scene)

After preparing the objects of the tree house, in this step, we will combine the objects to be manipulate into a single tree house. Start by adding the stem to the main document. Scale the size and place it where needed.

step17a

Then, add the shape to the document. Place it on the top of the stem. As usual, scale the size accordingly. Mask some unneeded part of the stem.

step17b

Then, add the door to the tree house. Give this door layer a layer style by going to Layer > Layer Styles > Bevel and Emboss:

step17c

Finally, to make the tree house more decorative, add some vines to it. Select all the tree house layers and hit Ctrl+G to group them. Here is the result should be:

step17d

Step 18 (adding highlight on the tree house)

To define the casted light, we will also add some highlight on the tree house. Please refer back to the previous step 15 on how to do this purpose.

step18

Step 19 (adding distant tree and stone houses)

In this step, we will add more tree houses to fill the distant space of scene composition. To do this, just duplicate the main tree house group layer three times. Scale the size of the duplications accordingly and place them in the space area behind the main stone house image. Vary the opacity of each duplication between 9-35% depending on the distance and depth they should convey. For example, the smallest tree house is set to 9% opacity at normal blending, the middle one is 15% and 38% for the biggest one. Mask each group a bit where needed:

step19a

Do similar way to add more distant stone houses:

step19b

Step 20 (adding farthest background)

There is still much empty space behind the main stone house. In this step, we will ‘enrich’ the composition of the scene by adding more background objects to fill the empty space. To achieve this purpose, we will use the same image used as the foreground in the previous steps. Duplicate (Ctrl+J) the layer containing the image used as the foreground. We can choose any layer from one of the four foreground groups previously made. After choosing and duplicating the layer, scale the size and place the duplication layer above the gradient background layer in the layer panel. Hide some parts of the layer by masking it and set its blending to normal at 65% opacity.

step20a

Add another background on the other side. For the second background object, set its blending to normal at 30% opacity:

step20b

Step 21 (adding more objects)

We have almost finished the composition. In this step, we will add more nuance of fairy atmosphere by adding flowers to the scene. As we can see in the screenshot, we can figure out where I added the flowers. However, optionally we can add the flowers somewhere which is not exactly the same place where I put them.

step21a

Now add fairies and butterflies. Give some highlight on the fairies the same way as we have add ones to the other objects. For the butterflies, vary their blending opacity to 45-60%.

step21b

Step 22 (adding light)

Create a new layer on which we will paint some soft white light under the faries feet. Activate the Brush Tool again. Choose a very soft round brush. Set its opacity to 10-20%. Paint some white light under the faries feet.

step22a

Create another new layer. Fill this new layer with black. Set its blending to color dodge at 100% opacity. On this layer, paint white spots on the foreground areas. Use a very soft round brush with size varied to 1-5. Set the opacity of the brush at 60-100%. Still on this layer, paint some light on the door of the main stone house. To paint the light on the door, set opacity of the brush to 5-10 and stoke the brush repeatedly on the door and stair. Well, this is the layer should look like in the normal blending at 100% opacity:

step22b

And this is the result after set to color dodge blending at 100% opacity:

step22c

Step 23 (adding more objects)

I decided to add more doors on the foreground trees to emphasize the feel of a fairy world. Well, this is what we should do: firstly, duplicate the door layer previously made in the tree house group. Make the duplication as many as needed. Place each duplication where needed on the tree foregrounds. Finally, give them some highlight.

step23a

Then, here is the result after being added a bird to the scene:

step23b

Step 24 (a peeking girl)

To complete the composition of the scene, we will add the final object: a peeking girl. Open the girl stock image. Cut out the model from its background and then add to the main document.

step24a

Create a new layer above the girl layer and give this new layer a clipping mask. On this new layer, paint soft black color on the lower dress and arm of the girl to define shade. Name this layer shade:

step24b

Step 25 (color adjustments)

In this step, we will give some color adjustments to set the mood of the scene. Firstly, go to Layer > New Adjustment Layer > Chanel Mixer. Follow the setting for this adjustment layer as shown in the screenshot. Then mask some part of this layer (marked in red) to hide its effect. Always use a very soft round brush to mask the parts. Finally, set its opacity to 86%.

step25a

Give another layer adjustment: photo filter.

step25b

More adjustment layer: curves

step25c

Duplicate the curves layer and mask some part of this layer:

step25d

Again, more adjustment layer: vibrance.

step25e

Last layer adjustment: color balance.

step25f

Well, here is the result should be after giving the adjustments:

step25g

Step 26 (final touch)

What we should do next is to stamp all the visible layers. Make sure the top most layer/group is selected, then hit Ctrl+Shift+Alt+E to stamp the visible layers into a single layer. Convert this stamp layer to a smart object. Next go to Filter > Others > High Pass. .

step26a

Next, place the cursor on the High Pass filter and then right click to show command option box

step26b

When the command option box shows up, choose Edit Smart Filter Blending Options. Then, set Screen for the blending mode at 17% opacity:

step26c

The result should look like this:

step26d

Finally, we will hide the effect of the high pass filter on some areas. To do this purpose, click the smart filter mask thumbnail, then mask the red marked areas on the scene:

step26e

That’s it....we have finished the work. Here is the result:

step26f

But..I decided to crop the result a bit. So here is the final result:

step26g

Final Results


Download the PSD

[vc_column width="1/1" el_position="first last"] [vc_cta_button title="Download" href="https://downloads.photoshoptutorials.ws/Welcome to the Jungle.zip" color="btn" size="btn-large" icon="none" target="_self" position="cta_align_right" call_text="Welcome to the Jungle.zip | 96 MB" width="1/1" el_position="first last"] [/vc_column]


Tutorial by Dek Wid

Thank you for following this tutorial! Hope that you will have fun following this tutorial and learn something useful from it. Please visit here to see more of my works. Happy photoshopping. - Dek Wid

- Dek Wid

Create Dot Grid Art in 1 Click
Sponsored

Turn any photo into a dot grid artwork with these Photoshop actions. You'll get great results with dots that change size. They get larger in brighter areas and smaller in darker areas. Free download available.

24 comments on “How to Create a Night Jungle Scenery in Photoshop”

  1. Thanks for this tutorial! I finished it and my image looks just like yours! It was a lot of fun! Thank you!

  2. Thank you for this tutoriel but certain material(equipment) not more available sound

    Ariata – DeviantART
    Flowers

  3. amazing photo! but when I opened the tree picture in the beginning in PS it was shorter than the background. Not that perfect as your screenshot. should I change the picture size or do you have any tip?

  4. "Links don't work" "writing on background", just use another picture. There's billions out there.

  5. damn haha, took forever!! Amazing tutorial, I wouldn't normally do something like this, but I need to step out of my comfort zone and learn something I may never use.

    Thanks.

    Amazing feeling to finish something like this lol

  6. Links #5, #6 (Ariata – DeviantART, Flowers – DeviantART) as well as the last one do not work :(

    1. hey how are you . my name is Arsi actually nothing is Hard you do try .. is simple and easy possible . don't say hard and go back .. do try and come to front side . Thanks

Leave a Reply

Your email address will not be published. Required fields are marked *

cross