
Is your lens lacking contrast? Find out how to simulate the contrast qualities of high quality lens with this Photoshop retouching tutorial. This effect increases visible detail and edge contrast without increasing the overall image contrast.
Local Contrast Photoshop Tutorial
Step 1: Open an image
Open a photo into Photoshop. To open a file, choose File > Open, browse for the image file, and click OK.

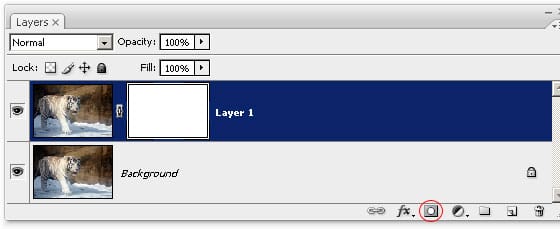
Step 2: Duplicate the layer and add a layer mask
Press Ctrl+J or choose Layer > Duplicate. This will create a second copy of the background layer. On the new layer, click on the add layer mask button in the Layers palette to add a layer mask.
Step 3: Use the Unsharp Mask filter
When we added the layer mask, it automatically selected the layer mask. Select back the layer by clicking on the thumbnail of the layer. Now choose Filter > Sharpen > Unsharp Mask.
In the Unsharp Mask tool, set the Amount to 100% and increase the radius until the details become more apparent. Don’t worry about it looking too sharpened – we’ll work on that later. Adjust the amount so that the image contrast looks strong, but not posterized. Click OK when done.

Step 4: Paint the layer mask
Most likely, you don’t want this effect to appear on the entire image, but rather just certain areas. In this step, we’ll paint the layer mask to specify where and how strong the local contrast effect will be applied.
There are two ways to do it:
- Remove the effect from certain areas
Use the Eraser tool to erase certain areas of the layer mask.
- Add the effect to certain areas
Select the layer mask and press Ctrl+I to invert. This will make the layer mask black. Use the Brush tool to paint the areas that you want to apply the local contrast effect to.
For this tutorial, we’ll use the Eraser tool. Select the Eraser tool and set the hardness to 0% and opacity to 50%. If you’re the Brush tool instead, use the same hardness and opacity.

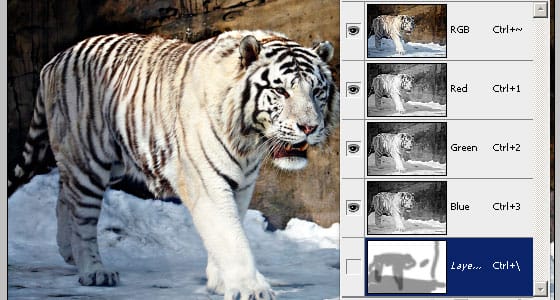
Make sure that you have the layer mask selected. Click on the layer mask thumbnail in the Layers palette to activate it. With the layer mask selected, erase the areas that appears to be too strong. If you’re using a brush, paint the areas where you want to increase the contrast. In the image below, I erased the ground. tiger, and parts of the background slightly. My layer mask may look like I did a sloppy job, but that is fine because it is hardly noticeable in the final results.
Now set the opacity to 100% and erase (or paint if you’re using the Brush tool) the areas that you want to fully remove the effect from. For example, the snow on the ground looks dirty with the effect, so I masked out the effect from the snow.
2 responses to “Local Contrast”
-

It works well.
-
I would say amazing it is
Leave a Reply to asiya majeedCancel reply