Download Lightroom presets and LUTs, absolutely free. Use the presets to add creativity and style to your photos.
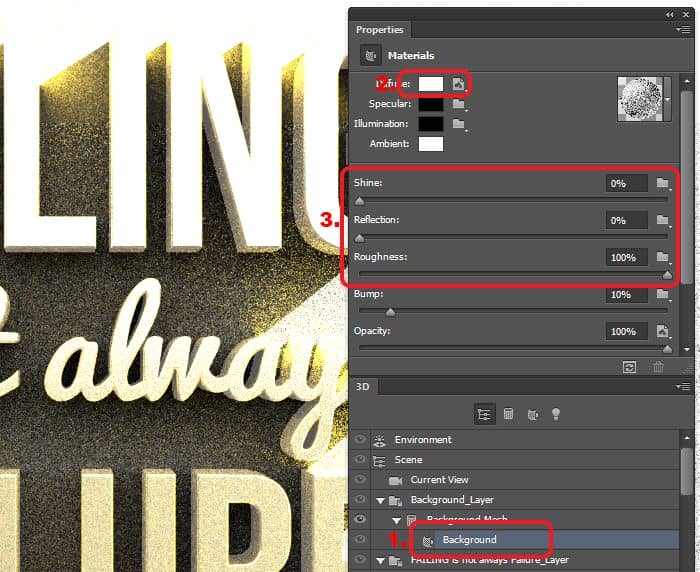
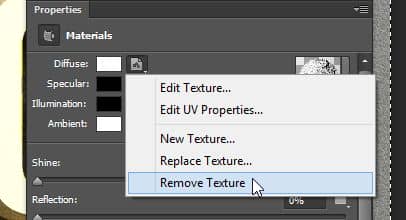
If you look in the diffuse setting, it has a texture that was automatically created in the beginning when we converted the background layer into a 3D object. We don’t need this texture so click on the button and choose Remove Texture.
In the bump settings, click on the folder button and choose New Texture. Set the width to 1920 pixels and height to 1200 pixels.

Click on the button again and choose Edit Texture. Photoshop will open the texture and we’ll be adding a noise pattern to this to give the wall a slight bump texture. Go to Filter > Noise > Add Noise. Leave the default settings then click OK. Press Shift+Ctrl+L (Shift+Cmd+L on Macs) to apply auto levels to your noise. Save and close the document.

Your background now has a bumpy texture but it’s a little too strong. Reduce the bump setting to 5% then render the scene to see how it looks.

Step 16
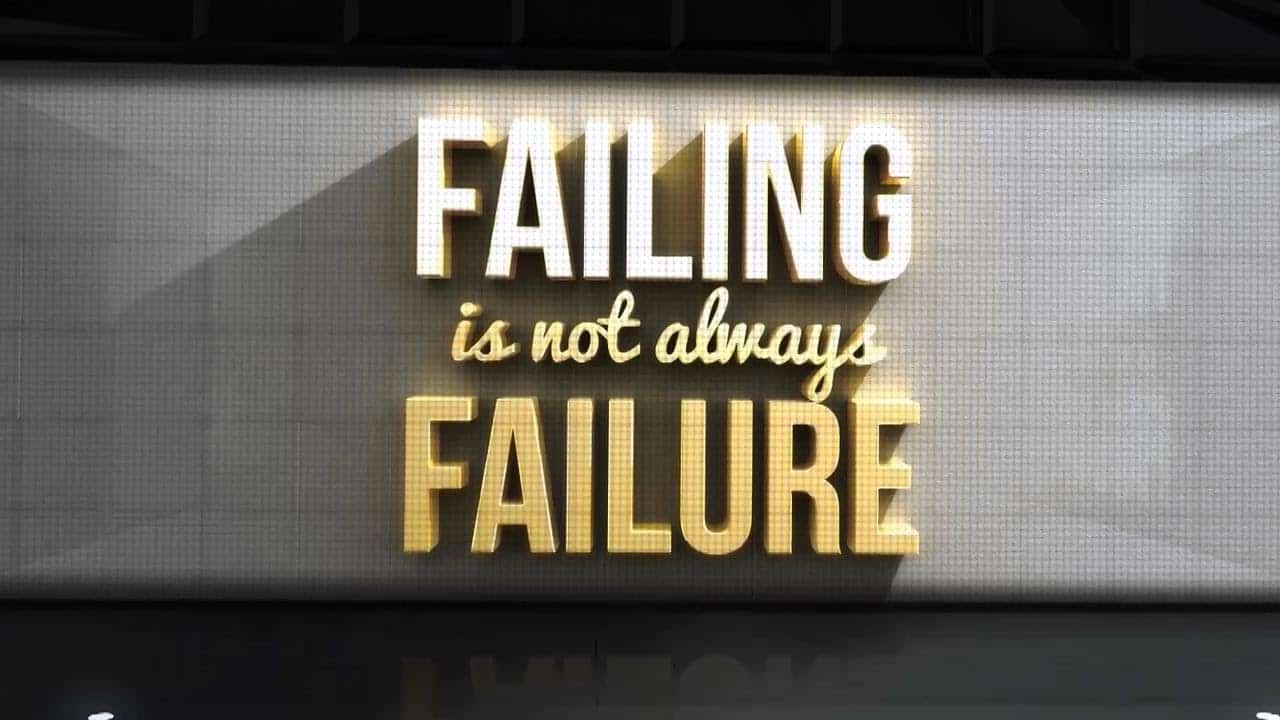
We’re done! Feel free to go back into any material or light layers to tune the settings. I went back into the Point Light layer to set the intensity to 100% then into the Environment layer to set the shadow softness to 100%. The shadow softness setting reduces harsh shadows.

Step 17
One thing about 3D artwork is that the colors can sometimes look too perfect. You can reduce this by adding some a film color effect. My favorite way of doing this is with the Curves tool. Add a new Curves adjustment layer (Layer > New Adjustment Layer > Curves). Switch the channel to blue and drag the points towards the vertical center – this will add some blues to the shadows and gold to the highlights. Switch to the red channel and create a very slight S curve. Switch back to the RGB channel and create an S shape to increase the contrast. You can adjust the opacity of this curves layer to reduce the effect.
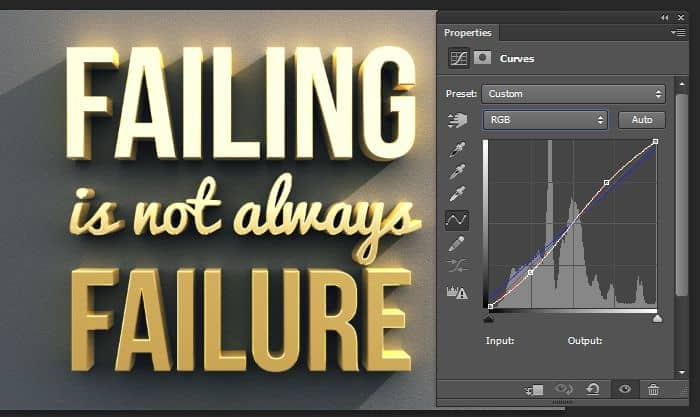
Here’s what the image looks like with and without the film effect.


Final Results

Download the PSD
[vc_cta_button title="Free Download" href="https://downloads.photoshoptutorials.ws/3D Typography Poster.zip" color="btn" size="btn-large" icon="none" target="_self" position="cta_align_right" call_text="3D Typography Poster (11.3 MB)" width="1/1" el_position="first last"]


30 comments on “Create Inspirational 3D Gold Text with Photoshop Extended”
this tutorial sucks. difficult to follow. not enough direction on where to find the options.
I tried it but the results on mine looked alot more basic/cheaper - on the tutorial photos the effects look higher quality, more like after effects
Good Jb
can you make an action of this ?
nys 1
No such thing as New 3D extrusion from layer. useless tutorial
Excellent post. Thanks for sharing……….
Thanks for sharing such informative post its help me to know deeply Photoshop work step by step.
I can't get the 3d to be an option in step 2. What am I doing wrong?
Thanks for tutorial.But I have not Illustrator.
8/10
Faaaaaccccckkkk my head hurts
Working on the background, I was wondering if there is the possibility to make it transparent: I mean, a soft (really soft) black just around the borders of the main writing, black that then fades to transparent.
If you are able to indicate me a few steps to achieve this effect I will appreciate your help.
Is it possible to follow this tutorial with Photoshop cs5.5?
For example, I see that in PsCS5.5 I have not the voice "New 3D Extrusion from selected layer" with right click on the shape layer.
I'm pretty sure you can do it with Photoshop CS5.5 Extended but the interface will look different. You need "CS5.5 Extended" (not the CS5.5) for 3D work.
Firstly, this is just beautiful! Love it! I'd like to try creating this.....in CS4 Extended. Is this an adventure worth trying or are the 3D Tools/Techniques in CS6 far too advanced for my endeavor?
bonjour...give it a shout..at a go
Fabulous! Photoshop, with the right tutorial, never fails to amaze me. Thank you.
Awesome tutorial! Thank you for offering it. Can you tell me how I can make the background behind my text translucent/transparent, please?
Excellent tutorial! One of the best I've read for a long time
Forgot something. Tutorial was damn helpful managed to create my own dictum.This is my final result...;added some more lightning effects........
http://stthomaschss.com/ashith/3d.jpg
Thanks a lot..
Where did you get the overlay texture with the circle lights?
@Joachim:
It's a simple technique ; The shape dynamics.
1. Create a new layer.
2. Goto window->Brush, choose a circular brush with 100% radius
3. Use spacing and set to 1000%.
4. Opt for shape dynamics and use size jitter 40% and roundness jitter to 25%(yup you can experiment your own values)
5. Now draw above the layer we created at step one to get uneven circles.
6. Give it a bit of Gaussian Blur (filter->blur->Gaussian blur....yes u know).
7.Use overlay
repeat steps 1 through 7 with different brush sizes and colors if you prefer...
voila, you are there......
Sorry at step two read as 100% hardness not radius..my bad.
the option U specified in Step 2 . ."choose New 3D extrusion from layer."
this option is not highlighted . . what to do?? tell me some solution
Precise dense video tutorial...Not a second is useless....highly informative and descriptive with clear explanation.....awesome is the word.......
I love your videos. Best voice ever!
best tutorial but where is font?
Sorry about that! Updated the tutorial with the links:
http://www.fontsquirrel.com/fonts/bebas-neue
http://www.fontsquirrel.com/fonts/pacifico
Please el link de descarga PSD..
Great end results!