Turn any photo into a dot grid artwork with these Photoshop actions. You'll get great results with dots that change size. They get larger in brighter areas and smaller in darker areas. Free download available.

We’re going to position this light on the top-right corner of the text and have it cast a shadow diagonally. Moving a light to the perfect spot takes a bit of experience with 3D but there’s an easier way to do this. Select the Move tool and set the 3D mode to Rotate in the options bar.

In the view box located on the bottom left of your screen, drag to reposition your view so that you are looking at your 3D text from the top-right corner. Think of it like playing a first person shooter game – you want to reposition yourself so that you can shine your flashlight from the upper-right side of the text. Once you’re in the right angle, switch your 3D mode to Slide and position yourself so that you’re further away from the 3D text. When you’re in the right position, click on the Move to View button in the Properties panel to move your point light to your current view. To make your shadow more noticeable, increase your intensity. We’ll readjust this setting later. Switch back to the Default Camera view then render the scene to preview your lighting. Play around with the camera view and light intensity to get the results that you like.

Step 9
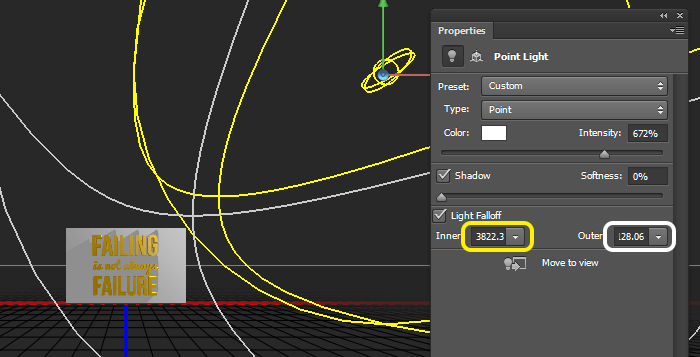
We have our shadow but it looks too solid. To improve it, we’re going to make the shadow fade by adjusting the light falloff of your point light. Make sure that you have your Point Light selected then in the Properties panel, enable the Light Falloff option. Zoom out of your document so that you can see the point light then adjust the outer light falloff setting so that the outline reaches the bottom-right of your document. Next, adjust your inner light falloff setting so that the outline reaches the top-right corner of your document. Render the scene to get a preview of the effect.

Here’s the before and after results of the light falloff setting.


Step 10
Now we’re going to go back to the 3D text, give it a bevel, and adjust the material setting. First, select the 3D text layer. In the Properties panel, click on the Cap settings then set the width to 10%. This will give your text a slight bevel on the edge.


30 comments on “Create Inspirational 3D Gold Text with Photoshop Extended”
this tutorial sucks. difficult to follow. not enough direction on where to find the options.
I tried it but the results on mine looked alot more basic/cheaper - on the tutorial photos the effects look higher quality, more like after effects
Good Jb
can you make an action of this ?
nys 1
No such thing as New 3D extrusion from layer. useless tutorial
Excellent post. Thanks for sharing……….
Thanks for sharing such informative post its help me to know deeply Photoshop work step by step.
I can't get the 3d to be an option in step 2. What am I doing wrong?
Thanks for tutorial.But I have not Illustrator.
8/10
Faaaaaccccckkkk my head hurts
Working on the background, I was wondering if there is the possibility to make it transparent: I mean, a soft (really soft) black just around the borders of the main writing, black that then fades to transparent.
If you are able to indicate me a few steps to achieve this effect I will appreciate your help.
Is it possible to follow this tutorial with Photoshop cs5.5?
For example, I see that in PsCS5.5 I have not the voice "New 3D Extrusion from selected layer" with right click on the shape layer.
I'm pretty sure you can do it with Photoshop CS5.5 Extended but the interface will look different. You need "CS5.5 Extended" (not the CS5.5) for 3D work.
Firstly, this is just beautiful! Love it! I'd like to try creating this.....in CS4 Extended. Is this an adventure worth trying or are the 3D Tools/Techniques in CS6 far too advanced for my endeavor?
bonjour...give it a shout..at a go
Fabulous! Photoshop, with the right tutorial, never fails to amaze me. Thank you.
Awesome tutorial! Thank you for offering it. Can you tell me how I can make the background behind my text translucent/transparent, please?
Excellent tutorial! One of the best I've read for a long time
Forgot something. Tutorial was damn helpful managed to create my own dictum.This is my final result...;added some more lightning effects........
http://stthomaschss.com/ashith/3d.jpg
Thanks a lot..
Where did you get the overlay texture with the circle lights?
@Joachim:
It's a simple technique ; The shape dynamics.
1. Create a new layer.
2. Goto window->Brush, choose a circular brush with 100% radius
3. Use spacing and set to 1000%.
4. Opt for shape dynamics and use size jitter 40% and roundness jitter to 25%(yup you can experiment your own values)
5. Now draw above the layer we created at step one to get uneven circles.
6. Give it a bit of Gaussian Blur (filter->blur->Gaussian blur....yes u know).
7.Use overlay
repeat steps 1 through 7 with different brush sizes and colors if you prefer...
voila, you are there......
Sorry at step two read as 100% hardness not radius..my bad.
the option U specified in Step 2 . ."choose New 3D extrusion from layer."
this option is not highlighted . . what to do?? tell me some solution
Precise dense video tutorial...Not a second is useless....highly informative and descriptive with clear explanation.....awesome is the word.......
I love your videos. Best voice ever!
best tutorial but where is font?
Sorry about that! Updated the tutorial with the links:
http://www.fontsquirrel.com/fonts/bebas-neue
http://www.fontsquirrel.com/fonts/pacifico
Please el link de descarga PSD..
Great end results!