Make skin look perfect in one-click with these AI-powered Photoshop actions.
Many people are afraid to use the 3D features in Photoshop but it can be incredibly simple once you get the hang of it. In this Photoshop tutorial, you will learn step-by-step how to convert your text into 3D type, create a crystal cube, and arrange your objects in 3D space. This tutorial will improve your familiarity with Photoshop’s 3D tools and give you a basic understanding of how you can add 3D objects to your artworks. To follow this tutorial, you’ll need Photoshop CS6 Extended.
Preview of Final Results

Step 1
To start, create a new 2400x1600 pixels document. Use the Text tool to add the text that you like. You should stick to a thick font for 3D text because thin fonts don’t show up well. The font I’m using is a free font called Couture. After typing, go into the Characters panel (Window > Characters) and reduce the leading. You can click on the Leading icon and drag left/right to increase/decrease the leading instead of typing in a number.
For the nightshift designers

Step 2
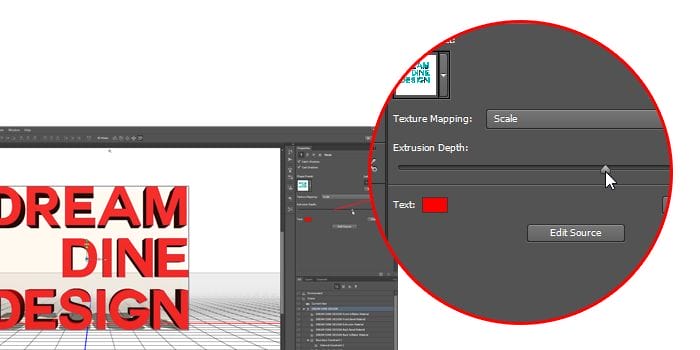
Next, we’re going to convert the text to 3D. With the Text tool selected, click on the 3D button in the options bar. Remember, you need Photoshop CS6 Extended to see this button. Your text will turn 3D instantly and Photoshop will be switched to the 3D workspace. With the Move tool selected, click on the text to select it. You can also select it from the 3D panel. With the text 3D layer selected, reduce the “Extrusion Depth” setting in the Properties panel. This makes your text thinner and you’ll see it change as you make the adjustment.


Step 4
We’re going to leave the text for now and create the crystal. It’s really easy to make and we’ll show you how. Create a new layer and name it “Crystal”. In your 3D panel, select “Mesh From Preset” then click Create. Photoshop will create a 3D cube for you on this layer. Next, we need to merge the cube with the text layer so that we can use the same camera and lighting setup. To do this, press Ctrl/Cmd+E or go to Layer > Merge Down.


Step 5
We’re going to reduce the opacity of the cube to give it some transparency. This will help in the next step when we fit the text inside the cube. In the 3D panel, click on the Cube_Material. Your Properties panel will change to show the cube material settings. Set the opacity to 5%.


Step 6
Now we’re going to resize and reposition the text so that it fits inside the cube. To make it easier, we’re going to switch the view so that we’re looking from the top down. In your 3D Secondary View window (View > Show > 3D Secondary View), click on the panel menu and select Top. Then click on the “Swap Main and Secondary-View” button located at top-right of your panel. This will swap your secondary view with your main view.

Step 7
Select the 3D text layer in your 3D panel. Switch the 3D Mode to Scale in your options bar then click on an area outside of the text and drag to scale it down so that it fits inside the cube. Switch your 3D Mode to Drag (the 3rd button), then click on an area outside of the text and drag to reposition the text so that it’s in the middle of the box.


Step 8
In your Secondary View panel, change the view to Left. Click on the “Swap Main and Secondary-View” button located at top-right of your panel. With the Drag tool selected, click on an empty area then drag to reposition the text so that it’s in the middle of your crystal. When you’re done, click on the “Swap Main and Secondary-View” button again to bring you back to the default camera view.

Step 9
Next, we’re going to add the image of the sky. I got my sky picture from ShutterStock but you can easily find free cloud pictures on other websites. Drag and drop the file into your document. Photoshop will place your photo as a new Smart Object. Rename this layer to “Blue Sky”. In the 3D panel, select 3D Postcard then click create. This will turn your layer into a 3D object. Press Ctrl/Cmd+E or go to Layer > Merge Down to merge this 3D postcard layer with your other 3D layer.


Step 10
Currently, your blue sky picture is cutting through the middle of your text and cube and we need to move this object way towards the distance. To do this, change the view to Left in your Secondary View panel then click the swap views button located at top-right of your panel. Select the Blue Sky 3D object in your 3D panel then set the 3D Mode in the options bar to Slide. Click on an empty area then, while holding the shift key, drag left to move the blue sky all the way towards the left. Click the swap view button to switch back to your default view.

Step 11
Now the sky image is too small but that’s because it’s all the way in the background. To enlarge it back, set your 3D mode to scale then click on an empty area and drag to enlarge it back.

It’s bigger now, but it’s cutting through the 3D ground plane. Switch your 3D mode to drag then click anywhere outside of your document and drag the sky photo up until it is above the ground plane.

Now we need to reposition our camera view so that it is looking straight in front of the blue sky background. On the bottom left of your interface, you’ll notice a translucent black box with 3 arrows inside of it. This is the camera move tool and can be used to reposition your camera view. We just need to move our camera view up, so while holding down the shift key, click on the green arrow and drag down to move your camera up until your background fills your entire screen.

Step 12
Now we need to move the text and cube up so that it’s back in our cameras view. To do this, select the text and crystal layer from the 3D panel (hold Ctrl/Cmd to select multiple 3D objects). Switch your 3D mode to Drag then click on an empty area and drag upwards while holding down the shfit key until the 3D objects are in the center of your image.

Step 13
We finally have everything in place and we can start playing around with the 3D crystal. First, we’re going to rotate the crystal and text slightly. With the text and crystal 3D objects selected, click and drag on the Y rotation angle to rotate the 3D objects. I moved mine to the left until it was around 24º.

Step 14
Select Cube_Material from your 3D panel then in go into your Properties panel. To make the cube look like a crystal, we want it to be transparent, reflective/glossy, and refract the image inside. To make it glossy, set your shine and reflection settings to 100% and roughness to 0%. The bump setting doesn’t matter because we’re not using a bump map and we already have the opacity set to 5% from an earlier step. The key to making it look like a crystal is to increase the refraction all the way to its maximum setting. This will refract the text inside the cube which will give it a crystal look. You won’t see the refraction unless you render it. You can render the scene by pressing Alt+Shift+Ctrl+R (Option+Shift+Cmd+R on Macs) or by going to 3D > Render. You don’t have to wait for the entire rendering to complete – it’ll take too long. When the image looks good enough, click or press a button to stop the render. If you’re on a slow computer, you can resize the image down and scale it back up at a later time. This is possible because everything we’ve done is nondestructive which means you can scale the image back without any loss in quality.

A high refraction setting combined with near-zero opacity turns the shape into a crystal
Step 15
Finally, we’re going to work on the light. Select Infinite Light 1 from the 3D panel. In the Properties panel, set the intensity to 100%, and enable Shadows with a softness of 50%. The softness setting blurs the shadows so that they don’t look so sharp. Click the “Move to view” button to move the light so that it’s positioned where your camera is (right in front of the crystal). Now that we’re done with the 3D objects, press Alt+Shift+Ctrl+R (Option+Shift+Cmd+R on Macs and let it render the scene until it’s complete. This may take awhile to render so take a break and come back in a couple minutes. If you stopped the rendering by accident, you can resume it by go to 3D > Resume Render. When it’s done rendering, you can switch your workspace back to the default Essentials (Window > Workspace > Essentials).


Step 16
To finish up the image, we’re going to add some clouds so that they appear in front of the crystal and apply some color effects. First, import the same clouds picture by dragging and dropping the file into your Photoshop document. Scale it so that it fits your image then press Enter to apply the transformation.

Step 17
In the Layers panel, hold the Alt or Option key and press the Add Layer Mask button to create an inverse layer mask.

Make sure your foreground color is white; you can do this quickly by pressing D on your keyboard. Then select the brush tool and paint with a soft round brush over the clouds that you want to appear in front of the crystal. You don’t need to be too precise with this – just a rough paint to reveal the clouds will do.

Step 18
Right-click on the current layer and choose Blending Options. In the Blend If options, drag the black input slider towards the right until the blue sky disappears. To make the clouds blend in smoother, hold the Alt/Option key then drag the right-half of the input slider towards the right until the clouds blend seamlessly with your crystal.

{YOUTUBEBLENDIF}

Step 19
To complete the image, we’re going to boost the contrast of the image. We can do this easily with the Color Lookup adjustment layers that’s new in Photoshop CS6. In your Adjustments panel (Window > Adjustments), click on the Color Lookup adjustment. Select Film Stock from the 3DLUT menu then adjust the layers opacity if needed.

Final Results
Because everything we did is nondestructive, you can make changes to the image any way you like. For example, I found that the crystals refraction makes the text look like “I Dream, Dine, I Design”. To fix this, I rotated the crystal horizontally by ~45 degrees. I also moved the foreground clouds to the right a bit so that it doesn’t cover the text.

7 comments on “How to Create a Crystal Cube with 3D Text in Photoshop Extended”
I like the idea of this tutorial, it’s very creative and the result looks great.
Impressive! Really impressed at this tutorial.. quality is great
nice tutorial
In the video, you keep clicking and dragging to change the text leading. If you highlight the text first, you will see the changes in realtime. Other than that great video and keep these coming!
Nice and easy
unique n amazing tutorial . .. .
COOL VIDEO!! Who cares about the crystal... teach me how to make the intro!!