Make skin look perfect in one-click with these AI-powered Photoshop actions.


Step 28
Focus on the Layers panel, select the vector shapes that make up the screw, hit Control + T and rotate randomly.
Select the vector shapes that make up your " i " and hit Control + G to grup them.
Open the Layer Style window for this group and enter the settings mentioned below.


Step 29
Change the foreground color to #C9A67C, grab the Rounded Rectangle Tool an set the Radius to 2px from the top bar. Move to your canvas and create a 15 x 165px vector shape.
Pick the Add Anchor Point Tool, focus on this brown vector shape and add new anchor points as you can see in the second image.


Step 30
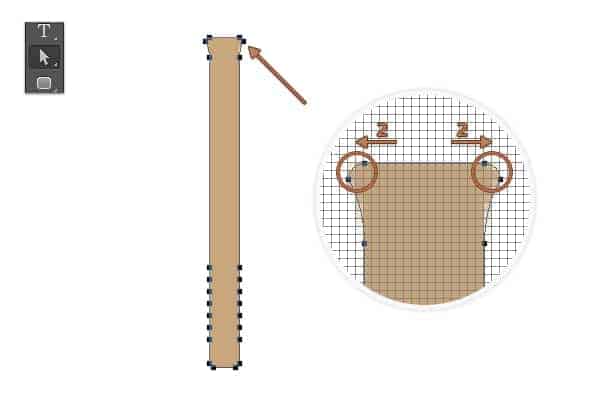
Pick the Direct Selection Tool, select the highlighted anchor points one by one and drag them as you can see in next images.


Step 31
Open the Layer Style window for the brown vector shape and enter the settings mentioned below.


Step 32
Set the foreground color to #E6E6E6, select the Rectangle Tool, create a 60 x 24px vector shape and place it as you can see in the first image.
Make sure that your rectangle vector shape is still selected, go to Edit > Transform > Warp, select Shell Upper, check the orientation button, set the Bend to 18 and then hit Enter.
Select the vector shapes that make up your axe, hit Control + T and rotate -45 degress.


Step 33
Open the Layer Style window for the vector shape made in the previous step and enter the settings mentioned below.


Step 34
Change the foreground color to #000000 and pick the Line Tool. Move to your canvas and create a tiny line as you can see in the first image.
Make sure that this black vector shape is selected, lower the Fill to 0% and then hit Control + [ once, to move this vector shape under the axe's blade.
Open the Layer Style window for this vector shape and enter the settings mentioned below.


Step 35
Focus on the Layers panel, make a new copy with the horizontal key and drag it out from that group.
Grab the Path Selection Tool, select the left end of the key and hit the delete button from your keyboard.
Change the foreground color to #00EB69, select the Ellipse Tool, create a 24px circle and place it as you can see below.
With the same tool, create a 12px vector shape and place it exactly over the 24px circle.
Focus on the Layers panel, select both circles, right click on one of these shapes and go to Merge Shapes. Pick the Path Selection Tool, click on the 12px circle, focus on the top bar and go to Subtract Front Shape.


One comment on “Create a Tools Text Effect in Photoshop”
nice nice