Luminar AI lets you turn your ideas into reality with powerful, intelligent AI. Download the photo editor and see how you can completely transform your photos in a few clicks.
In this tutorial I will show you how to create a tools text effect in Adobe Photoshop from scratch. You will learn how to use the basic tools and how to manipulate the anchor points to create a unique text effect. During the tutorial you will work a lot with vector shapes and anchor points but at the end of the tutorial you will feel more confident to work with these tools.
Let's begin !

Step 1
Create a 600x 450px document, go to View > Show > Grid to enable the Grid and then go to View > Snap To > Grid to enable the Snap to Grid. Hit Control + K to open the Preferences window, go to Guides, Grid & Slices and enter the settings mentioned in the next image. Along the tutorial I turned off the grid ( Control + ' ) for you to have a better vision. The grid will make it easier for you to create/edit the shapes.

Step 2
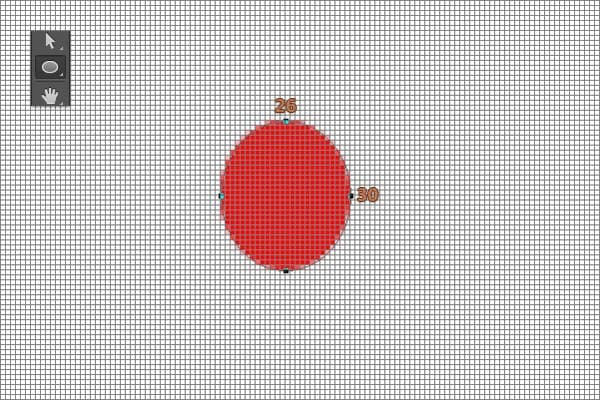
Concentrate on your Toolbar, set the foreground color to #FF0000 and pick the Ellipse Tool.
Move to your canvas and create a 26 x 30px vector shape.
Step 3
Select the Rectangle Tool, create a 14 x 15px vector shape and place it as you can see below.

Step 4
Pick the Add Anchor Point Tool, focus on the rectangle vector shape and add a new anchor point as you can see in the next image.

Step 5
Select the Convert Point Tool and click once on the anchor point added in the previous step to delete the handles.

Step 6
Grab the Direct Selection Tool, select the highlighted anchor point and hit the left arrow button from your keyboard four times which will move your selected anchor point 4px to the left.

Step 7
Focus on the Layers panel, select your existing vector shapes, right click on one of these shapes and click onMerge Shapes.
Pick the Path Selection Tool, click on your rectangle vector shape, focus on the top bar and go to Subtract Front Shape.

Step 8
Select the Rectangle Tool, create a 50 x 14px vector shape and place it as you can see below.

Step 9
Focuson the Layers panel, select the round vector shape and duplicate it using the Control + J keyboard shortcut. Make sure that this copy is selected, flip it horizontally using the Edit > Transform > Flip Horizontallycommand and then move to your canvas. Simply drag the shape made in this step to the left end of your rectangle exactly as shown in the following image.


Step 10
Select your all vector shapes, right click on one of it and go to Merge Shapes.
Click on the Layer Thumbnail Icon that stands for this vector shape and change the color to #F6F6F6.


Step 11
Open the Layer Style window for the vector shape that makes up your horinzontal key and enter the settings mentioned in the next images.


Step 12
Duplicate your horizontal key for 3 times using the Control + J keyboard shortcut and place the key copies as you can see in the first image.
To create a vertical key, simply select a key, hit Control + T and rotate it 90 degress.
If you want to change the key order, simply focus on your Layers panel, select your key and use the Control + [or Control + ] buttons from your keyboard shortcuts, as you can see in the second image.


Step 13
Open the Layer Style window for your vertical keys, go to Satin section and replace the existing settings with the ones shown below.


Step 14
Focus on the Layers panel, select all your keys and hit Control + G to group them.
Open the Layer Style window for this group and enter the settings mentioned in the next image.


Step 15
Change the foreground color to #00FFEA, select the Rounded Rectangle Tool, set the Radius to 6px from the top bar and create a 25 x 80px.
Pick the Add Anchor Point Tool, focus on the blue vector shape and add new anchor points as you can see in the second image.


Step 16
Pick the Direct Selection Tool, select the highlighted anchor points one by one and drag them as you can see below.


Step 17
Open the Layer Style window for the blue vector shape and enter the settings mentioned below.


Step 18
Focus on the Layers panel, make sure that the blue vector shape is still selected and then duplicate it.
Right click on this fresh copy, go to Clear Layer Style and then lower the Fill to 0%.
Open the Layer Style window for this copy and enter the settings mentioned in the next images.


Step 19
Set the foreground color to #4C4C4C and pick the Ellipse Tool. Move to your canvas, create two, 6 x 34pxvector shapes and place them as you can see in the first image.
Pick the Direct Selection Tool, select the highlighted anchor points and drag them 15px up using the up arrow button from your keyboard as you can see in the second image.


Step 20
Open the Layer Style window for the vector shapes made in the previous step and enter the settings mentioned in the next images.


Step 21
Change the foreground color to #AF594C and grab the Rectangle Tool. Move to your canvas, create a 30 x 4pxvector shape and place it as you can see in the first image.
Focus on your Layers panel, hold the Control button from your keyboard and then click on the thumbnail icon that stands for your main grey vector shape to load a simple selection around it. Now, make sure that your fresh rectangle is still selected and click on the Add Layer Mask button.


Step 22
Open the Layer Style window for the vector shape made in the previous step and enter the settings mentioned in the next images.


Step 23
Change the foreground color to #FF0000 and pick the Rectangle Tool. Move to you canvas, create a 5 x 68pxvector shape and place it as you can see in the first image.
Select the Add Anchor Point Tool, focus on the top side of this red rectangle and add two anchor points as you can see in the second image.
Pick the Direct Selection Tool, keep focusing on the top side of your red vector shape, select the left anchor point highlighted in the third image and drag it 2px to the right. Now, select the right anchor point highlighted in the same image and drag it 2px to the left.


Step 24
Open the Layer Style window for the vector shape made in the previous step and enter the settings mentioned below.


Step 25
Set the foreground color to #F6F6F6 and pick the Ellipse Tool. Move to your canvas, create a 15 x 15px vector shape and place it as you can see in the first image.
Open the Layer Style window for this vector shape and enter the settings mentioned in the next images.


Step 26
Change the foreground color to #C1C1C1 and grab the Rectangle Tool. Move to your canvas, create a 2 x 12pxvector shape and place it as you can see in the first image.
Open the Layer Style window for this vector shape and enter the setting mentioned below.


Step 27
With the same tool, create a 13 x 2px vector shape and place it as you can see in the first image.
Open the Layer Style window for this vector shape and enter the setting mentioned below.


Step 28
Focus on the Layers panel, select the vector shapes that make up the screw, hit Control + T and rotate randomly.
Select the vector shapes that make up your " i " and hit Control + G to grup them.
Open the Layer Style window for this group and enter the settings mentioned below.


Step 29
Change the foreground color to #C9A67C, grab the Rounded Rectangle Tool an set the Radius to 2px from the top bar. Move to your canvas and create a 15 x 165px vector shape.
Pick the Add Anchor Point Tool, focus on this brown vector shape and add new anchor points as you can see in the second image.


Step 30
Pick the Direct Selection Tool, select the highlighted anchor points one by one and drag them as you can see in next images.


Step 31
Open the Layer Style window for the brown vector shape and enter the settings mentioned below.


Step 32
Set the foreground color to #E6E6E6, select the Rectangle Tool, create a 60 x 24px vector shape and place it as you can see in the first image.
Make sure that your rectangle vector shape is still selected, go to Edit > Transform > Warp, select Shell Upper, check the orientation button, set the Bend to 18 and then hit Enter.
Select the vector shapes that make up your axe, hit Control + T and rotate -45 degress.


Step 33
Open the Layer Style window for the vector shape made in the previous step and enter the settings mentioned below.


Step 34
Change the foreground color to #000000 and pick the Line Tool. Move to your canvas and create a tiny line as you can see in the first image.
Make sure that this black vector shape is selected, lower the Fill to 0% and then hit Control + [ once, to move this vector shape under the axe's blade.
Open the Layer Style window for this vector shape and enter the settings mentioned below.


Step 35
Focus on the Layers panel, make a new copy with the horizontal key and drag it out from that group.
Grab the Path Selection Tool, select the left end of the key and hit the delete button from your keyboard.
Change the foreground color to #00EB69, select the Ellipse Tool, create a 24px circle and place it as you can see below.
With the same tool, create a 12px vector shape and place it exactly over the 24px circle.
Focus on the Layers panel, select both circles, right click on one of these shapes and go to Merge Shapes. Pick the Path Selection Tool, click on the 12px circle, focus on the top bar and go to Subtract Front Shape.


Step 36
Select the Rectangle Tool, create two, 2 x 3px vector shapes and place them as you can see in the first image.
Merge these two rectangle, duplicate this fresh vector shape three times and rotate the copies one by one as you can see in the next images.


Step 37
Focus on the Layers panel, select the vector shapes that make up your new key, right click on one of it and go to Merge Shapes. Click on the Layer Thumbnail Icon that stands for the new key vector shape and change the color to #F6F6F6.
Rotate this new key to -45 degrees and place it as you can see in the second image.
Open the Layer Style window for this vector shape and enter the settings mentioned below.


Step 38
Focus on the Layers panel, make sure that the new key is selected and duplicate it. Go to Edit > Transform > Rotate 180 degrees and place this fresh copy as you can see in the image below.
Select all the vector shapes that make up your " x " and group them ( Control + G ).
Open the Layer Style window for this new group and enter the settings mentioned below.


Step 39
Focus on the Layers panel, select and duplicate the group that stands your your " i " and place it as you can see in the first image.
Now select the brown rectangle, duplicate it ( Control + J ) and place it as you can see in the second image.


Step 40
Set the foreground color to #F6F6F6, pick the Pen Tool and create the following vector shape.


Step 41
Open the Layer Style window for the vector shape made in the previous step and enter the settings mentioned below.


Step 42
Focus on the Layers panel, select all the vector shapes that stand for your " t " and group them.
Open the Layer Style window for this group and enter the settings mentioned in the next images.


Step 43
Focus on the Layers panel, select the Background layer and click on the padlock icon to unlock the layer. Set the foreground color to #58857E or #80664F, grab the Paint Bucket Tool and fill the canvas with your new color. Open the Layers Style window for the layer unlocked in this step and enter the settings mentioned in the next images.


Final Results


Download the PSD
[vc_column width="1/1" el_position="first last"] [vc_cta_button title="Download" href="https://downloads.photoshoptutorials.ws/Tools Text Effect.zip" color="btn" size="btn-large" icon="none" target="_self" position="cta_align_right" call_text="Tools Text Effect.zip | 431 KB" width="1/1" el_position="first last"] [/vc_column]
One comment on “Create a Tools Text Effect in Photoshop”
nice nice