
Turn any photo into a dot grid artwork with these Photoshop actions. You'll get great results with dots that change size. They get larger in brighter areas and smaller in darker areas. Free download available.

Step 62
Double click the moon layer to enter advanced blending mode and use settings like shown below.

Step 63
Now let's add a vignette. Make a new layer and set the blend mode to multiply. Choose a brush with the following settings:
- Size: 200 px
- Hardness: 0%
- Opacity: 100%
Set the foreground color to: #030200 and brush gently around our picture to darken the edges. Lower the brush opacity to 50 % and brush a little more on the inside of the picture.

Step 64
As a final touch, let's increase the brightness of some specific parts of our composition. Make a new curves adjustment layer and use settings like shown below. Fill the layer mask with black and choose a brush with the following settings:
- Size: 80 px
- Hardness: 0%
- Opacity: 80%
Choose white as foreground color and brush over the areas shown below.

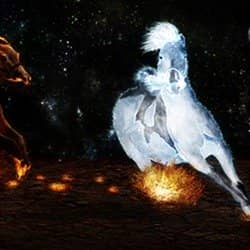
Final Results
![final-results[1]](https://cdn.photoshoptutorials.ws/images/stories/b92ae1f6d854_13010/final-results1.jpg?strip=all&lossy=1&quality=70&webp=70&avif=70&w=1920&ssl=1 "final-results[1]")
Authors Comment
 We learned in this tutorial that we can use same elements multiple times and still obtain variety. I hope you liked my tutorial and learned something useful from it. You can see some of my other art deviations here. Have fun photoshoping!!
- Adrian Scheff
2 comments on “Create a Spectacular Space Scene in Photoshop”
what are the settings for the fire horse color balance?
What are the settings used on color balance layer?