Make your artwork look like they're from an alternate universe. These Cyberpunk presets work with Photoshop (via the Camera Raw filter) and Lightroom. Download all 788 presets for 90% off.
You will know, how to make this epic photomanipulation in medieval-fantasy style. I'll show you, how to mix stock, use transforms and how to change colors on further photomanipulations. You will know, how to use blurs and colors in making perspective in photomanipulations. I'll show as well, how to use Topaz Clean 3 plug-in in works.
What you'll be creating
Composition "Field of glory" is showing dropped sword in the background of battlefield. I'll show how to use adjustment layers, how to make fog in the picture and how to use Topaz Filter. You'll need Photoshop CS5 or newer to follow this tutorial. You'll need Topaz Clean 3 plugin to Photoshop as well.

Tutorial Resources
- Fire stock - CGtextures
- Caimari - pixabay
- Grass Clumps 04 - Wolverine041269
- Golden Run Sword - Fantasystock
- Grass 10 - Wolverine041269
- Lateral foliage - eveblackwoodstock
- Battlefield Skies - missstark
- Magic fire 02 - Ayelie-stock
Step 1
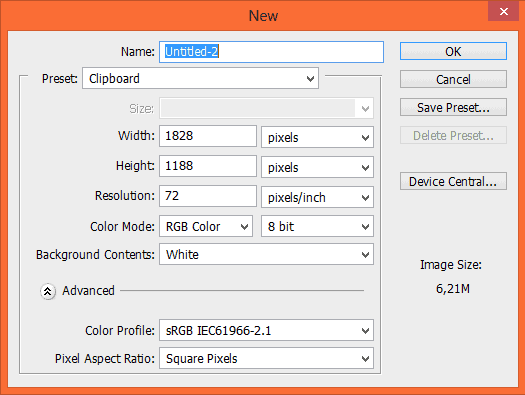
Create new file. Go to File > New... (Ctrl + N)

Step 2
Place "caimari" stock to created file.

Step 3
dd new adjustment layer with Hue/Saturation. Go to Layer > New adjustment layer > Hue/Saturation or use marked shortcut.

Step 4
Add new layer (Layer > New > Layer... , Shift + Ctrl + N or marked shortcut). Use big, soft round brush, choose #232827 color. Draw flat shadow on mountains.

Step 5
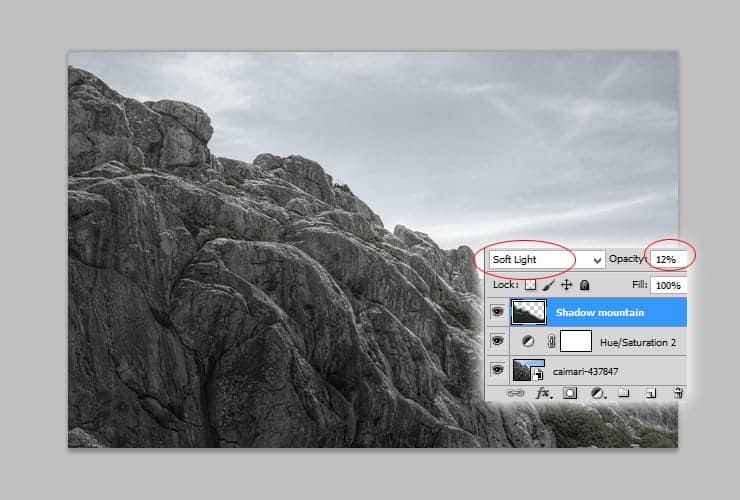
Change blending mode of this layer to Soft light. Decrease opacity to 12%.
Step 6
Duplicate created layer with shadow - drag it and drop to new layer symbol or go to Layer > Duplicate layer.

Step 7
Change blending mode of this layer to "Normal" and change opacity to 15%.

Step 8
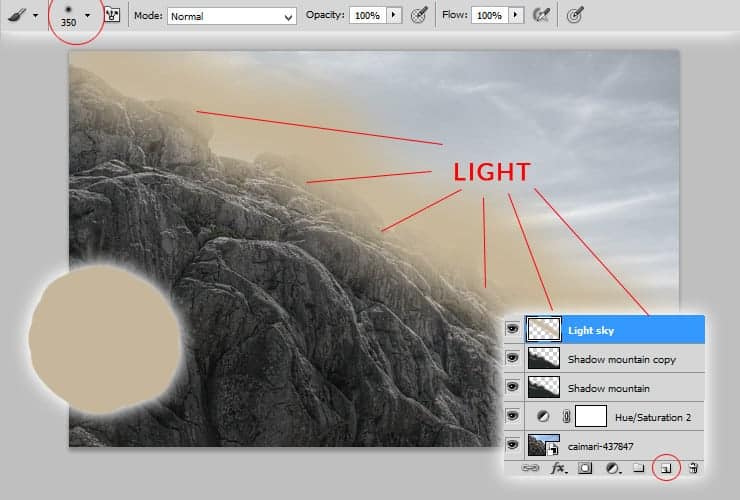
Add new layer (Shift + Ctrl + N or marked shortcut). Use big, soft round brush, choose #c6b69b color. You'll create lights on mountains - draw some strokes on the edges of mountains.
Step 9
Change blending mode of this layer to Overlay.

Step 10
Add new adjustment layer with Hue/Saturation - you'll gently decrease lights on stock image. Go to Layer > New adjustment layer > Hue/Saturation or use marked shortcut.

Step 11
Add new adjustment layer with Color Balance. You'll add blue tone to shadows. (Layer > New adjustment layer > Color Balance or use marked shortcut).

Step 12
Add new adjustment layer with Color Balance (Layer > New adjustment layer > Color Balance or use marked shortcut).

Step 13
Place "Battlefield sky" stock - drag it and drop to your file.

Step 14
Use hard round brush and mask area with mountains.

Step 15
Add new layer. (Shift + Ctrl + N or marked shortcut). Use big, soft round brush, choose #a9a9a9 color, set brush opacity to 50%. You'll create lights on mountains - draw some blurred dots on the edges of mountains, where light goes. For better effect on the left top, You can use #2e2e2e color and draw a few dots.

Step 16
Change blending mode to Color Burn and decrease opacity to 27%.

Step 17
Duplicate created layer - drag it and drop to new layer symbol or go to Layer > Duplicate layer.

Step 18
Change blending mode to Screen and decrease opacity of this layer to 6%

Step 19
Add new layer. (Shift + Ctrl + N or marked shortcut). Use big, soft round brush, choose #c8b998 color. You'll create lights on mountains - draw strokes on the edges of mountains, where light goes.

Step 20
Change blending mode to Linear dodge (Add), decrease its opacity to 22%.

Step 21
Place "Grass clumps 04" stock to your file. Set it as is shown. Create ground! Here's no need to worry about color adjustments.

Step 22
Place "Golden Rune Sword", transform it as is shown.

Step 23
Mask sword with hard round brush.

Step 24
Add new adjustment layer with Color Balance. Go to Layer > New adjustment layer > Color Balance or use marked shortcut. Then, right-click on this layer and choose "Create clipping mask" (Alt+Ctrl+G or Layer > Create Clipping Mask).

Step 25
Then, add new adjustment layer with Hue/Saturation. Go to Layer > New adjustment layer > Hue/Saturation or use marked shortcut. Next, right-click on this layer and choose "Create clipping mask" (Alt+Ctrl+G or Layer > Create Clipping Mask).

Step 26
Add new layer (Layer > New > Layer... , Shift + Ctrl + N or marked shortcut). Follow the light source and draw shadows on sword hilt. Use small, soft round brush with dynamic pressure size, set #232827 color and draw gently strokes. Next, right-click on this layer and choose "Create clipping mask" (Alt+Ctrl+G or Layer > Create Clipping Mask).

Change blending mode of this layer to Linear burn and decrease its opacity to 55%.

Step 27
Add new layer (Layer > New > Layer... , Shift + Ctrl + N or marked shortcut). Choose big, soft round brush and set its opacity to 20%. Use the same color as before. Follow the light source and draw shadows on blade. Avoid shading edges of blade. Shade also decoration above sword hilt - see the picture. Next, right-click on this layer and choose "Create clipping mask" (Alt+Ctrl+G or Layer > Create Clipping Mask).

Change blending mode of this layer to Multiply.

Step 28
You'll create lights on sword hilt. Add new layer (Layer > New > Layer... , Shift + Ctrl + N or marked shortcut). Set 50px soft round brush and choose #daccae color. Decrease opacity of brush to 60%. Follow light source. Next, right-click on this layer and choose "Create clipping mask" (Alt+Ctrl+G or Layer > Create Clipping Mask).

Change blending mode to Screen, decrease its opacity to 79%.

Step 29
Place "Smoke0387_L" to your file. Transform it as is shown. For free transform one point, use Ctrl and drag it as you want.

Change blending mode of this layer to Screen

Add new adjustment layer with Hue/Saturation. Go to Layer > New adjustment layer > Hue/Saturation or use marked shortcut. Next, right-click on this layer and choose "Create clipping mask" (Alt+Ctrl+G or Layer > Create Clipping Mask).

Click on "Smoke0387_L" layer and go to Filter > Sharpen... > Sharpen".

Step 30
Place Magic fire to your image. Transform it and change blending mode to Screen.

Step 31
Mask top of the stock. Click on white canvas on the left of layer thumbnail and use big, soft round brush.

Step 32
Duplicate layer with fire - drag it and drop to new layer symbol or go to Layer > Duplicate layer.

Step 33
It will be necessary to mask top of stock more. Click on white canvas on the left of layer thumbnail and use big, soft round brush.

Step 34
In your color picker set colors: #c8b998 and #232827. Then, add new adjustment layer with Gradient Map. Go to Layer > New adjustment layer > Gradient Map or use marked shortcut.

Change blending mode to Soft light.

Step 35
Back to bottom of stack of layers. Duplicate "Battlefield sky" stock and drag it on the top of stack. Right click on layer mask thumbnail and choose " Delete layer mask".

Step 36
Add new mask to this layer. Click on shortcut or go to Layer > Layer Mask > Reveal all... Use big, soft round brush with dynamic opacity. Mask randomly parts of clouds, to achieve fog effect.

If you want, you can use other trick to achieve fog effect. Click on mask thumbnail and go to Filter > Render > Clouds. Effect wouldn't be as nice as drawn by hand, but this way is more faster!
Step 37
Place "grass 10" stock to your file and transform it as is shown.

Step 38
Make it blurry - like on not focused part of image. Go to Filter > Blur > Gaussian blur...

Step 39
Add adjustment layer with Hue/Saturation - green on this stock is too bright and saturated. Go to Layer > New adjustment layer > Hue/Saturation or use marked shortcut. Next, right-click on this layer and choose "Create clipping mask" (Alt+Ctrl+G or Layer > Create Clipping Mask).

Add adjustment layer with Brightness/Contrast - you'll adjust brightness to whole picture. Go to Layer > New adjustment layer > Brightness/Contrast or use marked shortcut. Next, right-click on this layer and choose "Create clipping mask" (Alt+Ctrl+G or Layer > Create Clipping Mask).

Step 40
Place "Grass clamps" again. Transform it as is shown.

Step 41
Make it blurry - like on not focused part of image. Go to Filter > Blur > Gaussian blur... .

Step 42
Less focused things should be darker. Add adjustment layer with Brightness/Contrast. Go to Layer > New adjustment layer > Brightness/Contrast or use marked shortcut. Next, right-click on this layer and choose "Create clipping mask" (Alt+Ctrl+G or Layer > Create Clipping Mask).

Step 43
Duplicate most recent "Magic fire" layer - drag it and drop to new layer symbol or go to Layer > Duplicate layer. Then, drag it on the top of stack.

Step 44
Duplicate this layer (duplicated) (drag it and drop to new layer symbol or go to Layer > Duplicate layer) again. Then, change blending mode of this layer to Color dodge.

Step 45
Place lateral foliage to your file.

Mask the brightest parts of the foliage - use soft round brush.

Make it blurry - like on not focused part of image. Go to Filter > Blur > Gaussian blur...

Add adjustment layer with Hue/Saturation - green on this stock is too bright and saturated, we want to have dark, gothic mood here. Go to Layer > New adjustment layer > Hue/Saturation or use marked shortcut. Next, right-click on this layer and choose "Create clipping mask" (Alt+Ctrl+G or Layer > Create Clipping Mask).

Step 46
Place again Magic fire stock and set its blending mode to "Screen". Free transform it as is shown.

Step 47
Add new layer (Layer > New > Layer... , Shift + Ctrl + N or marked shortcut). Choose big, soft round brush and draw glow from the fire. Use #f4aa0a color.

Change blending mode of this layer to Soft light, decrease opacity to 20%.

Step 48
Next steps will be optional - You can stop here, or just follow tutorial further to achieve other color effect.
At first, You'll cool down colors on your picture by Photo Filter. Go to Layer > New adjustment layer > Photo Filter or use shortcut.

Now, add more blue tones to work. Go to Layer > New adjustment layer > Color Balance or use shortcut.

Decrease saturation. Go to Layer > New adjustment layer > Hue/Saturation or use shortcut.

Fix yellows and reds, by using Selective color adjustment layer. Go to Layer > New adjustment layer > Selective Color or use shortcut.

Now you'll create on your image purple tones. Add Channel mixer adjustment layer go to Layer > New adjustment layer > Channel mixer or use shortcut.

Change blending mode of this layer to Soft light, decrease opacity to 52%.

Add ambient lights - In your color picker set colors: #c8b998 and #232827. Then, add new adjustment layer with Gradient Map. Go to Layer > New adjustment layer > Gradient Map or use marked shortcut.

Change blending mode of this layer to Lighten, decrease opacity to 10%.

Create vignette filter. Add new adjustment layer with Gradient fill. Go to Layer > New adjustment layer > Gradient fill or use marked shortcut.

Change blending mode to Multiply, opacity to 12%.

Add some curves. Go to Layer > New adjustment layer > Curves or use marked shortcut.

Step 49
We are done with color adjustments for this moment. Now, I'll show You, how you can use here "Topaz filter". Select whole image (Select > All). Then go to Edit > Copy Merged (Shitf+Ctrl+C). Then, paste copied image.

Step 50
Go to Filter > Topaz Labs > Topaz Clean 3. Set it as is shown. Choose Curly smooth preset and set Strenght to 1.

Step 51
You can leave picture as is now, or add some color changes, to make effect more smoother - if You want, in your color picker set colors: #fff and #46264b colors, add Gradient map adjustment layer (go to Layer > New adjustment layer > Gradient map or use marked shortcut).

Change blending mode to Lighter color and decrease opacity to 39%.

Fix yellows and reds, by using Selective color adjustment layer. Go to Layer > New adjustment layer > Selective Color or use shortcut.

Final Results

Download the PSD
[vc_column width="1/1" el_position="first last"] [vc_cta_button title="Download" href="https://downloads.photoshoptutorials.ws/Medieval Battlefield.zip" color="btn" size="btn-large" icon="none" target="_self" position="cta_align_right" call_text="Medieval Battlefield.zip | 107 MB" width="1/1" el_position="first last"] [/vc_column]
11 comments on “Create This Surreal and Medieval Style of a Battlefield in Photoshop”
I can only see step 45 and below. Any help please?
battlefield's missing
Can't see
This is an *excellent* tutorial. I'm experienced in Photoshop, but a novice (at best) when it comes to photo manipulation at this level. The steps to this tutorial were baby-easy to follow, and my resulting work was nearly identical to the tutorial's. Even at individual steps, my canvas matched the photos. Not once did I have to start doing additional work to reach the same point as the tutorial. That's so rare!
This is really the only in-depth tutorial I've followed that doesn't assume fore-knowledge, shows all the necessary elements, doesn't skip details, and thoroughly explains steps and processes without over-elaborating. And all that without asking me to pay for stock! Fantastic!
Thank you for such a detailed and well-built tutorial, I'm on my way to see what else you've got.
Supab
Thank you so much! Just a great lesson!
Step 50 - rubbish!!
Step 48 - Channel mixer - Green - green - -58) Thanks for tutorial, awesome =)
nice
The link to the Battleground Skies doesn't work - states it's invalid.
Great!