
Turn any photo into a dot grid artwork with these Photoshop actions. You'll get great results with dots that change size. They get larger in brighter areas and smaller in darker areas. Free download available.
As I said you need to save the selection to be able to use it later. To do that go to Select > Save Selection ... and as Name write e.g. Woman. Press OK.

Press Ctrl + D on your keyboard to deselect it. You'll came back to the selection soon.
Step 3 - Adding Mountains
Download the picture of mountains and drag it to the picture. Press Ctrl + T on your keyboard and resize the picture on proper size. Then press Enter to apply the resizing. Rename the layer on MOUNTAINS and place it on the top of all layers.
To blend the layer with the rest of the picture change its Blending Mode on Overlay. You can find the Blending Mode option in the upper part of the palette Layers.

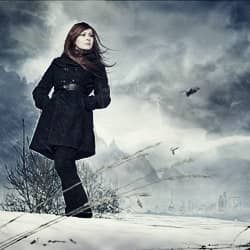
Your manipulation should look like the following picture. As you can see the mountains are well blended with the sky but they're also on the woman which looks really weird.

Now it comes time to use the selection you've created and saved in previous step.
Add new layer mask to MOUNTAINS. You can find the button "Add layer mask" in the bottom part of palette Layers (same as the buton "Create a new layer").

Go to Selection > Load Selection ... and select Channel Woman. Press OK.

Grab the Brush Tool (B) and pick black color. Make sure that the layer mask is active (just click on it) and paint with black inside the selection. It causes that the mounatin on woman dissapear.
You should get something like on the picture below.

Press Ctrl + D to deselect the mask.
Step 4 - Adjusting the Mountains
Mountains would look better if they're darker and less saturated. You'll fix it in this step.
First let's make them darker. To do that add new adjustment layer Levels above MOUNTAIN. You can find the button "Add new fill or adjustment layer" in the bottom part of the palette Layers similarly as the button "Add new layer mask" you've used in the previous steps.

Using of adjustment layers is much better than direct adjustments of the picture because this way you can always go back and edit whatever you need and you're not limited with the number of step which you have set to History remembers. Also you don't need to re-do anything. But back to the image...
10 comments on “Create a Mysterious Fashion Photo Manipulation in Photoshop”
Thanks for stopping by!I use Lightroom and Photoshop for my pp'ing. I'm rlleay just learning still have found some actions that I like that I have actually rlleay learned a lot from using.
struck in first step...plz tell me how u remove cloth and retain the straw..plz mail me the solution so that i can go for second step
And here's mine:
http://oi59.tinypic.com/2c126w.jpg
:)
I used a different mountain - the original is missing.
Alirght alright alright that's exactly what I needed!
Hi,
Great tutorial, thanks.
And this is my result: https://imageshack.com/i/0lh0uxj
I have made snow instead of rain ; )
This is really amazing.. its great. but given model image resoulution is not enough for this type of design. Thanks..
Those were very educational Terence! It was like you took us into atenhor world that we would never see & into the eyes of those that work up in the sky. The shot behind the crane operator was awesome and I loved the candid shots that you took. Amazing work my friend! Must have been quite the experience.
amazing. thks!
Thank you very much,I love you !
i liked it very much...thnk u