
Turn any photo into a dot grid artwork with these Photoshop actions. You'll get great results with dots that change size. They get larger in brighter areas and smaller in darker areas. Free download available.

It’s time we create a layer for “wave4.” Use the same brush we used for “wave3.” Brush it on the right wall just beside “wave3.” Remember to rotate it to be aligned with the present waves and erase the excess waves that you see. See image below:

Now for the left wall, just duplicate “wave2” and “wave3” and align them to the left wall. Do the necessary rotations to align it with the wall. See reference below:

Step 6 - Creating the splashes on the walls
Now we will be creating the splashes on the walls. Activate your brush tool and replace the current brushes with the water effects brush by fiftyfivepixels. We will be adding some authentic-looking water splashes with the help of these brushes. Create a new layer and name it “wave5.” Activate your brush tool once again (Take note that the brush opacity should still be set to 100%) and follow instructions from the image below:

Change the brush size now to 1411px and brush it over “wave1.” Do the necessary erasures to the excess waves. The result should be similar to this:

Create a new layer and name it “wave6.” Open your brush tools and select the brush indicated by the image below:

Once you’ve selected that brush, change its size to 1014px. Brush it on the left wall over the duplicated “wave2” and “wave3” layers. Then use your Distort tool via the Transform tools and distort the layer so it would be aligned to the wall, therefore making it look like it splashed on that wall. It should result to something similar to this:

Create another layer and name it “wave7” and pick the brush as shown in the image below:

Use the default size which is 2500px. Apply the brush in this manner as seen in the image below:

Remember to erase the unwanted waves.
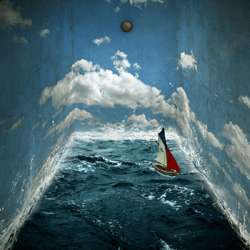
The result should be similar to this image:

Create a layer and name it “wave8.” Pick this brush from the current brush tools (waves brush by anaRasha) as seen in the image below:

Apply the brush like this:

Now we will be distorting “wave8”, it would be a little tricky so pay attention closely to the images shown below:


Erase the excess waves and the result should be similar to this:
8 comments on “Surrealistic Room Photo Manipulation”
Psd pleasd not link
We have fixed the broken link. Thank you for letting us know.
Thanks a lot! Great tutorial and love your precise approach =) I modified final part, but love your original idea. Here is my version http://milanaserk.deviantart.com/art/Setting-Off-484852574
I searched a lot, but the Anarasha wave brush seems to be offline. But after some searching I found equally good wave brushes at this site:
http://midnightstouch.deviantart.com/art/Stormy-Seas-38507114
A lot more 'water brushes' can be found here:
http://www.photoshopfreebrushes.com/25-sets-of-high-quality-water-brushes-for-creating-splashing-backgrounds/
Hope this will help!
Kind regards,
Mike
very very nice, your picture works.thanks sir...........
sorif,
the waves brush by anaRasha is not a working link. I've tried looking for it and it would be really cool for a different download or something like that.
Not sure if your aware theres a guy selling prints of your Tuts, I'm guessing without any permission?
Not sure if your aware theres a guy following your Tuts as finished artwork out there...I'm guessing without any permission?