Make skin look perfect in one-click with these AI-powered Photoshop actions.
- Vignette amount: –100
- Midpoint: +50
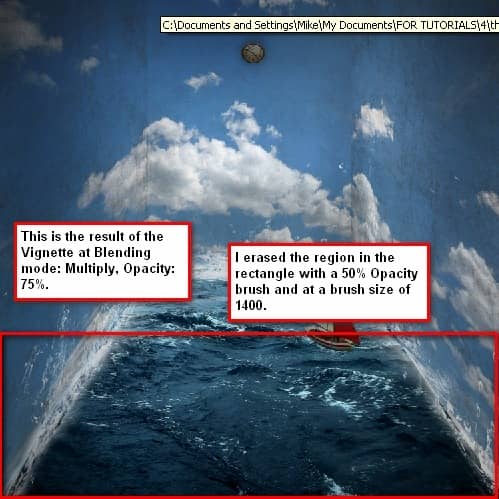
Drag that vignette layer to our original image and put it on top of all the layers that we’ve created, and then use these settings:
- Blending mode: Multiply
- Opacity: 75%.
You can adjust the opacity as per your wish but I would strongly recommend 75%.
Notice that the bottom part of the image seems too dark? That doesn’t look too good. We’d have to erase that. While your Vignette layer is selected, activate your Eraser tool (E) and set your brush values to:
- Brush size: 1400px
- Opacity: 50%
See image below as to where we would be using our eraser tool:

Step 10 - Giving the image another retouch
The image is complete but let’s retouch it some more to improve its aesthetic quality.
Let’s increase the image’s contrast. Click on the Create a New Adjustment Layer button and pick Brightness/Contrast and enter these values:
- Brightness: 0
- Contrast: +7
Now let’s adjust the Color Balance. Click again on the Create a New Adjustment Layer button, and pick Color Balance and enter these values respectively:
- -6; 0; -14.
Create another Gradient Map from the Adjustment layer button and set it to Luminosity, Opacity:
- 25%.
Adjust the Brightness/Contrast once again but input these values:
- Brightness: +5
- Contrast: 0
Let’s add more Cyan and Yellow to our image. Create another Color Balance Adjustment Layer from the Adjustment Layer button and input these values respectively:
- -6; 0; –6
You may also want to lower the Opacity down to 70% to make it not too green.
Finally, let’s bring out the whites in the image by increasing the contrast. Create another Brightness/Contrast adjustment layer and input these values:
- Brightness: 0
- Contrast: +6
Step 11 - Sharpening and saving as PSD
Now that that’s done, you may want to save it as PSD file so you may edit the image again in the future. After that, let’s sharpen the image. “Go to Filter > Sharpen > Smart Sharpen” and input these values:
- Amount: 125%
- Radius: 1.0
- Remove: Gaussian Blur
- Check the More Accurate box
Step 12 - Saving the file to TIFF and Jpeg
After you’ve done the sharpening, you may flatten the image by right clicking on any layer and clicking Flatten Image. You may want to save it as a TIFF file first, which would allow you to do some quick changes to the image, like adjustment layers and fill layers without reducing its quality. You can view cracks in the image through the Histogram. Finally, save it as a JPEG image.


8 comments on “Surrealistic Room Photo Manipulation”
Psd pleasd not link
We have fixed the broken link. Thank you for letting us know.
Thanks a lot! Great tutorial and love your precise approach =) I modified final part, but love your original idea. Here is my version http://milanaserk.deviantart.com/art/Setting-Off-484852574
I searched a lot, but the Anarasha wave brush seems to be offline. But after some searching I found equally good wave brushes at this site:
http://midnightstouch.deviantart.com/art/Stormy-Seas-38507114
A lot more 'water brushes' can be found here:
http://www.photoshopfreebrushes.com/25-sets-of-high-quality-water-brushes-for-creating-splashing-backgrounds/
Hope this will help!
Kind regards,
Mike
very very nice, your picture works.thanks sir...........
sorif,
the waves brush by anaRasha is not a working link. I've tried looking for it and it would be really cool for a different download or something like that.
Not sure if your aware theres a guy selling prints of your Tuts, I'm guessing without any permission?
Not sure if your aware theres a guy following your Tuts as finished artwork out there...I'm guessing without any permission?