Preview of Final Results

Tutorial Resources
- Library by Cats-go-moo-always
- Woman, hair and dress
- Mist Brushes by pelleron
- Sun Rays Brushes by pelleron
- Dust Texture by boxx2genetica
- Light Texture by stock-basicality
Step 1 – Preparing Background
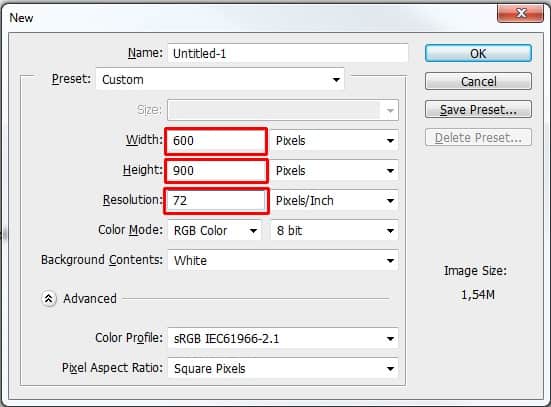
Let’s start with creating new document in Photoshop. Go to File > New… Set its Width on 600px, Height on 900px and Resolution on 72Pixels/Inch. Press OK.
Step 2 – Placing the Library
Download the stock photo of the library listed in the beginning of the tutorial and drag it into your photo manipulation. Place it on the top of all layers and name it LIBRARY. Press Ctrl + T to activate the Free Transform tool and change the photo on size of the document. Hold Shift while doing it to remain constant proportions. Press Enter on your keyboard after you’re done to apply the changes.
Step 3 – Lowering Saturation
Add new adjustment layer Hue/Saturation on the top of all layers and set the value Saturation on -40. To affect only LIBRARY and not the rest of the image create clipping mask from this adjustment layer by clicking on the square icon on the bottom part of the Hue/Saturation palette (see below).

Step 4 – Adding Floor
In following steps you’ll add photo of the woman to the bottom left corner. Because of that you don’t need to have floor placed there. But there would be some empty space in the bottom right corner. You’ll get rid of it in this step.Click on the layer LIBRARY. Grab the Lasso Tool (L) and select the floor (see picture below).

Step 5 – Saturation of the Floor
You need to lower the saturation of the floor same as you did it with the LIBRARY. Add new adjustment layer Hue/Saturation on the top of all layers and set the value Saturation on -40. Create clipping mask from this layer to affect only one layer below (= FLOOR).After you’re done your photo manipulation should look like the one shown below.8 responses to “How to Create Dramatic Light in Your Fantasy Photo Manipulation”
-
?
-
just awesome work can you share advanced technique for masking …….. i will be grateful to you .
-
Thanks for this article. I’d also like to convey that it can always be hard if you find yourself in school and starting out to initiate a long history of credit. There are many college students who are only trying to live and have long or good credit history can often be a difficult thing to have. fkdkedacegcggegc
-
I loved your post.Much thanks again. feedfkdbfdgc
-
спасибо! красиво!
-
Done and published here http://annewipf.deviantart.com/art/In-the-Library-491408093 Thank you!
-
Hi, these sunray brushes can’t be downloaded for free? So what to do next? Thnxs.
-
beautiful work!


Leave a Reply