
Turn any photo into a dot grid artwork with these Photoshop actions. You'll get great results with dots that change size. They get larger in brighter areas and smaller in darker areas. Free download available.

Step 8
Click OK to close the liquify tool then select the burn tool. We are going to darken some of the shadows on the face. Change the brush size to about 257 px and the exposure about 25 %

Use the burn tool to darken some areas on the hair and nose.

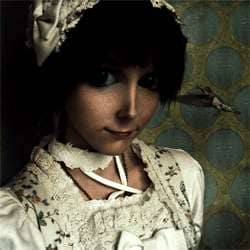
Step 9
Now with the same tool and a brush about 60 px and 50% exposure, shape the edge of the eye to make it darker. Try not to leave it too much from the eye line. Then, with a bigger brush add more shadows over the eyes to make it even darker.

Step 10
Select now the blur tool (R) with a brush about 60 px and a strength around 71%. Paint over the face and neck to make the skin smoother.

Step 11
Now select the healing brush tool and correct the imperfections on the skin. Be sure that you erase the smudged texture created from the Liquify filter (in my sample they’re visible next to the nose).

Step 12
Now we’re going to paint the models lips to make it more striking. Create a new layer on the top and select the brush tool (B). Use a small brush (about 30) and select a dark red color. On the newly created layer, paint over the lips with the selected red color. You don’t have to be too careful because we are going to fix this later.
Change the layer mode to Soft Light and the opacity to 62%. Finally use the eraser tool to erase any painted areas that are not on the lips.

Step 13
Now select the smudge tool (R) with a small brush (about 8 px) and strength at 80 %. We are going to add some hair. in quick downward motions, smudge on the areas shown in the image below to create the hair. Alternate the size of the brush to get shorter or longer hair. You can quickly change the brush size by pressing the [ and ] keys on your keyboard.
After you created the hair, you’ll notice that the background has been blurred from the smudge tool. We’ll fix this later.

Step 14
Choose Image > Canvas Size. Enter 1840 px as the width. We are going to add the background now. Usually you would select the girl and cut and paste her over the background, but we are going to try another technique that can be helpful sometimes.