
One of the most common underwater photography difficulties is trying to capture a photo without extreme color and contrast loss. In this Photoshop Tutorial, you’ll learn how to analyze and restore the color and contrast of underwater photos.
Underwater Photo Retouching Photoshop Tutorial
Color Correction
Loss of color and contrast is the primary obstacle faced by underwater photographers. First, we’ll work on restoring the color of the photo to produce a fuller spectrum of color. The deeper the location image was taken at, the more color loss there is. Colors with longer wavelengths such as red and orange disappears first. When extremely deep, only blue can be recorded.
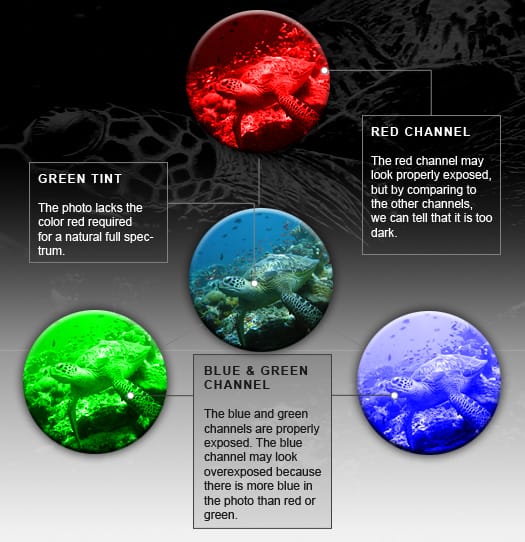
Identifying the Problem
Correcting the color for underwater photos is simple, but not as simple as regular photos. Unlike most photos where the color can be corrected using by setting the gray point with the Levels tool, underwater photos need to be manually corrected. Because most underwater photos lack an accurate gray as a reference for the color, we need to analyze the channels to identify the color causing the problem. There are two primary elements that need to be worked on: color and contrast. First, we’ll show you how to restore the colors and then we’ll show you how to enhance the contrast of the distance.
Correcting Color
Step 1
Open an underwater photo in Photoshop. To do this, click on the File menu and select Open. Then, browse for the photo and click OK.

Step 2
To brighten the red channel, we’ll use a Levels adjustment layer. Click on the “New Adjustment Layer” button located in the Layers pallet and select Levels.

Step 3
The Levels tool should appear. Change the channel to Red.

Step 4
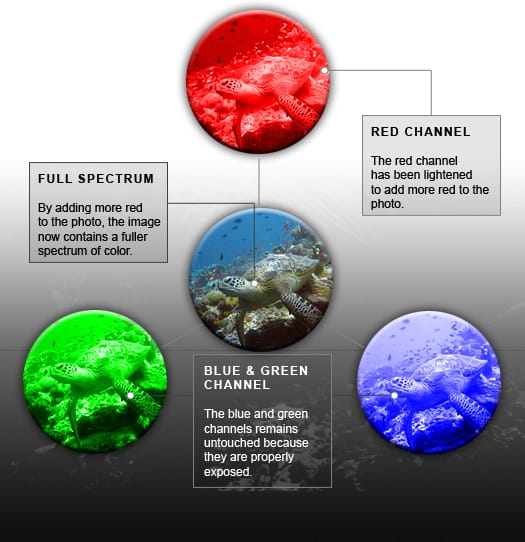
Drag the middle input slider towards the left until the color of the photo looks correct. Keep your eye on the photo as you adjust; especially on the red areas.

The color is now fixed. Looking back into the channels, we can see that the blue and green channels were left untouched while the red channel was brightened.
Next, we’ll learn how to correct the contrast of underwater photos.
Correcting Contrast
Contrast is another primary element for underwater photography that usually requires retouching. Follow this simple Photoshop technique to enhance the contrast of the distance without affecting the foreground.
One response to “Underwater Photo Retouching”
-

I find the quickest and easiest way is to just hit ‘autocolour’ a number of times until there is no further change – usually about 10 or 12 times, then increase vibrance and saturation.
You can set this as an action for fixing batches.
Leave a Reply