Step 20
Next we will openBird 2 After you open the image, use Quick Selection Tool(W) and start selecting the Bird. After the selection area has been created, simply copy (Ctrl / Cmd + C) and Paste (Ctrl / Cmd + V) it to our work canvas. Then position the image with the transform tool (Ctrl / Cmd + T). Hold Alt + Shift and resterize like image below. In Photoshop CC only hold Alt to resterize al sides together.Make a selection with the Quick Selection toolSelect the Quick Selection tool in the Tools panel. Add a checkmark to the Auto-Enhance option in the Options bar. Click and drag over an area you want to select. The tool automatically selects similar tones and stops when it finds image edges.Add to the selectionTo add to the initial selection, just click and drag over another area. The Quick Selection tool automatically changes to the Add to selection option.Subtract from the selectionTo subtract from the initial selection, press the Option key (MacOS) or Alt key (Windows) as you select an area you want to remove from the selection. When you release the Option or Alt key, the Quick Selection tool switches back to its Add to selection option.


Step 21
Add Adjustment Layer “Levels”

Step 22
Add Adjustment Layer “Curves” and press Ctrl/Cmd + I to invert and use Brush Tool(B) Soft Round with foreground color white and paint the right side of bird.


Step 23
Add Adjustment Layer “Curves” and press Ctrl/Cmd + I to invert and use Brush Tool(B) Soft Round with foreground color white and paint the left side of bird.


Step 24
Now, go to File > Open and select Model. Then use a Pen Tool(P) and start selecting. When we finish the selection press right click on mouse and “Make Selection” then create layer mask..The simplest path you can draw with the standard Pen tool is a straight line, made by clicking the Pen tool to create two anchor points. By continuing to click, you create a path made of straight line segments connected by corner points.
- Select the Pen tool.
- Position the Pen tool where you want the straight segment to begin, and click to define the first anchor point (do not drag).
- Click again where you want the segment to end
- Continue clicking to set anchor points for additional straight segments.
- The last anchor point you add always appears as a solid square, indicating that it is selected. Previously defined anchor points become hollow, and deselected, as you add more anchor points
- Complete the path by doing one of the following:
- To close the path, position the Pen tool over the first (hollow) anchor point. A small circle appears next to the Pen tool pointer
 when it is positioned correctly. Click or drag to close the path.
 - To leave the path open, Ctrl-click (Windows) or Command-click (Mac OS) anywhere away from all objects. To leave the path open, you can also select a different tool.


Step 25
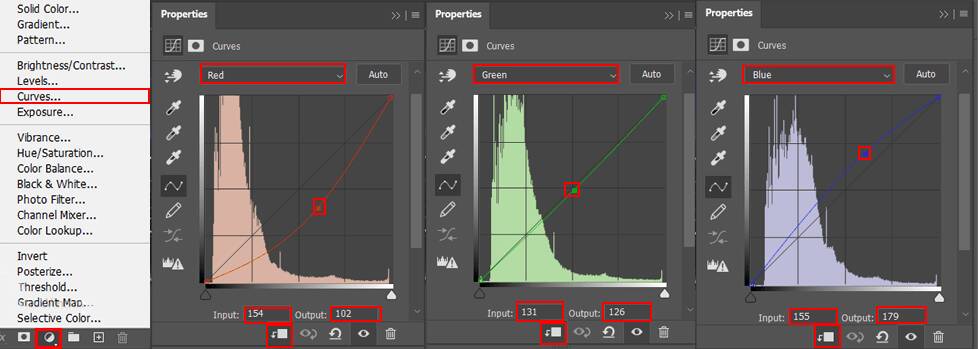
Add Adjustment Layer “Curves”

Step 26
Add Adjustment Layer “Hue/Saturation”

Step 27
Add Adjustment Layer “Levels”
7 responses to “A Gate of New Hope Photoshop Tutorial”
-
Photoshop prtis ka karna
-
PSD File is not downloadable.
-
The PSD file works for us. It’s a really big file, so it will take awhile to download.
-
-
The download link doesn’t work
-
Sorry about that – link has been fixed!
-
-
very good :)
just a problem with link psd-
Sorry about that – link has been fixed!
-


Leave a Reply