
“After an orange cloud — formed as a result of a dust storm over the Sahara and caught up by air currents — reached the Philippines and settled there with rain, I understood that we are all sailing in the same boat.” In this Photoshop tutorial, we will learn how to create a cool landscape scene with astronauts. First, we added Background with mountains and fields, then insert a Rocket and planet. Next added some stars and galaxy and helicopter. Finally added Astronauts and apply the Camera Raw filter.
Preview of Final Image

Tutorial Resources
Step 1
Now, let’s start by creating a new image file, go to the Menu bar and click File > New, and then input the following values on their respective fields
- Preset: Custom
- Width: 3080px
- Height: 3850px
- Resolution: 300px
- Color Mode: RGB Color 8 bit
- Background Contents: Transparent

Step 2
Now, place Background Go to File > Place and select Background Then place it to our work canvas and position the image with the transform tool (Ctrl / Cmd + T). Hold Alt + Shift and rasterize like the image below. In Photoshop CC only hold Alt to rasterize all sides together.


Step 3
Add Adjustment Layer “Curves” and create layer mask. Next use Soft Round Brush with foreground color black and start painting on field and sky.

Step 4
Next go to open Rocket. File > Open and select Rocket. Use Rectangular Marquee Tool(M). With the Rectangular Marquee tool, drag over the area you want to select. Hold down Shift as you drag to constrain the marquee to(release the mouse button before you release Shift to keep the selection shape constrained).


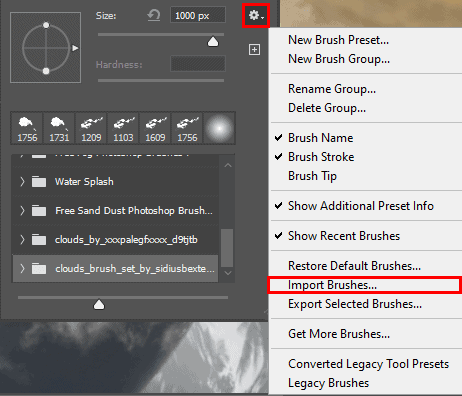
Next, we add Cloud brushes but first we need to import brushes. Select a Brush Tool(B) and right click on background. Now click on the gear icon and Import Brushes (Select a downloaded brush).
Next create a layer mask and use cloud brush with foreground color black and start painting over the smoke…

Step 5
Add Adjustment Layer “Color Balance”

Step 6
Add Adjustment Layer “Curves”

Step 7
Add Adjustment Layer “Curves” and press Ctrl/Cmd + I to invert. Then use Brush Tool(B) Soft Round with foreground color white and paint dark parts.


Step 8
Add Adjustment Layer “Curves” and press Ctrl/Cmd + I to invert. Then use Brush Tool(B) Soft Round with foreground color white and paint highlight parts.
Leave a Reply