img(14)
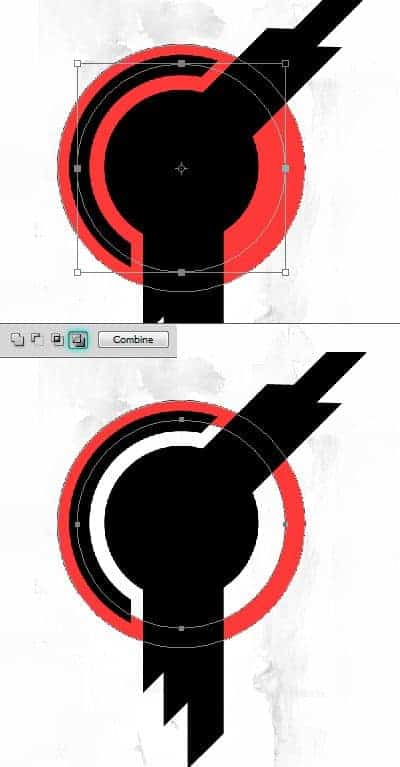
Cut hole in the circle.
img(15)
I want to use this part of the circle, hide rest of it.
img(16)
Create a new layer above the cut circle. Use the Pencil Tool with 1px dia to create the pattern. Select it with the Marquee Tool. Choose Edit > Define Pattern.
img(17)
Clip the pattern layer to the circle layer. The shortcut is Ctrl+Alt+G.
img(18)
Duplicate the circle and delete the Layer Mask. Delete the inner circle.
img(19)
img(20)
Reduce the fill opacity to zero. Then Apply stroke.
img(21)
Hide part of the circle with a layer mask.
img(22)

Step 6

Open up the model stock image in Photoshop. Isolate the subject from the background. Use the Pen Toolto select the subject, pay some attention while selecting the hair.
img(23)
Copy and paste the model into the main document. Convert the layer to Smart Object ( Layer > Smart Objects > Convert to Smart Object ). Resize the model.
img(24)
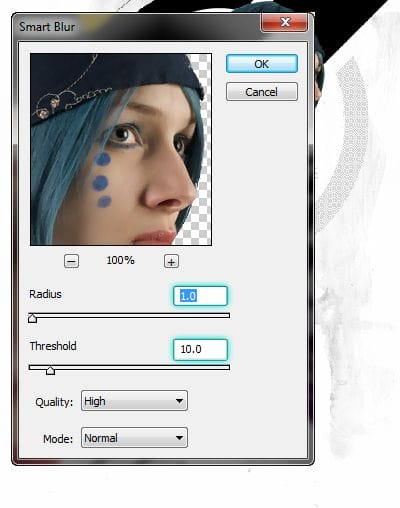
Apply Unsharp Mask ( Filter > Blur > Smart Blur ).
img(26)
Ctrl+click on the circle vector mask to load selection. Click on the Add layer mask button to add mask.
img(27)
Reveal some more portion of the model.
img(28)
Reveal rest of the image.
img(29)
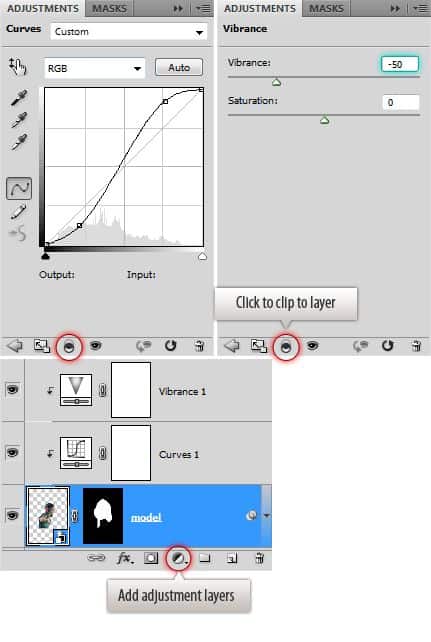
Color correct the image using Curves and Vibrance adjustment layers.
img(30)

Step 7

Load the stag ( img035 ) into Photoshop. You need to change the image mode to RGB from Index. Choose Image > Mode > RGB. Then drag it into the design. Invert the image ( Ctrl+I)
img(31)
Place it behind the model. Change blend mode to Lighten.
img(32)

Step 8

Open up the male head stock. Desaturate the image. Adjust brightness and contrast using the Curves command.
img(33)
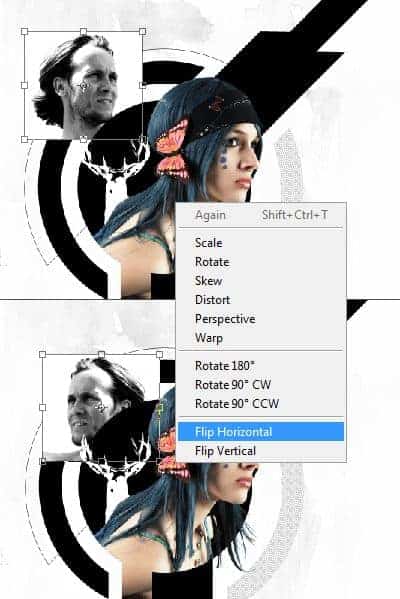
Drop the image into composition. Resize and flip horizontally.
img(34)
Change the blend mode to Multiply.
img(35)
Duplicate the head layer and invert it.
img(36)
Load selection from the circle in the middle and use it to mask out the head negative thus showing the portion inside the circle.
img(37)
Apply gradient to the outer circle.
img(39)

Step 9

Load the flames stock image. Copy the below one and paste above the outer circle.
img(40)
Incorporate the flames into the ring. Mask out the flames using the selection from the ring.
img(41)
Change blend mode to Screen. Increase flames saturation using Hue/Saturation dialog box ( Ctrl+U).

Pages: 1 2 3 4

29 responses to “How to Create an Amazing Mixed Media Poster in Photoshop”

  1. Dylan Avatar
    Dylan

    This is cool looking but i hate the ones that got no downloads.

  2. Ryuu Avatar
    Ryuu

    Thank you for this tutorials. I get some problems in step 8. I change the blend mode to Multiply and duplicate the head layer and invert it. But it’t not work. It becomes draker. I try many ways. But it dosn’t show like that.

  3. Mukul Avatar
    Mukul

    I really enjoyed this tutorial.thanks

  4.  Avatar
    Anonymous

    thank’ssssssssssssss

  5. Murzith Avatar
    Murzith

    It’s always helps when I visit your site and I always learn some new stuffs from you. Thanks a lot

  6. beepbeepimajeep Avatar
    beepbeepimajeep

    man this is really cool

  7.  Avatar
    Anonymous

    good job ,, thanks

  8.  Avatar
    Anonymous

    I loved this tutorial. Some parts were hard to understand but searching for the answer got me more familiar with Photoshop. The only thing i really didn’t like was the section where you make a blend in Illustrator. I don’t know enough about the program to know how to do that. I had to leave it out because I couldn’t figure it out. A little more detail on that part would really help. Other than that, great job. Thank you

  9. Maidul Islam Avatar
    Maidul Islam

    A very smart approach to explain the things,like your step by step tutorial.

  10. Grayson Avatar
    Grayson

    Amazing! I am a beginner in photoshop and I was able to create an exact look alike thanks to your tutorial!

  11. Red Devil Avatar
    Red Devil

    Thank you for this tutorials.

  12. Pissed Off Avatar
    Pissed Off

    **** you for this this is so badly written!

    1.  Avatar
      Anonymous

      bruh

  13. dilshan Avatar
    dilshan

    nice…welldone

  14. Mr.MRF Avatar
    Mr.MRF

    Thanks 4 this amazing tutorial, if u leave dl sorce link it was very good:d

  15. Doris Stokes Avatar
    Doris Stokes

    SUCH! an interesting and informal tutorial, I know so much more now and first thing tomorrow will design my own version of this and try and expand upon techniques. Brilliant! Thanks for all your effort in preparing this.

  16. ranjeet Avatar
    ranjeet

    excellent………..i love it

  17. Juhyeon Kim Avatar
    Juhyeon Kim

    THANKS ^^

  18. KG Avatar
    KG

    I enjoyed your tutorial. A few of the steps were confusing as I am learning some of the tools. A few things were not explained, like having to take off the multiply blend mode from the second male head so the invert worked. All in all very nice job!

  19. kevin harper Avatar
    kevin harper

    getting a lil bit of problems in step four but i’ll get it

  20. Rod Avatar
    Rod

    Great tutorial. Thanks.

  21. Joanna Avatar
    Joanna

    Love it. This website always has the best tuts

  22. Beth Avatar
    Beth

    Omg, thank you so much for this tutorial. How awesome! I love it. :D

    1.  Avatar
      Anonymous

      your welcome

  23. TrollMaster Avatar
    TrollMaster

    This actually isnt that bad.

  24. Yuni eka putri Avatar
    Yuni eka putri

    Like

  25. George Foreman Avatar
    George Foreman

    Niceeeeeeeee!

Leave a Reply

This site uses Akismet to reduce spam. Learn how your comment data is processed.

Discover more from Photoshop Tutorials

Get the latest Photoshop tutorials, download and updates delivered to your inbox.

Continue reading