Step 7
Extract the right rock and position it at the right of our main picture after converting it to Smart Object and resizing. I set this layer under mid rocks one:

I use layer mask to remove a small white part of this rock:

Step 8
I make some adjustment layers (Clipping Mask) to blend the right rock:
Curves:

Hue/Saturation:

Color Balance:


Step 9
I want to correct color in the front of this rock so I make a new layer (Clipping Mask) and choose color #a9a9ac (picked from the top of the rock) and paint on indicated area. I change the mode to Color 50%:

Step 10
I make a new layer and use brush with color #7a7e7e to paint on the right of this rock to darken it. Put the mode to Multiply 100%:

Step 11
I use a new layer and take soft white brush to create some mist at the top left of the rock. Then I lower opacity of this layer to 30% (remember to vary opacity of this brush to get the result below):

Step 12
I make a new layer (Clipping Mask), change the mode to Overlay 100% and fill with 50% gray:

I use Dodge Tool with Midtones Range and Exposure about 15% to brighten a small part of the left stroke of the rock a little. You can see how I applied this tool with Normal mode and result with Overlay mode:

Step 13
Isolate the left rock and move it to the left of the picture and make it as a Smart Object and downsize it. I make the top part of it visible:

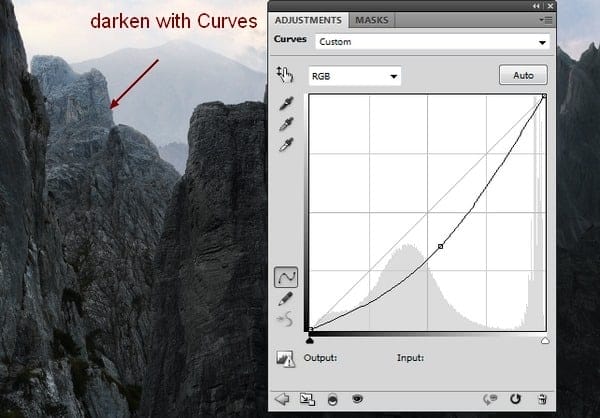
I add a Curves layer (Clipping Mask) to darken this rock:

Step 14
I make two new layers (Clipping Mask) and use soft brush with color #7a7e7e to darken the front of this rock that’s hidden from the main light source. I change the mode of these layers to Multiply 80% and 70%:


Step 15
Create a new layer (Clipping Mask) and use soft brush with color #e9eded to paint on the top left of this rock. I lower opacity of this layer to 20% to create some mist for this part:

Step 16
Make a new layer (without Clipping Mask) above left rock ones but under the mid rocks. Use soft brush with color #e9eded to paint between the rock ones to make a misty effect there. I lower opacity to 20%:

Step 17
Open waterfall 1 stock. Extract the waterfall only (I use Channels to do it) and place it at the middle area of mid rocks after converting it to Smart Object and resize it. Flip it horizontally (Edit-Transform-Flip Horizontal):
22 responses to “How to Create a Mountainous Matte Painting in Photoshop”
-
Good
-
bhai iski photoshop file bhej do kam urgent
-
it`s not sxc.hu but scx.hu existed while the linked did`nt worked.
-
Thank you, this has been a real help
-
Очень замечательный урок!:) Делаю с огромным удовольствием!:) Правда остановился на 33 шаге, не могу сообразить где эта часть горы которую нужно вставить в правый угол на передний план. Уже измучился и не пойму как тут разобраться:) Просидел над этим куском горы уже весь день:)) Неужели тут придётся вырисовывать… так скажем проявить смекалку…)
-
ur all amazing i wanna give u all hugs!!!!
-
Thank you very much:)
-
how to download this video
-
Beautiful, creative and acutely enjoy able!
-
Great, thanks for all the helpful info!
-
please, you might place the images: Background mountain y Bottom right rock ?
-
thank you very much :)
-
nice tutorial
-
I don’t understand where have you found (seen) the steps in this tut.?
sorry, but I can’t see them(
hope you help me
-
-
That’s amaging tutorial and I feel happy
-
I really fell happy.
-
This tutorial is amazing. Thanks Ms. Le
-
Really nice and very useful. Thank you very much….
-
Really nice and fun to work with. I’m very nooby at photoshop and I learnt a lot from this.
-
thanks machan…….
good buy….. -
Amazing tutorial
-
nice tutorials…thanksss


Leave a Reply