
“At every sunset, the sky is a different shade. No cloud is ever in the same place. Each day is a new masterpiece. A new wonder. A new memory.” In this Photoshop tutorial, we will learn how to create a surreal place above clouds. First, we added Mountains then add moon and comets. Then added a big window and with a pen tool cut the window. Next, add satellite, man, and plane. Then extend the wall and roof. Put all into the group and with adjustment layers blended it. For the final adjustment, we used Camera Raw Filter.
Preview of Final Image

Tutorial Resources
Step 1
Now, let’s start by creating a new image file, go to the Menu bar and click File > New, and then input the following values on their respective fields
- Preset: Custom
- Width: 1125px
- Height: 2436px
- Resolution: 300px
- Color Mode: RGB Color 8 bit
- Background Contents: Transparent

Step 2
Now, place Mountains Go to File > Place and select mountains, then place it to our work canvas and position the image with the transform tool (Ctrl / Cmd + T). Hold Alt + Shift and rasterize like the image below. In Photoshop CC only hold Alt to rasterize all sides together.


Step 3
Next, we will open clouds. After you open the image, use Rectangular Marquee Tool(M).

After the selection area has been created, simply copy (Ctrl / Cmd + C) and Paste (Ctrl / Cmd + V) it to our work canvas. Then position the image with the transform tool (Ctrl / Cmd + T). Hold Alt + Shift and resterize like image below. In Photoshop CC only hold Alt to resterize al sides together.

Now create a layer mask and with a soft round brush tool delete mountains on the bottom… Blend mode change to Lighten.


Step 4
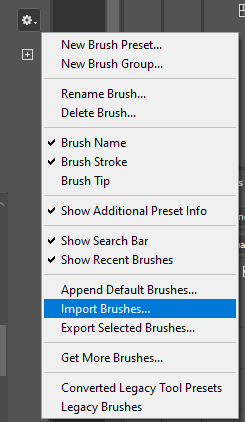
Next, we will add Clouds but first, we need to import brushes. Select a Brush Tool(B) and right-click on the background. Now click on the gear icon and Import Brushes (Select a downloaded brush).

Now we can paint comets. Create a new layer and change the blend mode to Soft Light with foreground color white.

Step 5
Open Moon photo stock, go to File > Open and select Moon. Use Elliptical Marquee Tool(M). With the Elliptical Marquee tool, drag over the area you want to select. Makes an elliptical selection (or a circle, when used with the Shift key). Hold down Shift as you drag to constrain the marquee to a square or circle (release the mouse button before you release Shift to keep the selection shape constrained). To drag a marquee from its center, hold down Alt (Windows) or Option (Mac OS) after you begin dragging.
2 responses to “Create a Destination Above the Clouds in Photoshop”
-

I hate this tutorial so much.
-
why?
-
Leave a Reply