Photoshop is not only powerful on image editing or photo manipulations, but also very useful to produce image creations. Even from scratch, pure from your imaginations. We can take character design for example. When you design a character, you put your imaginations on your canvas. You can do it although you start from a blank canvas, and this tutorial will help you to see the process.
What you’ll be creating
On this tutorial, you can draw a pirate character using Photoshop from blank page without any additional resources or stock images. You’ll use shape layers, understand the highlight and shadow, paint using Brush Tool manually, it just need your patience. Use Adobe Photoshop CS3 or higher, let’s jump in!

Step 1
Create a new document. Then pick Rounded Rectangle Tool (U), set its radius to 40 px and its color to #ebbda1. Draw a rounded rectangle, this will be the face of the pirate. Holding down the shift key while creating rectangle constrains the rectangle to a square.

Step 2
Then pick Pen Tool (P) and check the “Auto Add/Delete” option on the option bar. Go back to the rounded rectangle you’ve made and click on the center of its bottom side to add anchor point. While Pen Tool still active, hold the “Cmd/Ctrl” key to change it to Direct Selection Tool temporarily. Drag the new anchor point downward.

Step 3
Release the “Cmd/Ctrl” and delete two anchor points near to it. The Pen Tool will be automatically converted to Delete Anchor Point Tool when you stick it on the anchor point.

Step 4
To create ears, use Ellipse Tool (U). Hold down “Shift” key while drawing ellipse in order to be in one layer with the face. Then rotate and duplicate it.

Step 5
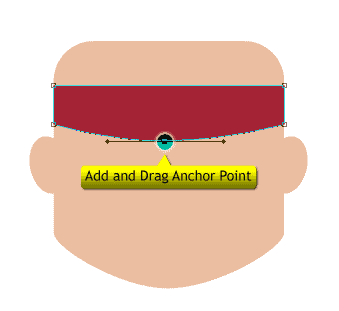
Use Rectangle Tool (U) and set the color setting to #a42335 then draw a rectangle for Headband.

Step 6
Add anchor point on the center of its bottom side and move it down.

Step 7
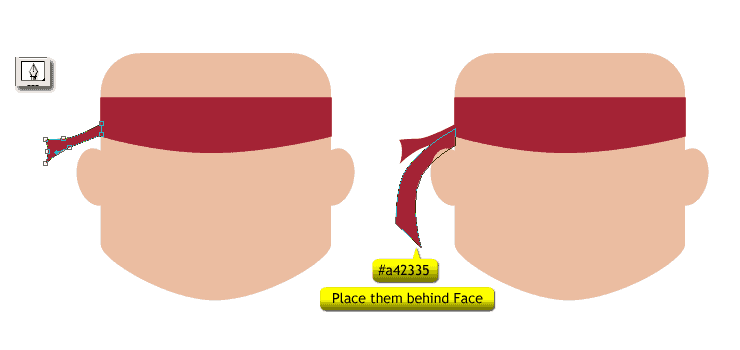
With Pen Tool (P) draw the dangling part of the headband, place it behind the face’s layer.

Step 8
Using Ellipse Tool (U) create a white ellipse for the iris of left eye and black one for the pupil on the center. Group them and name it “Left Eye”.
30 responses to “How to Draw a Cute Pirate Character in Photoshop”
-
Great tutorial thanks for sharing .pls we need more of this,and little more details on reasons for choice of colours
-
Scary
-
you’re not alone bud
-
i hate this
-
Great tutorial it was fun and entertaining so much that i couldnt do it
-
awful. I hate this so much.
-
terrible tutorial.
-
boo!
-
pls is ps use for publishing comics
-
quite interesting :)
-
It is hard for me to comprehend the detail that is needed for this to go through photoshop.
-
Thanks for sharing
-
nice demo
-
awesome
-
Some pen instructions could be clearer on how to do them
-
yes i can’t do the anchor selection on headband
-
-
TOOOOO GOOOD . This site made me to learn photoshop,i love these tutorials
-
I like the idea of this tutorial, it’s very creative and the result looks great.
-
This is a really inspiring collection for all, I like it, thanks for shearing!
-
Thanks a lot for this tutorial! I learnt a lot from this! Keep posting more! <3
-
hello guys! i’m new on photoshop and i having trouble at textures in step 19, can anyone tell more details about this step? thanx! :)
-
Go to layer palette, put your cursor on the black “front part” of the hat, click to activate it. Then Create a new layer using “Ctrl+Shift+N”. Fill it with black, and then create clipping mask using “Ctrl + Alt + G”. Click menu “Filter > Sketch > Chalk & Charcoal” and set like the example.
-
-
Thanks, I learned a lot from this
-
Hey, thanks for the pirate. I have learned some new blending techniques and fogging
-
I have to do this in class and I find it extreamly difficult so i decided to copy and paste it.
-
I will try.
-
Great tutorial, can’t wait to try it. Thank you so much for putting so much work and effort into making it clear.
Happy Photoshoping,
M. -
helo:)
-
wow
-
It wasn’t as hard as it initially felt like it would be. Thank you for the another amazing tutorial, might pass this on to some of my game dev friends :)


Leave a Reply