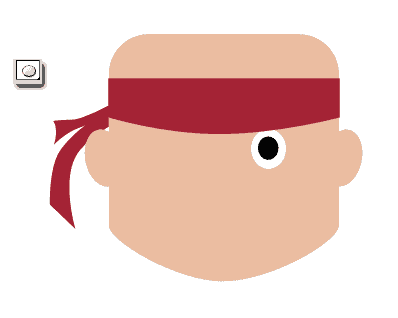
Step 9
Draw black circle and small rectangle on the right side of the face to create eyes’s cover.

Step 10
Then create mouth with white color.

Step 11
Add layer style for the left eye. First, add Drop Shadow with 120 degrees Angle, 1 px Distance and Size. Then add Inner Shadow with same Angle and Distance, but give 5 px for the Size. And use Brush Tool (B) to create a highlight on a new layer above the pupil, with white color and soft round brush tip shape.

Step 12
Also add layer style for the mouth. On Inner Shadow option, set the Choke to 30%. And for Outer Glow, use #5e0000 color.

Step 13
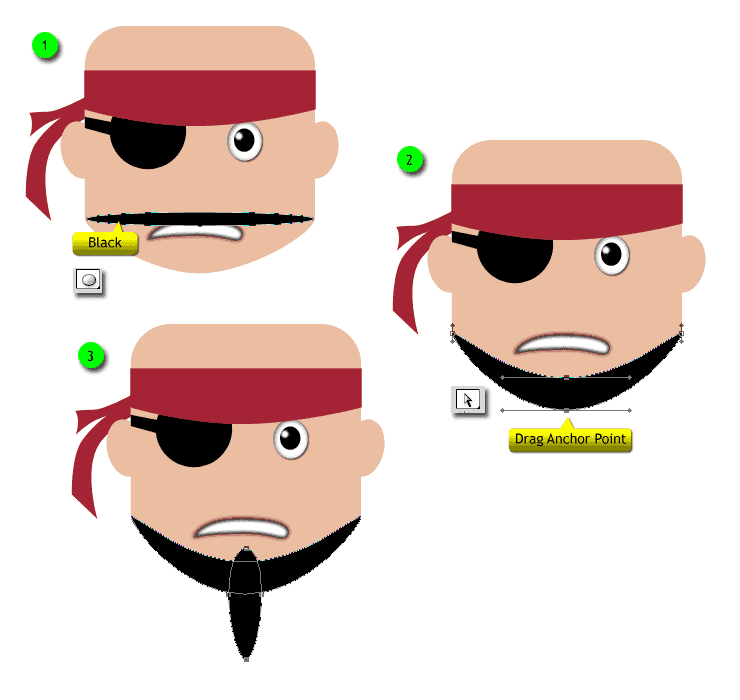
Create a horizontal longish ellipse as shown on the image below. Then drag both of the center anchor points downward. After that, draw a vertical longish ellipse. You can see the following image for reference.

Step 14
Draw an ellipse again for the mustache. Add two anchor poits on the top side and drag the anchor point on the center of top side downward.

Step 15
Then use Pen Tool (P) to draw shape of the hair. You can just draw right side and then copy it by dragging, hold “Opt/Alt” and drag using Path Selection Tool (A) to duplicate, then press “Cmd/Ctrl + T” and Right Click > Flip Horizontal. Then you need to group them all and name it “Head”.

Step 16
For the front part of the hat, draw this shape with black color.

Step 17
And this back part, draw and place it behind the front part.

Step 18
Draw the hem with #b47b02 color.

Step 19
Make a new layer (Cmd/Ctrl +Shift + N) in front of “front part” and fill it with black. Create clipping mask (“Cmd + Opt + G” / “Ctrl + Alt + G”) and give filter, click menu Filter > Sketch > Chalk & Charcoal, and use the following setting.

Step 20
Do the same way for the back part of the hat. Then group them and name it “Hat”.

Step 21
Use Ellipse Tool (U) to create white circle, and place it behind face.

Step 22
To create the legs you must draw them manually using Pen Tool (P). Draw the left or right first then “Opt/Alt + Drag” using Path Selection Tool (A) to duplicate it. When dragging, you have to hold down the Shift key to constrain your movement to perfect vertical.
30 responses to “How to Draw a Cute Pirate Character in Photoshop”
-
Great tutorial thanks for sharing .pls we need more of this,and little more details on reasons for choice of colours
-
Scary
-
you’re not alone bud
-
i hate this
-
Great tutorial it was fun and entertaining so much that i couldnt do it
-
awful. I hate this so much.
-
terrible tutorial.
-
boo!
-
pls is ps use for publishing comics
-
quite interesting :)
-
It is hard for me to comprehend the detail that is needed for this to go through photoshop.
-
Thanks for sharing
-
nice demo
-
awesome
-
Some pen instructions could be clearer on how to do them
-
yes i can’t do the anchor selection on headband
-
-
TOOOOO GOOOD . This site made me to learn photoshop,i love these tutorials
-
I like the idea of this tutorial, it’s very creative and the result looks great.
-
This is a really inspiring collection for all, I like it, thanks for shearing!
-
Thanks a lot for this tutorial! I learnt a lot from this! Keep posting more! <3
-
hello guys! i’m new on photoshop and i having trouble at textures in step 19, can anyone tell more details about this step? thanx! :)
-
Go to layer palette, put your cursor on the black “front part” of the hat, click to activate it. Then Create a new layer using “Ctrl+Shift+N”. Fill it with black, and then create clipping mask using “Ctrl + Alt + G”. Click menu “Filter > Sketch > Chalk & Charcoal” and set like the example.
-
-
Thanks, I learned a lot from this
-
Hey, thanks for the pirate. I have learned some new blending techniques and fogging
-
I have to do this in class and I find it extreamly difficult so i decided to copy and paste it.
-
I will try.
-
Great tutorial, can’t wait to try it. Thank you so much for putting so much work and effort into making it clear.
Happy Photoshoping,
M. -
helo:)
-
wow
-
It wasn’t as hard as it initially felt like it would be. Thank you for the another amazing tutorial, might pass this on to some of my game dev friends :)


Leave a Reply