Paint “Mark the Cute Orange” in Photoshop

Paint “Mark the Cute Orange” in Photoshop

Learn how to paint a detailed 2D illustration in Photoshop. This tutorial will show you techniques such as how to create a concept sketch, paint a background, refinement of the painting, etc.


Preview of Final Results
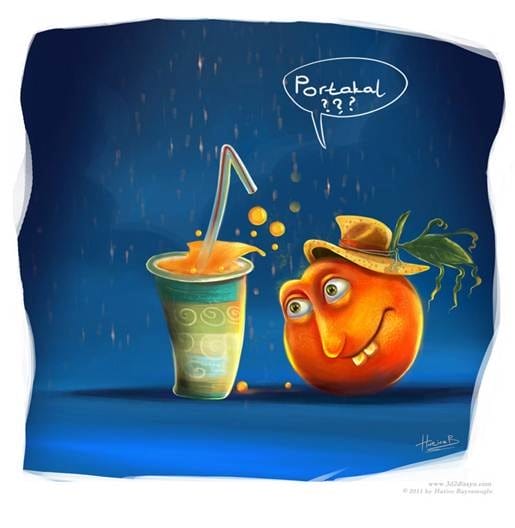
clip_image022

Paint "Mark the Cute Orange" Photoshop Tutorial


Tools used

  • Photoshop CS2
  • Wacom Graphire 4 4×5 USB (Blue)

Step 1

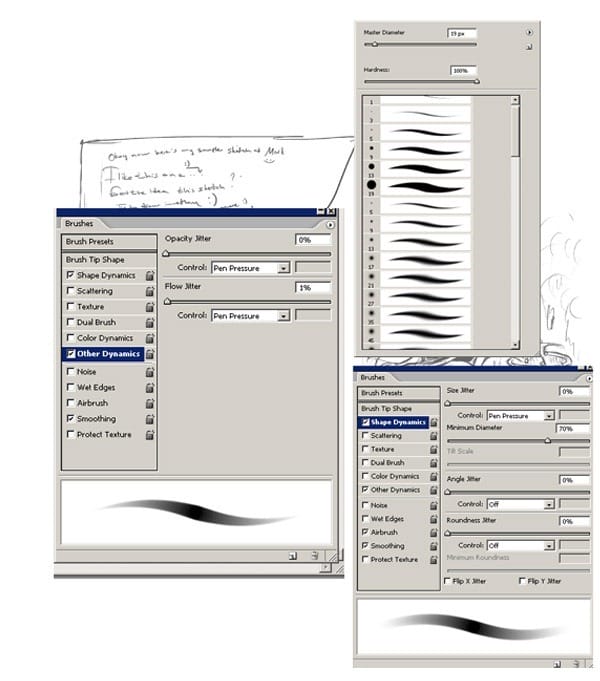
Now maybe it may sound funny at first but I only used a few standard brushes, the hard edge not for any particular reason nor do I not use other brushes. The only adjustments I make to these settings are to the opacity and flow and in my own case I change the, flow, opacity and size jitters respectively to 'pen pressure'. Because I'm using a Wacom tablet.

clip_image003

Step 2

Ok. Here we go. The very first step is to create a base sketches for the main idea. I started with some quick sketches about the character. First I drew some sketches in Photoshop using a small, pressure-sensitive paintbrush.I'm sure the one who know not drawings can manage draw some little quick sketches like this. I start out with thumbnail sketches to get inspirations. I did make quick pencil gesture drawings to explore diverse attitudes and proportions. What is the story all about? Figure out the story first before you do the sketching. It could save you a lot time. Once you figure out what story is and you know about colors then let's start the main sketches and painting process. However, my tutorial will not teach you how to draw cartoon characters. About the sketch, it doesn't necessarily have to be clean. Let's not to try to make it super detailed because the lines will be covered up.

clip_image004

Step 3

I use Adobe Photoshop CS3 and a Wacom tablet for all my digital. This is important. Create a story about each character. Hmmmm now let's think about this character. My orange character has a name of course and his name is Mark J He is a sweet orange toon character and he is looking to this orange water glass in wonder. Trying to get figure out what happened to his friend :D Get the idea about this sketch work? See this is what I am trying to explain to you when I draw him. So here we go. it is always very important to have a background story on all your characters.

clip_image005

Step 4

Finding sources of inspiration for your drawings isn't hard, you might have a favorite childhood character, an over stimulated imagination. Let's start with opening a new document of around 800 pixels by 532 pixels with a resolution of 72px/inch. Now on the first Photoshop file, select your sketch layer and drag the layer to this new file (800x532). Your layer should look like this now and you name it as " Mark sketch" and save your work with the name of "Coloring orange" Ah by the way, resolution must be 72 for now. Later you need to make it bigger to add painting details. But not now. When you drew this picture you don't need to have a very strong hardware.

clip_image006

Step 6

As you are going to see on these steps, coloring and creating the atmosphere is fairly simple with the right tools like Photoshop and other Adobe products. For my character I am going to use only standard brushes with some different pen pressure settings. Let me show how I arrange my brush. First select the Brush Tool and then Right Click on the canvas. Setting up the appropriate brush is certainly important. These settings are under you "Basic Brushes" Under your brushes window, make sure your settings match the ones that I have displayed in the image to the right. Under "Other Dynamics" make sure Opacity Jitter and Flow Jitter are turned on. This is the brush I use for most of my soft shading. it's nice and pressure sensitive. I spent some time on the colors things like the main colors and background color. I add a new layer in Photoshop underneath the drawing and begin coloring background layer.

clip_image007

Step 7

This is a very important stage in creating your artwork is to decide which colors are best for your painting. Here are my colors selection. I want to do something really colorful and warm colors for the cartoon orange painting . I decided for background a dark blue color . Other colors are for the character face and the paper glass. Open an another file and save your colors. And always keep open that new file when you are painting.

clip_image008

Step 8

Now after we selected our colors, we can begin to to color the orange. Don't worry about going out of the lines. That will be cleaned up later on. Once you have done we can begin shading. Remember, start a new layer for each things. Hey see..... I usually end up with lots of layers.......Now select one of the brush and turn off the opacity really low and use a large brush. Make sure the "Mark color" layer is selected not the sketch layer :) Using the large brush, do some general shading for the overall shape of the orange and the paper glass. As you see nothing detailed at this point.

clip_image009

Step 9

Try not to lift your pen too much or release the left click on your mouse. Too many strokes will destroy the smooth gradient effect we are trying to achieve. I'm adding some more colors. Here take a look at the character painting. it's eyes began to look clear at this step. At the next steps I'll work more on the eyes and the body and try to bring the character to life.

clip_image010

Step 10

I took a smaller brush and a darker opacity. I traced around the edges but also defined some of the pencil shading under paper glass and around the orange. Now this looks pretty good but it needs more work. I continue to add more details and opening some new layers when I need. Pay attention to my layer order. Now look at all details. I have created a new second color layer for the character coloring. And also I have just add some colors at the background.

clip_image011

Step 11

Now some shades. Use at least two darker tones to this. Firstly lighter one. Use some small sharp brush with up to 30% opacity. Smudge the hat as in the picture. Take some dark color, set the opacity to 60% and draw some thin lines. And at this step I would like to change the size of my file because I'll begin to add more details so I'll need a bigger file size. I do wish my file is to be more bigger size because at this stage I do think I can't make so much detailed painting. So I open Image/Image Size. And make the settings as you see 4724×2865.

clip_image012

Step 12

This is a window with layers and History taps and the tools are the only windows I have in my workspace. By the way notice I hide some layers. When I want to see only the part I'm working on I hide all the other layers. Do that by clicking the eye icons. Set your background layer to visible again. Another little tip that makes things a lot easier is to set the layer to "lock opacity" This means you will only be coloring over areas that are opaque in this layer. if you are only color in the skin then your strokes won't go outside the lines. And it is good to name your layers so you can easily find what you are looking for.

clip_image013

Step 13

I'm adding some more colors. Here take a look at the character painting. it's eyes began to look clear at this step. Now we can start out detailing our character's hat. I also used Color Dodge for the bright areas.I continue to adding more details. I also would like to add some more details on it's hat like leaf. Three things are done here; I have added darker shadows, added warm colors to the right side of his face, and then I added blue to the shadows. The blue comes from the atmosphere. And lastly, from the atmosphere again, I have added some blue light from the explosion. .and more shading and highlighting. I want to change the orange leaf shape. I don't like that kind of shape for the leaf.

clip_image014

Step 14

Here I decided that the background was too light to depict the mood I was aiming for, so I duplicated the cultured background layer and set the layer mode to overlay... . I don't like working on plain-looking backgrounds so I added some more details.

clip_image015

Step 15

As you see at this step I added detail to hat and I have changed the shape of the leaf. Of course if you want,you can draw different one maybe similar leafs and a different kind of hat for you character. Use your creativity here and, decide what kind of details your character will have.

clip_image016

Step 16

And here as you see I used Smudge Too (R) for smoothing. The smudge tool is used to smear paint on your canvas. The effect is much like finger painting. You can use the smudge tool by clicking on the smudge icon and clicking on the canvas and while holding the mouse button down, dragging in the direction you want to smudge. As you see below on the orange you will use mainly the brush and smudge tool and maybe occasionally the dodge or burn tool for extra highlights and shadows. Eh maybe now you think is is a very long process :) but I say have patience and you efforts will be worth it

clip_image018

Step 17

Here I changed background color a little, I added some details. Here there is a shadow layer and it is reduced the opacity to 60%. You can change the setting as you wish. And always for detailing I only use standard brushes.. Now I continue with the details and the other parts like the dust which are flying in the air. Looks good so far I guess...but let's continue.... now the final steps. Adding as much detail as possible.

clip_image019

Step 18

In the detailing of orange, I used light orange color by mixing some more yellows. . First I click on the Brush Tool (B) and choose a very thin, hard brush I take the Brush again and Pen Pressure on Other dynamics. So details, I think that is the part when I usually being satisfied from the painting. I start in the left where there is no light brighter color in the right where the orange are exposed to the light source in a scene of the light. This creates the set color range you want for each section of the picture, but no strong darks yet. After I've applied my light colors with dodge tool, I go back and begin taking darker colors by taking dark orange color. To make it more shiny or something of the sort use the thin brush and add highlights at the sides like in the picture.

clip_image020

So anyway this is the end of the tutorial. I hope this basic steps helped give you a better understanding of my process and how you can apply it to your own technique and illustrations. Always keep practicing, be creative and enjoy my tutorials J İf you have any questions, please let me know and I am going to try my best to answer you questions. Thanks for reading.

clip_image022
Download Free Presets
Sponsored

Download Lightroom presets and LUTs, absolutely free. Use the presets to add creativity and style to your photos.

One comment on “Paint “Mark the Cute Orange” in Photoshop”

Leave a Reply

Your email address will not be published. Required fields are marked *

cross