
Make your artwork look like they're from an alternate universe. These Cyberpunk presets work with Photoshop (via the Camera Raw filter) and Lightroom. Download all 788 presets for 90% off.

Step 8
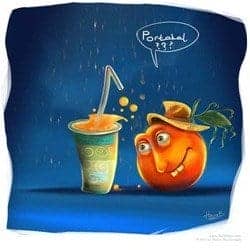
Now after we selected our colors, we can begin to to color the orange. Don't worry about going out of the lines. That will be cleaned up later on. Once you have done we can begin shading. Remember, start a new layer for each things. Hey see..... I usually end up with lots of layers.......Now select one of the brush and turn off the opacity really low and use a large brush. Make sure the "Mark color" layer is selected not the sketch layer :) Using the large brush, do some general shading for the overall shape of the orange and the paper glass. As you see nothing detailed at this point.

Step 9
Try not to lift your pen too much or release the left click on your mouse. Too many strokes will destroy the smooth gradient effect we are trying to achieve. I'm adding some more colors. Here take a look at the character painting. it's eyes began to look clear at this step. At the next steps I'll work more on the eyes and the body and try to bring the character to life.

Step 10
I took a smaller brush and a darker opacity. I traced around the edges but also defined some of the pencil shading under paper glass and around the orange. Now this looks pretty good but it needs more work. I continue to add more details and opening some new layers when I need. Pay attention to my layer order. Now look at all details. I have created a new second color layer for the character coloring. And also I have just add some colors at the background.

Step 11
Now some shades. Use at least two darker tones to this. Firstly lighter one. Use some small sharp brush with up to 30% opacity. Smudge the hat as in the picture. Take some dark color, set the opacity to 60% and draw some thin lines. And at this step I would like to change the size of my file because I'll begin to add more details so I'll need a bigger file size. I do wish my file is to be more bigger size because at this stage I do think I can't make so much detailed painting. So I open Image/Image Size. And make the settings as you see 4724×2865.

Step 12
This is a window with layers and History taps and the tools are the only windows I have in my workspace. By the way notice I hide some layers. When I want to see only the part I'm working on I hide all the other layers. Do that by clicking the eye icons. Set your background layer to visible again. Another little tip that makes things a lot easier is to set the layer to "lock opacity" This means you will only be coloring over areas that are opaque in this layer. if you are only color in the skin then your strokes won't go outside the lines. And it is good to name your layers so you can easily find what you are looking for.
One comment on “Paint “Mark the Cute Orange” in Photoshop”
Can portakal :)