
Make skin look perfect in one-click with these AI-powered Photoshop actions.

Step 13
I'm adding some more colors. Here take a look at the character painting. it's eyes began to look clear at this step. Now we can start out detailing our character's hat. I also used Color Dodge for the bright areas.I continue to adding more details. I also would like to add some more details on it's hat like leaf. Three things are done here; I have added darker shadows, added warm colors to the right side of his face, and then I added blue to the shadows. The blue comes from the atmosphere. And lastly, from the atmosphere again, I have added some blue light from the explosion. .and more shading and highlighting. I want to change the orange leaf shape. I don't like that kind of shape for the leaf.

Step 14
Here I decided that the background was too light to depict the mood I was aiming for, so I duplicated the cultured background layer and set the layer mode to overlay... . I don't like working on plain-looking backgrounds so I added some more details.

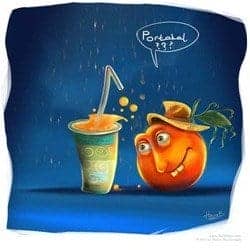
Step 15
As you see at this step I added detail to hat and I have changed the shape of the leaf. Of course if you want,you can draw different one maybe similar leafs and a different kind of hat for you character. Use your creativity here and, decide what kind of details your character will have.

Step 16
And here as you see I used Smudge Too (R) for smoothing. The smudge tool is used to smear paint on your canvas. The effect is much like finger painting. You can use the smudge tool by clicking on the smudge icon and clicking on the canvas and while holding the mouse button down, dragging in the direction you want to smudge. As you see below on the orange you will use mainly the brush and smudge tool and maybe occasionally the dodge or burn tool for extra highlights and shadows. Eh maybe now you think is is a very long process :) but I say have patience and you efforts will be worth it

Step 17
Here I changed background color a little, I added some details. Here there is a shadow layer and it is reduced the opacity to 60%. You can change the setting as you wish. And always for detailing I only use standard brushes.. Now I continue with the details and the other parts like the dust which are flying in the air. Looks good so far I guess...but let's continue.... now the final steps. Adding as much detail as possible.
One comment on “Paint “Mark the Cute Orange” in Photoshop”
Can portakal :)