Luminar AI lets you turn your ideas into reality with powerful, intelligent AI. Download the photo editor and see how you can completely transform your photos in a few clicks.
This is a detailed and step by step tutorial for creating an Vector based cover page design in Photoshop. This tutorial demonstrates effective usage of Photoshop's vector tools and techniques. PSD file included.
Preview of Final Results
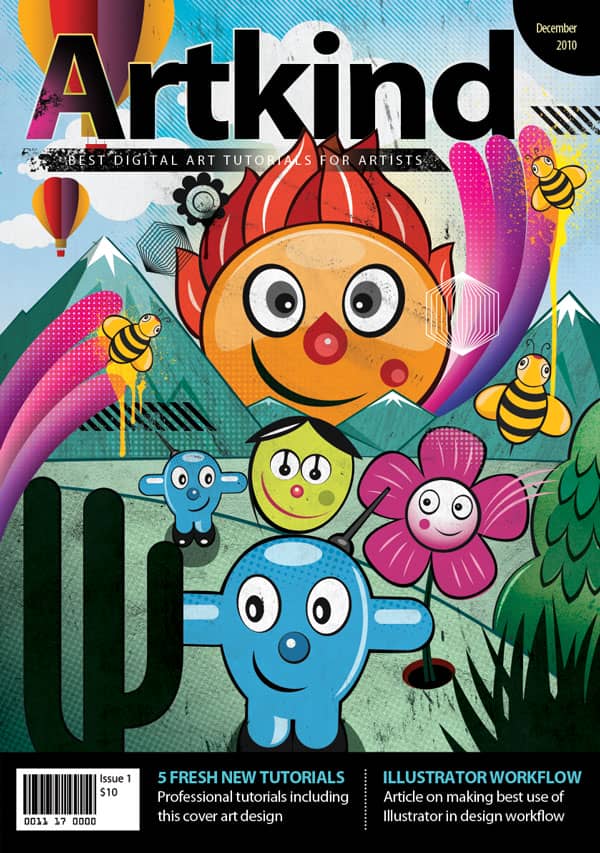
Create a Vector Style Magazine Cover Photoshop Tutorial
Resources
- Halftone Pattern - Vecteezy
- Texture1 - Caleb Kimbrough
- Texture2 - Bashcorpo
- Texture3 - Caleb Kimbrough
- Texture4 - Princes of Shadows
- Texture5 - Zen Textures
- Paint Texture Pack - Media Militia
- Drippy Spray Brushes - Colorburned
- Grungy Film Brushes - Colorburned
Step 1 : Setting up the Document
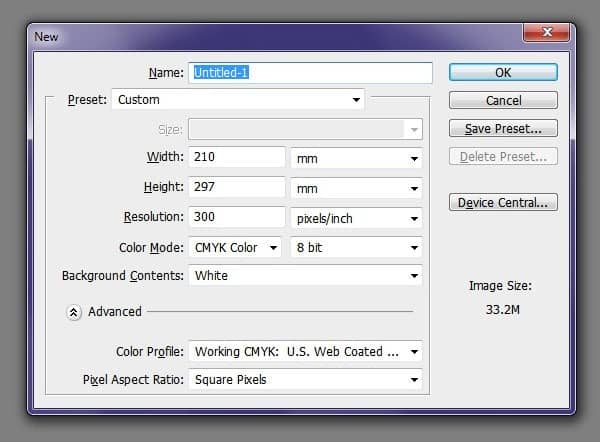
Create a new document with the below settings. This is basically A4 (210 X 297) size document. There are many sizes when it comes to magazine layout. More often you will be given the magazine size and less often we decide on it. But for this project we will proceed with our own size which is also a standard magazine size.
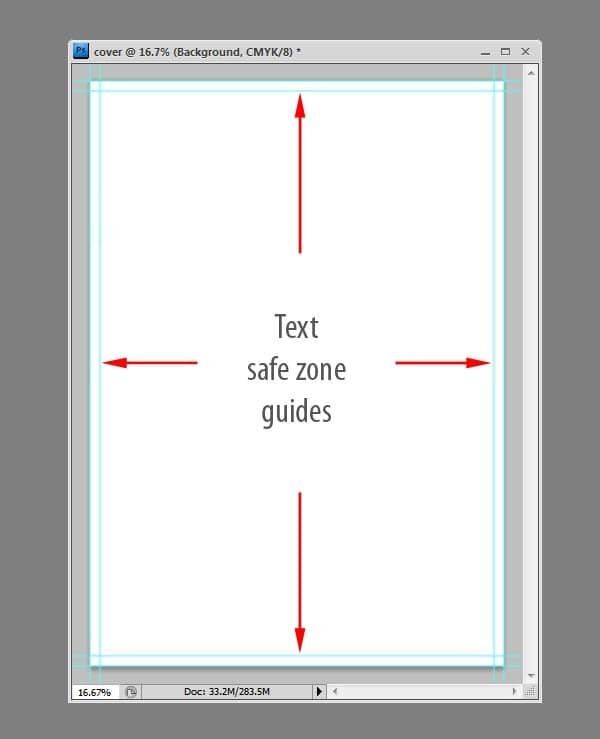
Set the measurement units to Millimeters by right clicking on the Ruler. Add guides on the four sides of the document. And then add guides at 5mm distance from the document’s border on four sides of the document. These are text safe margins. We limit our text to this area.
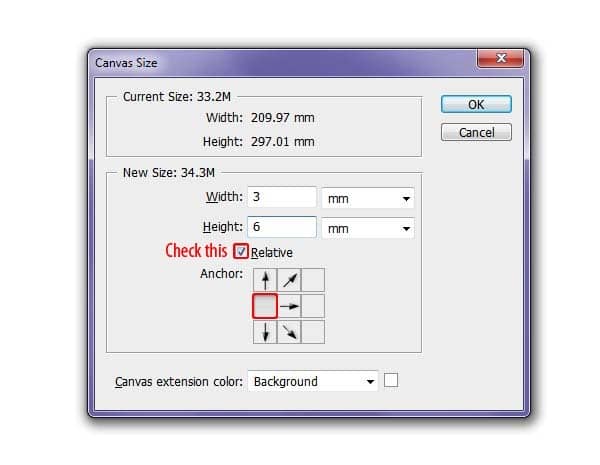
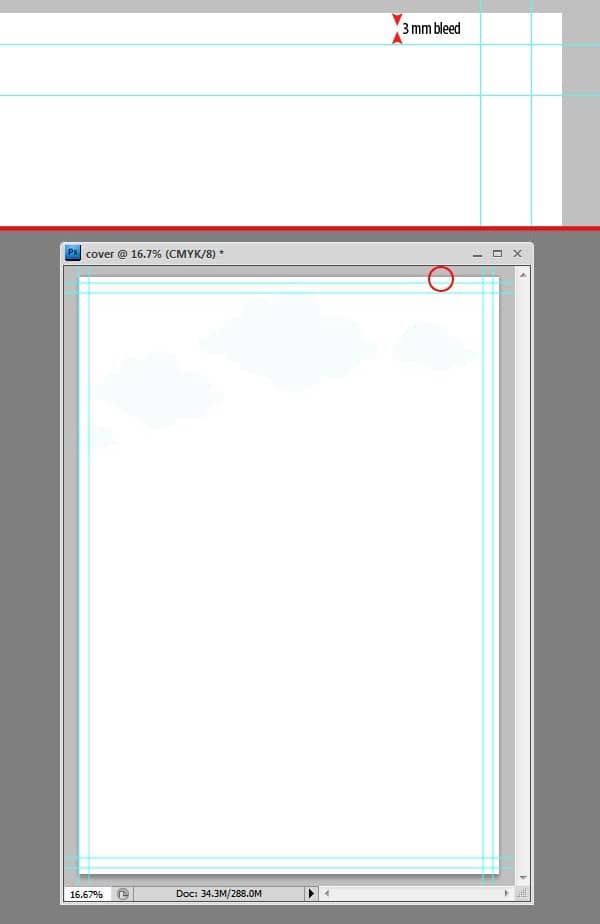
Provide a little room for errors when trimming. Set a 3mm bleed. This is very simple, extend the canvas by 3mm except on the left side since the cover page doesn’t get trimmed on the left side there is no need to set the bleed. Press Control+Alt+C or go to Image > Canvas Size to load the Canvas Size dialogue box and enter the values.
Step 2 : Sketch
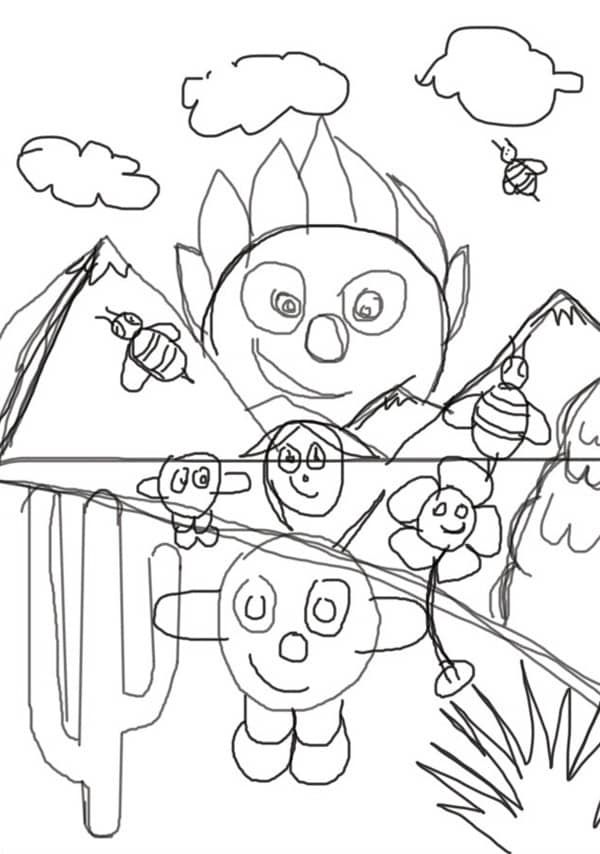
After a bit of brainstorm I’ve come up with this loose sketch done in Photoshop. This is the base of our illustration. It is a pretty simple and loose sketch not very detailed but will serve our purpose well. These are the elements that we will be creating during the course of this tutorial. Coming to colors I wanted it to be simple flat colored illustration. We will add details as we progress through the tutorial. We will create the characters first then create the remaining next.
Step 3 : Creating the Sun
One thing I want you to follow through the rest of the tutorial is maintain objects in Groups. Before you create any major character or object create a new group and create layers in that group. This will save you from lot of mess. Now start by actually creating the Sun character. Create a new group. Go to Layer > New > Group or by clicking on the Create a new group icon on the bottom of the Layers palette. Rename it to "Sun" Grab the Ellipse tool, on the Options select Shape layers option, set the color to a nice orange or #e0912e and draw this oval shape. Make sure that the layer is created in the "Sun" group.

Draw another oval on top of the previous layer with Ellipse Tool with color #f3d28f.

Grab the direct selection tool select the bottom anchor point of the oval shape hold Shift key and move it upwards to the center. Set the layer opacity to 60%

With the Ellipse Tool selected draw a smaller oval. Set the color to #ffffff and reduce the opacity to 30%. You can set the shape layer color by double clicking on the layer thumbnail.

Now create eyes. Draw an oval like below with the Ellipse Tool. For color set #000000. Draw another oval on top of it with color #ffffff.

Add more details like below with Ellipse Tool.

Select the eye layers by holding Ctrl and clicking on the layers and go to Edit > Free Transform and rotate the eye about -20 degrees and press enter to confirm the transformation. Use the Info palette to see how much you are rotating.

Now the eye is created on one side, we need to duplicate it and place it on the other side. To do this select all the eye layers choose Layer > Duplicate layers. This will duplicate the eye and now press Ctrl+T then right click on the bounding box choose Flip Horizontal option from the context menu.

We forward to the nose. Draw a circle with the Ellipse tool like below. Set color #9d2429.

Draw a rectangle with the Rectangle Tool on the circle. Set the same color as above. Press Ctrl+T and rotate it about 45 degrees to match the below image. Press Enter key to confirm it.

Add some highlights with Ellipse Tool.

Now create the smile using a simple technique that I am going to show you. Draw a circle like below.

Now click on the Vector mask thumbnail of the circle you just drew. Grab the Ellipse Tool select Subtract from shape area option or Press the "Alt" key and draw a circle like below. Note that you are actually drawing inside the vector mask. See the result.

Add a little blush to the sun.

Draw flames using the Pen Tool. Create them below the sun's base layer.

Our Sun character is finished. I wanted to give it an extra treatment. Add strokes with the Pen tool. Pick a dark brown color or #2c1617. Draw a shape around the sun below all other layers.

Draw strokes to the flames on top of flames layers.

Now draw some highlights with Pen Tool.

Step 4 : Creating the Little Robo
Turn off the "Sun" group. So we can work on a plain background. We can turn it on later. Create the Little Robo character that we have in the sketch. Create a new group and rename it to "Little Robo". Create everything related to this character in this group. Take the Ellipse tool, set the color to #65a4d0 and draw similar shape.

Remove the middle anchor points with Delete Anchor Point Tool. Select the top anchor point with Direct Selection Tool.

Pick the Convert Point Tool, hold Shift key and click on the anchor point and extend the handle like in the below image.

We need to add hands and feet to the character. Click on the Vector mask thumbnail of the shape you just drew, grab the Rounded Rectangle Tool and draw in the vector mask.

Create eyes with shape layers same as we did earlier. Create one eye first, rotate it a bit, duplicate and flip it horizontally to make a pair.

Create smile using the same technique we used before.

Draw the nose.

Draw the Shoes.

Draw this shape around the character under all other layers in the stack.

Draw antenna with Pen Tool.

Now draw some highlights. Draw an oval with color #c8e5f2.

Pick the Rectangle Tool. Draw inside the vector mask holding the "Shift" key.

Pick the Ellipse Tool, Press "Alt" key and draw like in the below image.

Add one more highlight with Pen Tool.

Step 5 : Drawing the Girl Character
We use the same methods to create this character. Create a new group. Rename it to "Girl". Draw the following shape.

Duplicate the above layer by pressing Ctrl+J. Resize it a bit and change the color to #d6dd55.

Create eyes.

Create the smile like we created earlier. Draw an oval and select Subtract from shape area option on the Options bar. Draw inside the Vector mask to subtract.

Draw nose with Ellipse Tool.

Draw the remaining details following the image below.

Step 6 : Creating the Flower Character
Start by creating a new group called "Flower". Pick our best friend Ellipse Tool, set color to #000000 draw a circle. Create another circle on top of it.

Apply gradient to this light colored circle. Click on the FX icon on the bottom of the Layers palette and choose Gradient Overlay. Apply the below settings.

Resulting image.

Now start creating eyes and other facial details.

Next step is to draw petals. We need to create one petal and then we can duplicate it and rotate it.

We created one petal. Here is the tricky part, we can just duplicate the petal layer multiple times and rotate it around the flower's face. But that creates a few extra layers. We can avaoid extra layers by drawing in the Vector mask. Exactly how we did previously. Just click on the Vector mask thumbnail of the petal, this selects the path. Now press Ctrl+C to copy the existing path and press Ctrl+V to paste it. The path will be pasted on the same location where we copied it. Press Ctrl+T to transform it, set the registration point to somewhere to the middle of the flowers face. Hold by the corner of the bounding box and rotate it.


Draw stroke above the flower layer with Pen Tool.

Add some detail with the Pen Tool.

Draw the stem with Pen Tool. Place this below all the other layers in the stack. Follow the steps in the following image.

Step 7 : Creating the Bee Character
Create a new group called "Bee". Draw the below shape. Set the color to #efc035.

Draw the head with Ellipse Tool. Add some stripes to the bee's body. Draw them with the Pen Tool.

Clip the stripes to the bee's body. Select the layer and press Ctrl+Alt+G or hold the Alt key and click on the layer's border in the layers palette.

Adding details.


Add strokes to our character.

Step 8 : Background
At this point all characters are completed. Next create sky background. Create a new layer and place it at the very bottom of the Layers palette. Create gradient with colors #a7d0f5, #ffffff.

Step 9: Mountains
Create a new group called "Mountains". Place this group above "Sun" group. Draw mountains with Pen Tool. Make sure shape layers option is selected.

Use Pen Tool to draw strokes.

Draw some shadows, clip them to the mountains below .

Add snow to the mountain tops.

Step 10 : Ground
Create two groups above the "Mountains" group. Rename them as "Above ground", "Below ground". Now draw this shape in the "Above ground group".

Draw another ground shape in the "Below ground" group.

Apply gradient to the ground. Use the following values.

Add stroke using Pen Tool .

Step 11 : Drawing plants.
Create a new group called "Plants" and place it above the ground layers. Let’s start by creating cactus. Follow the steps.


Draw the other side.

Ctrl+click on the Vector mask. Contract the selection by 10 pixels. Go to Select > Modify > Contract. Create a new layer and fill the selection with #162116.

Create bush. Pick the Pen Tool, start with one simple curve then create more by drawing in the vector mask.

Step 12 : Create another plant
Draw another plant. Create a new group called "Bushy Plant". Select the Pen Tool and draw the outline of the plant. Place the group between the two ground layer groups.

Add a stroke. Duplicate the above shape and change the color to #0c0e0d. Place it under the above layer.

Give some color treatment to the plant, create a new layer above the plant shape, take a large soft brush, pick a bright green color and add some color.

Clip the layer to the shape layer, change the blending mode to Luminosity.

Draw leaf outlines.

Step 13 : Drawing Clouds
Creating clouds is quite simple. Start by creating one shape layer and draw inside the vector mask holding "Shift" key. Once a full cloud is completed just select the paths with Path selection tool, copy and paste them to create multiple copies. Resize a bit by pressing Ctrl+T. Place this layer above the "Sky" layer.

Step 14 : Organize layers
Take a look at our Layers palette notice how things are organized.

Step 15 : Setting up the characters
Turn on the "Sun" group. Reposition it as below.

Turn on the "Little Robo" group. Arrange it like below.

Now draw shadow to the robo character. Create the shadow with Ellipse Tool or using Pen Tool, place it at the very bottom of the layer stack of the group. Set color to #000000, reduce the layer opacity to 50%.

Turn on other characters as well and arrange them similar to the image. Resize them if your characters happen to be big, click on the group and press Ctrl+T and reduce the size.

Add some more bees to the composition. Select the bee group and drag and drop it on to the Create new layer icon on the Layers palette. This duplicates the group. Right click on the group and choose Convert to smart object. We can easily duplicate it by pressing Ctrl+J. Create one more copy of it and arrange them as you see below.

Step 16 : Flourishes
Create a new group called "Flourishes", place it above the "Bee" group. Draw this simple shape with Pen Tool. Use any color.

Duplicate the layer a couple of times to get this result.

Apply gradients.

Right click on the shape layer to which you applied gradient. Choose copy layer styles, right click on the other shape and choose Paste layer styles. Double click to load the Layer styles dialogue box and apply the following gradient. No need to touch the bevel. Just adjust the gradient.

Repeat the process.

Reposition the group.

As you can see the flourishes are above the sun and mountains. I want them to look like they are coming from behind the sun. So we need to mask out the overlapping areas. Add a Layer mask to the folder and follow the steps.

Duplicate the "Flourishes" layer group. Press Ctrl+T and right click on the selection, choose Flip Horizontal. Rotate a bit and reposition like in this image.

Step 17 : Adding highlight
Let’s add some highlights behind the sun. Create a new layer,rename it as "Highlight" and place it below the clouds. Pick a color, here I used #fff9d5, with a large soft brush add some highlights.

Step 18 : Texturing - Background
Open the Halftone textures file in Illustrator. Copy this pattern by pressing Ctrl+C.

Back in Photoshop paste the texture by pressing Ctrl+V. Paste it as Smart Object.

Send it below to "Highlight" layer and reposition it.

Open Texture 1, desaturate it by pressing Ctrl+Shift+U. Drag and drop it into the main file. Place it just above the "Clouds" layer. Set the blending mode to Multiply and set the opacity around 30%.

Step 19 : Texturing - Sun
Open Texture 2. Draw a selection with Rectangular Marquee Tool. Press Ctrl+Shift+U to desaturate. Press Ctrl+L to load Levels dialogue box, apply the settings.


Now copy the selection, paste it in the main file. Place it at top in the "Sun" group.

Change the texture blending mode to multiply. Add a Layer mask and Mask out any hard edges.

Step 20 : Texturing - Mountains
Open Texture 3 and draw a selection. Desaturate it and run Levels command by pressing Ctrl+L. Use the below values.

Copy and paste it into the main file. Place this layer in the "Mountains" group above the mountain(the left one) layer.

Press Ctrl+T, right click on the bounding box, choose Distort. Now distort by the top right corner until you find it similar to the image.

Change the texture blending mode to Multiply. Reduce the Opacity to 70%. Clip this layer to the mountain. Repeat this process to texture the other mountains, just duplicate the texture and clip it to the appropriate layer. For the right most mountain I flipped the texture horizontally.

Step 21 : Texturing - Ground
Let’s apply texture to the ground. We will use the same process to texture the ground. Open the Texture 4 and desaturate it.

Drag and drop in to main file. Place it in the "Above ground" layer group at very top. This texture is a vertical one, rotate it 90 degrees in counter clock wise.

Press Ctrl+T and enlarge the texture until it covers all the ground while holding the Shift key. Then Clip it to the ground layer. Change layer blending mode to Multiply.

Now duplicate the above texture and apply it to the other ground layer. Simply press Ctrl+J to duplicate the texture layer and move it to "Below ground" layer group. Place it just above the ground layer. Reposition it to cover all the ground. Now we can clip this to the ground layer but since the ground layer has a Layer style applied clipping won't have any result. Instead Ctrl+Click on the Vector mask of the ground layer to load the selection. Now click back on the texture, while the selection is active click on the Add layer mask button at the bottom of the Layers palette. This creates the layer mask.

Our image so far.

Step 22 : Texturing - Plants
Open the Textre-5. Select a portion, desaturate it and increase the contrast using Levels. Use similar values used before.

Copy and paste the selected portion into main file. Place this layer in "Bushy Plant" group at the very top.

Mask out the area outside the plant shape using Layer mask. Load selection by clicking on the plants Vector mask, back on the texture clicking on Add layer mask button. Change the blending mode to Color Burn, set the opacity to 80%.

Texture the other plants as well using the same method. Use any of the textures or just duplicate and apply the previous texture.

Step 23 : Adding halftone patterns
Create a new layer in "Flourishes" group. Select the Brush Tool set a large radius. Pick a nice pink color or #f00ebfa. Paint a blob.

Go to Filter > Pixelate > Color Halftone. Apply these settings. Change the layer blending mode to Overlay.

Mask out the area outside the flourishes. Hold Ctrl+Shift and click on all three Vector masks in the group to load multiple selections. Now click on the halftone pattern and click on the Add layer mask button.

Now duplicate the halftone pattern layer. Click on the Layer mask and press Ctrl+I to invert the Layer mask. Click on Layer thumbnail press Ctrl+Shift+U to desaturate the layer. Press Ctrl+I to invert the layer. If the effect is not strong duplicate the layer a couple of times.

Add another halftone pattern. Create a new layer in "Mountain" group. Pick a medium gray and add a spot. Apply halftone pattern with the same settings used before. Follow steps you see below.

Create a black and white gradient. Apply Halftone pattern. Move it into the "Below ground" group. Position it on top of the ground layer. Change the Blend mode to Soft Light. Mask out unwanted area by loading selection from the ground layer.


Step 24 :Adding Custom Elements
Open the Illustrator file provided below. Copy and paste shapes into our file as Smart Objects. You can apply layer styles to them. Once you arrange them group them as "custom elements". Place it above the "Flourishes" group.

Step 25 : Add paint texture
Open the 22.png from the "Drips and Spray Paint Pack". Drag and drop it into the main file.

Use layer mask to erase areas where it is too strong. Reduce the Opacity to 30%.

Duplicate the paint texture. Press Ctrl+T, right click on the bounding box and choose Flip Vertical. Reposition it at the bottom of the layout. Select the two layers and press Ctrl+G to group them and rename it as "Paint Texture".

Load the "Drippy Spray Brushes". Create a new layer and under the bees, pick a spray paint brush. Add splats. Change the blending mode Hard Light.

Step 26 : Title
Now add title. I chose the name "Artkind". Create a new group called "Title". Place it at top in the layer stack. Select the Horizontal Type Tool and type the text. I used Myriad Pro family to create the entire text. You can choose any similar font. But always limit your fonts to 2 to 3 types. Turn on the guides to make sure the text is within the text safe zone.

Ctrl+Click on the title layer, goto Select > Modify > Expand. Expand the selection by 9 pixels. Create a new layer below the title and fill the selection with #ffffff or white. Rename this layer as "Stroke".

Create a new layer above the "Stroke" layer. Paint some bright greens with a large soft brush. Now clip this to the "Stroke" layer below. Change the "Stroke" layer blend mode to Lighten.

Step 27 : Caption bar
Draw this shape with the Pen Tool inside the "Title" group . Add the some caption.

Load the "Grungy Film Brushes". Add a layer mask to the caption bar. Press 'D' to set the colors to default. Pick a brush from the Grungy film brushes. Paint on the either edges in the Layer mask to get this grungy look. Pick a large soft brush and paint in the middle of the caption bar. Follow the image.

Step 28 : Text
Create a new group called "Text" below the "Title" group. Add strips. We will add text on top of the strips.

Add Month & Year. I used Myriad Pro Condensed.

Copy and paste barcode from the resources file into "Text" group. Reposition it like below.

Add some text with the Type Tool.

Add a divider. You can create it very easily in Illustrator.

Step 29 : Finishing Touches
Now add a vignette. Create a new layer below the "Text" group called "Vignette". Pick a large soft brush with #000000; paint on the edges of the document.

Change the layer Blend mode to Overlay. The effect is a bit strong on the lower part. Add a Layer mask to hide the effect.

Draw with a black&white gradient inside the mask. Make sure white is at top.

Create a new layer above the title layer. Add a nice pink color with a soft brush. Clip it to the title layer. Grab the Eraser Tool. Select a grunge brush from the "Grungy Film Brushes". Erase a bit.

Load selection from the sun's outline layer and click on the title layer, click on the Add layer mask button. See the result.

Add grunge effect to the stripes. Add a mask. Use a grunge brush to erase.

Preview of Final Results
![final-results[1] final-results[1]](https://cdn.photoshoptutorials.ws/images/stories/cba1361524db_1458/final-results1.jpg?strip=all&lossy=1&quality=70&webp=70&avif=70&w=1920&ssl=1)
Download the PSD
Artkind.zip | 13 MB
8 comments on “Create a Vector Style Magazine Cover in Photoshop”
You would do anything in your power to make your best friend's day even better. That could mean picking up their go-to coffee in the morning, or sending a funny TikTok you know will make them LOL. It could also mean that whenever they post a cool pic, you’re the first to like it. As their No. 1 fan on social media, you’ll also need the best comments to leave on Instagram for your bestie as well. After all, you know you can't just drop them a like. A stunning selfie in their OOTD or foodie pic of their lunch order deserves all the love with some funny Instagram comments from yours truly.
Hello Niranth, this was truly a fun filled tutorial!!!! Thank you very much for supplying such a detailed and organized project. I have recently finished this tutorial and was wondering if I could post this on my portfolio site? I would be sure to give you credit. Just let me know if you ever have the chance. <3
Sincerely - Auzurial
you took my name
Learn to type friend
can u plz mail me d psd file as ders some downloading error wic im facing..plaeas do it by 2mrw...its really very urgent
You are amazingly talented ... wow, I loved that. Makes me proud to be an artist. Thanks!!!!
Nice idea and a wonderful lesson
no