Using 3D text effect as main design element wasn’t something new. I’m pretty certain that most of us has been seen 3D text in many place like magazine, poster or in the internet. Years ago, we need 3d application and some skills to create believable 3d text. But since Adobe released Photoshop CS5 in 2010, we really can depend on it to create cool 3d text. Feeling anxious about this topic? If you really want to learn, keep on reading to find out how we’re going to make it.
Preview of Final Results

“Clock Up” Wallpaper Photoshop Tutorial
Resources
- wall texture – sxc.hu
- sun rise – sxc.hu
- cosmos aura – sxc.hu
- plasma explosion lighting – sxc.hu
- brown planet – sxc.hu
- blue planet – sxc.hu
- space universe – sxc.hu
- 24 clouds brush – brusheezy.com
- 4 clouds – brusheezy.com
- 16 clouds – brusheezy.com
Step 1
Inside Photoshop, create a new document with 800×600 px wide with 150dpi resolution.

Step 2
Fill the background layer with black then type the text you want, mine was ‘clock UP’. For optimal result, choose thick font with unique shape. As for the text color, make sure you set it white.
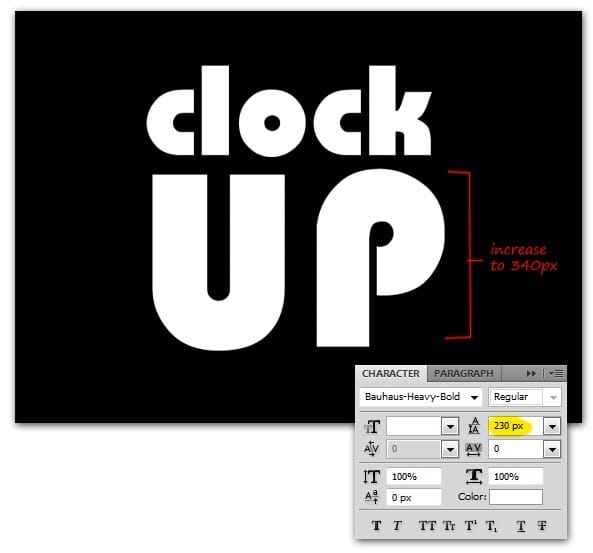
I assume you type the same word as i do, so arrange the word ‘clock’ to 168px size, whereas the word ‘UP’ reside below it with larger size, around 300px.

Step 3
Show the Character panel ( from the Window> Character menu if you didn’t know how ). Inside the Character panel, set the leading to 230px. This will reduce the gap between ‘clock’ and ‘UP’ words. I’m also increase the font size for the word ‘UP’ to 340px, so both words wide is equally each other.

Step 4
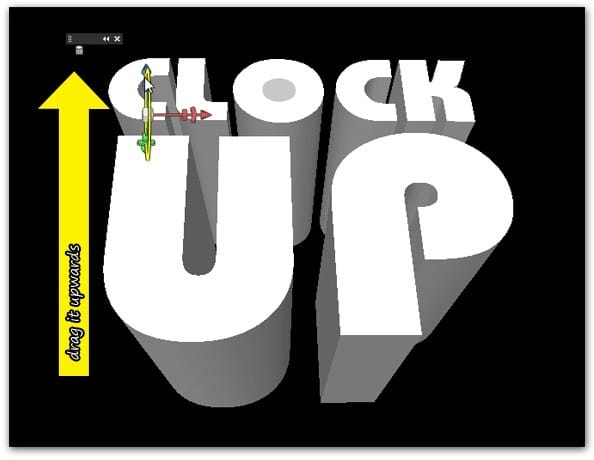
Transform text to 3D by using the menu 3D> Repouse> Text Layer. When the Repousse Dialog appear, rotate the mesh option is activated by default. So now you can drag the 3D text vertically upwards to get the 3D text perspective like shown in the image below.

Step 5
Still inside the Repousse Dialog, look at the Extrude section. Reduce Depth value to 0.51 and Scale to 0,79. This will reduce extrudes depths while also enhance the perspective feels. In case you want bigger 3d text, click on the Scale the mesh option. Drag to right direction to increase the 3D text, while drag to left would decrease it. Click OK when you’re done.

Step 6
The text layer become 3D layer now. Next, go to Window> 3D to show the 3D panel’s. Inside the 3D panel, select By Whole Scene filter. Click Scene category then choose Ray Traced Final from the Quality option.
6 responses to “Create a “Clock Up” Wallpaper in Photoshop”
-
Nice and simple,thank you
-
TIKAL HINDI TAPOS
-
Nice. good work
-
Thank you sooooooo much! Brilliant work, very easy to follow and much to learn!
-
Bauhaus-heavy-bold
-
Whats the name of the font your using?


Leave a Reply