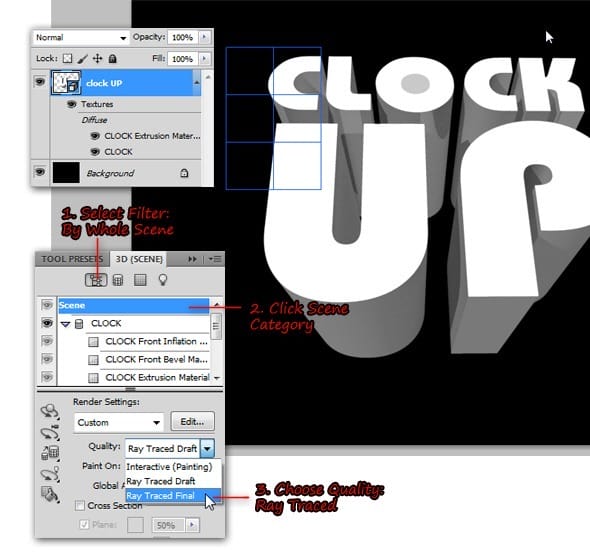
Photoshop will start rendering your 3D text, it will takes some time to render the 3D text (depending on your hardware and ram/memory ) so just wait until it’s done.
Note: the rendering process will be interrupted if you do something ( such as moving the 3D text layer or change the layer blend mode ). If you coincidentally do this, just go back to 3D panel and set the Quality again, this way Photoshop will render the 3D text again.

Step 7
When the rendering is done, you’ll get a smooth pretty 3D text like shown in the image below. Now go to Layer> Rasterize> 3D to rasterize the 3d layer.From now, the rasterized 3d text layer will be called ‘clock up’ layer.
Open texture image. Select All ( press Ctrl+A ), then copy it to the clipboard via Ctrl+C.

Step 8
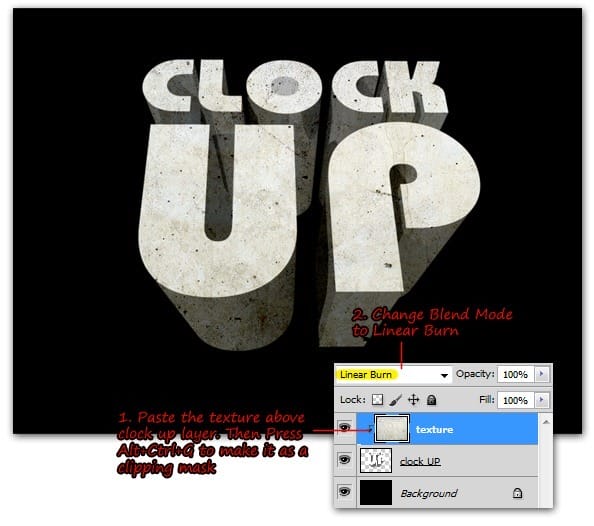
Back to our 3D text document, press Ctrl+V to paste the texture image above clock up layer. Make texture layer as a clipping mask layer and then change the blend mode to Linear Burn.

Step 9
Hide texture layer, then create a selection on the front face of the 3D text using Magic Wand tool. To make selection easier, make sure you select the Add to selection option and Sample All Layer is checked from the option bar.

Step 10
Reverse selection by pressing Shift+Ctrl+I. Make sure you’re on the texture layer, now click Add layer mask button to transform the selection into layer mask. Now you can see the texture only appears inside the extrusion areas.

Step 11
Make a copy of texture layer (simply pressing Ctrl+J would works) then clear the layer mask, but keep the clipping mask activated.This time, change the blend mode to multiply.

Step 12
Back to clock up layer, add Gradient Overlay for it. Inside Gradient Overlay dialog, choose Overlay as the blend mode then adjust gradient color, so it will be mix between blue and purple color.

Step 13
Open space universe image, select then make a copy of it below clock up layer, rename it to space layer. Go toed it> Transform> Rotate 90 CW menu to rotate space image. Later, use free transform command ( press Ctrl+T ) to decrease space image size.
6 responses to “Create a “Clock Up” Wallpaper in Photoshop”
-
Nice and simple,thank you
-
TIKAL HINDI TAPOS
-
Nice. good work
-
Thank you sooooooo much! Brilliant work, very easy to follow and much to learn!
-
Bauhaus-heavy-bold
-
Whats the name of the font your using?


Leave a Reply