Make skin look perfect in one-click with these AI-powered Photoshop actions.
Learn how to edit your photos using AI while still getting realistic results. This tutorial will help you tackle AI challenges such as fixing abnormalities, refining hand details, and matching noise patterns. By the end of the tutorial, you'll know how to produce professional-quality images suitable for stock photo websites and professional projects.
Preview of Final Results
In this tutorial, we'll be replacing the outfit of this model using Photoshop's Generative Fill. We'll fix the abnormalities to create an image that does not look AI-generated.

Step 1: Creating a Selection of the Replacement Area
There are many ways you can use generative fill, such as adding/removing objects or changing objects. In this tutorial, we'll be changing the outfit of this model.
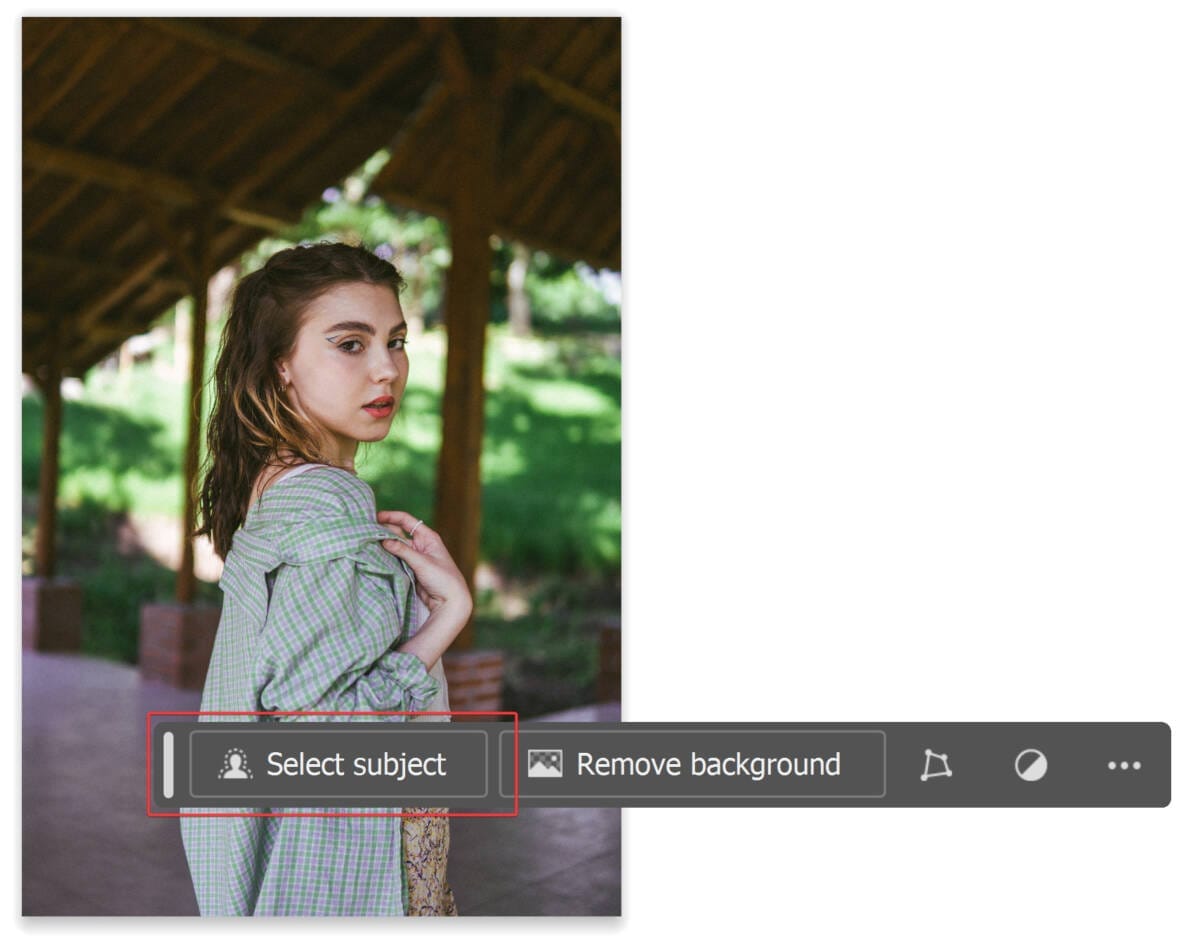
To use generative fill, start by making a selection of the area that you'd like to change. It doesn't need to be a perfect selection. For our image, we can simply use the "select subject" tool to do this automatically.
Note: If you'd like to follow along with the same image, you can download the image here.
Step 2: Protecting Areas From Generative Fill
Before we continue, it's important to only select the areas that you want to change. In this case, we want to deselect the head and hands. To do this, simply select any selection tool, such as the Rectangular Marquee tool, and while holding the Alt/Option key, drag a box around the areas you want to remove. To add areas, hold the shift key.

Here's the selection that we ended up with. We removed the areas that we absolutely do not want Photoshop to replace.

Step 3: Using Generative Fill
With the selection made, we can now use the Generative Fill tool. Click on the "Generative Fill" button.

In the text field, tell Photoshop what you want to generate. For our image, we told Photoshop to generate an "azure blue and sienna orange bohemian dress".

Step 4: Refining the Prompt and Picking Variations
When it's done generating, you'll find in the Properties panel a few variations to pick from. You can generate more by clicking on the "Generate" button again, and you can also modify your prompt if needed.
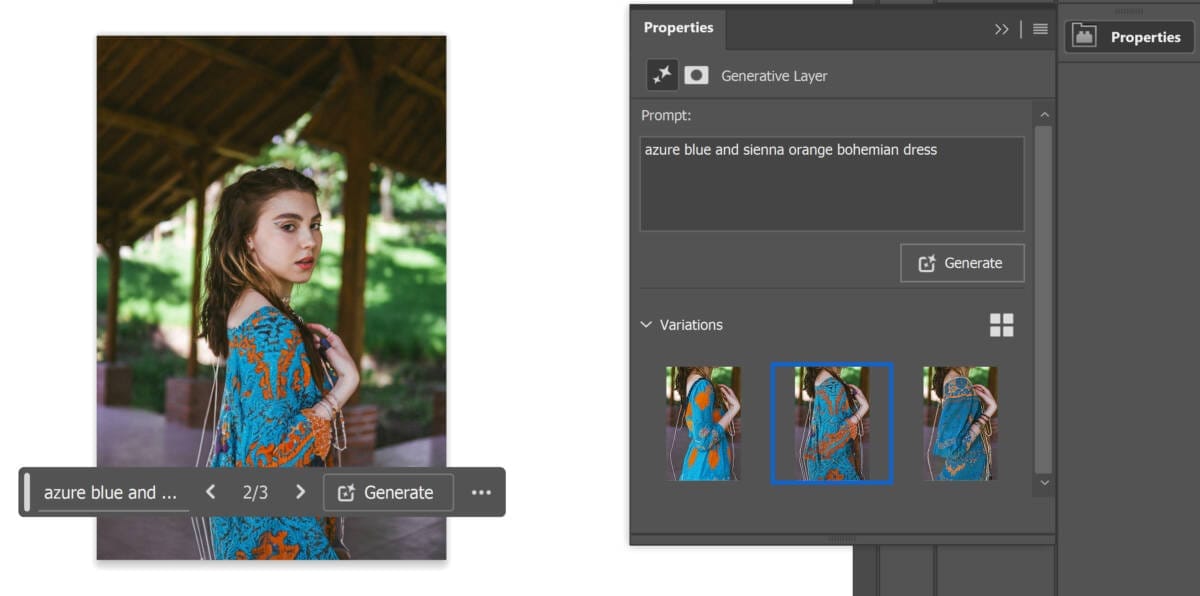
If you don't like any of the variations, you can change the prompt then click the "Generate" button again.

Before we proceed, you'll notice that Photoshop created this AI replacement on a new layer. This is a new type of layer in Photoshop called "Generative Layer". It is a non-destructive layer that will keep a copy of the variations and the prompt, so you don't need to worry about losing these options.

Step 5: Trying Different Ways to Fix Abnormalities
Although the image looks great at a glance, you'll find issues with the hands and fingers. This is a common issue with Photoshop's Generative feature currently and hopefully it'll improve in the future.
Let's go through some of the ways you might try fixing this. These steps don't usually work, but we should go over them so that you're aware of them.

Step 6: Telling Photoshop to Regenerate the Hand
You can try creating a new selection over the hand, and telling Photoshop to generate a hand, but you'll find that this often creates even worse results.

Step 7: Regenerating Small Parts Bit by Bit
Let's undo the previous step since it didn't work.
This time, we'll try creating smaller selections and regenerating the hand bit by bit. This works better than the first strategy and can eventually get you desirable results.


Step 8: Copying from the Original Image and Regenerating
If the previous step didn't work, undo or delete the Generative Layers.
Sometimes the best strategy is to bring back parts from your original image and using Generative Fill to blend in the seams.
To do this, hide all the layers except for the original image.

Step 9: Duplicating the Original Hand
Switch to the Quick Selection tool. With the original layer selected, create a selection of the original hand.

Duplicate the selection by pressing Ctrl/Cmd+J (or Layer > Duplicate Layer). Move this layer to the top from the Layers panel (Window > Layers).

Step 10: Using Generative Fill to Blend the Original Hand with the AI Image
Create a selection around the areas that you want to regenerate with the Lasso tool.

Leave the prompt blank and click the Generate button.

Pick the best variation from the Properties panel (Window > Properties).

Step 11: Repeat the Process
Continue the previous step until you get realistic results.

Make smaller selections each time, leaving out the parts already fixed by Photoshop's Generative Fill.

You may need to do this many times to get desirable results (we had to do this 9 times).

Step 12: Blending With a Layer Mask
For other areas, it is easier to simply blend it with a layer mask.

To add a layer mask, select the layer with the original hand then click on the "Add Layer Mask" button near the bottom of the Layers panel.

Step 13: Painting the Layer Mask
Select the Brush tool (B) and set your foreground color to blank. You can do this quickly by pressing D (set the foreground/background colors to black and white), then pressing X (reverses the foreground/background colors).

Paint over the areas that you want to blend with the previous layer.

Here's a before and after comparison after some manual layer masking.

Step 14: Keep Correcting Other Image Abnormalities
Continue using the three techniques you learned to perfect the results. For this section here, we regenerated it with another Generate Fill layer.

Here's how our image looks like before and after.

Step 15: Grain/Texture Mismatch
Photos often have a grainy pattern, even if they seem clean when zoomed out. When zoomed in, you'll see that the AI-generated areas are perfectly smooth and grain-free, unlike the original photo.

Step 16 - Merge the Generative Fill Layers into a Smart Object
Let's fix this mismatch. Select all of the Generative Fill layers and convert them to a Smart Object.

If there's a non-Generative Fill layer between the Generative Fill layers, keep the layer organization by converting them into separate Smart Objects.


Step 17: Add Noise
Go to Filter > Noise > Add Noise. Adjust the settings to match the grain in your photo. You'll know you have the right settings when you cannot tell the AI-generated areas from the non-AI generated areas.
- Amount: Adjust this to match the amount of grain from the original photo.
- Distribution: Swap between these two to find the noise pattern that best matches the original photo.
- Monochromatic: Checkmark this option if the grain in the original photo is grayscale.

Select the other Smart Object (if you have any), and repeat the same filter by pressing Alt+Ctrl+F/Option+Cmd+F.

Here's how it looks before and after adding the noise. As you can see, the smoothness of the AI-generated areas is gone and blends in much better.

Step 18: Healing Brush
Finally, for small touchups, use the Healing Brush tool. To do this, create a new layer and position it as the top layer. Select the Healing Brush tool, set the mode to "Content-Aware", and checkmark the "Sample All Layers" option.

Final Results
We're done! Photoshop's Generative AI doesn't always produce flawless results, but by using the techniques you've learned in this tutorial, you can significantly enhance the outcome.

This image shows the before, after generative fill, and after refining the generative fill.

One comment on “How to Get Realistic Results with Photoshop's Generative Fill”
Are these tutorials free? to watch them?, or there is a fee