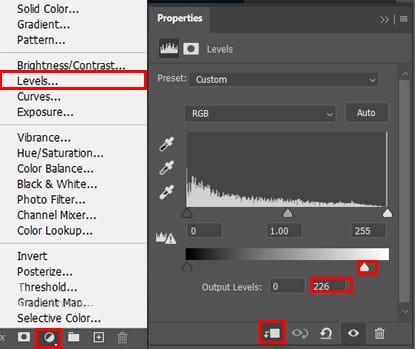
Now click on add layer mask and press Ctrl/Cmd + I to invert it.

Step 7
Open Sky and use Rectangular Marquee Tool(M). With the Rectangular Marquee tool, drag over the area you want to select. Hold down Shift as you drag to constrain the marquee to(release the mouse button before you release Shift to keep the selection shape constrained).

Step 8
After the selection area has been created, simply copy (Ctrl / Cmd + C) and Paste (Ctrl / Cmd + V) it to our work canvas( put a layer at the bottom, behind the ocean and the mountain layer) Then position the image with the transform tool (Ctrl / Cmd + T). Hold Alt + Shift and resterize like image below. In Photoshop CC only hold Alt to resterize al sides together.

Step 9
Select Sky layer and Add Adjustment Layer “Curves”

Step 10
Add Adjustment Layer “Brightness/Contrast”

Step 11
Select Ocean layer and add Adjustment Layer “Curves”

Step 12
Add Adjustment Layer “Levels”

Step 13
Add Adjustment Layer “Brightness/Contrast”

Step 14
Add Adjustment Layer “Curves”

Step 15
Add Adjustment Layer “Color Balance”

Step 16
Create a new layer and make clipping mask. Right click on layer and “Release Clipping Mask”. Now use Brush Tool(B) Soft Round with foreground color black and paint under Mountains. Reduce Opacity to 31%.

Step 17
Select Mountain layer and add Adjustment Layer “Hue/Saturation”

Step 18
Add Adjustment Layer “Curves” and set Opacity to 85%.

Step 19
Add Adjustment Layer “Levels” and set Opacity to 75%.

Step 20
Add Adjustment Layer “Color Balance”

Step 21
Create new layer and make clipping mask, Right click on layer and “Release Clipping Mask”. Then use Brush Tool(B) Soft Round with foreground color #171c1f and paint on Mountain. Opacity set to 42%.


Step 22
Go to File > Place and select Birds, then place it into your document. Then position the image with the transform tool (Ctrl / Cmd + T). Hold Alt + Shift and resterize like image below. Blend mode Normal and Opacity 65%.

Step 23
Next we will openMoon. After you open the image, use Rectangular Marquee Tool(M).

Step 24
After the selection area has been created, simply copy (Ctrl / Cmd + C) and Paste (Ctrl / Cmd + V) it to our work canvas. Then position the image with the transform tool (Ctrl / Cmd + T). Hold Alt + Shift and resterize and Rotate like image below. In Photoshop CC only hold Alt to resterize al sides together. Blend mode change from Normal to Screen and Opacity 100%.
4 responses to “How to Create Magic Atmosphere in the Sky in Photoshop”
-
Hi there. This is a great tutorial however, I am working my way through it and can’t seem to locate two of the resources you use in this tutorial. One of them is the “sky” image and the other one is the “birds” image. Neither of them are listed in the tutorial resources list. I really want to be able to replicate your image as closely as possible. Can you please provide the links for these resources? That would be greatly appreciated! Thanks again!
-
I find that with a lot of tutorials I am glad I saw this post so I don’t have to waste my time
-
Well, why don’t you then download the final PSD file? Usually there the original files are present within, since most of the time the manipulation is only done with non-destructive techniques like adjustment or masking layers.
Then you can just copy the layer you are looking for into another file and work with this image.
I would say for a copy/paste and transform the original file is not necessarily needed.
-
-
Hola.
La foto del cielo y los pájaros no la habéis puesto, pero no tiene una gran relevancia.
Lo que no comprendo es este comando
“Crea una nueva capa y haz una máscara de recorte. Haga clic derecho en la capa y “Liberar máscara de recorte”.
Me lo podéis aclarar.
Gracias.


Leave a Reply