Enhance dull photos soft contrast. This Photoshop effect enhances contrast and saturation.
Apply the Soft Contrast Effect
The soft contrast Photoshop effect is easy and quick. Follow the steps below to apply the soft contrast effect.
Step 1
Open a photo you would like to edit. Or, you may use the photo used in this tutorial (from iStockPhoto).

Step 2
Duplicate the layer (Layer> Duplicate Layer or Ctrl+J) and change the blending mode of the new layer to Overlay.

Step 3
Activate the top layer and apply a Gaussian Blur filter (Filter> Blur> Gaussian Blur).


Retain the Details
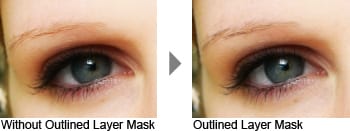
The majority of this effect has been done. But you’ll notice that the edges may appear softer due to this effect. In the steps below, you’ll learn how to filter out this effect from the edges.
Step 4
Select the top layer and add a layer mask (Layer> Add Layer Mask> Reveal All).

Step 5
Make sure the layer mask is activated. The thumbnail of the layer mask in the layers window should have a white border around it. If it doesn’t, click on the thumbnail to activate the layer mask.
Step 6
With the layer mask selected, open the Apply Image tool (Image> Apply Image). Change the Layer to Background and click OK.


Step 7
With the layer mask still activated, apply a Find Edges filter (Filter> Stylize> Find Edges). You may be able to notice slight changes in the edges of your image when you apply the filter. After applying the Find Edges filter to the layer mask in my image, the edge details have been restored; especially on the eyebrow.


Step 8
You may notice some outlining on some of the edges. To remove this, apply a Gaussian Blur filter (Filter> Blur> Gaussian Blur) with a radius of 3 pixels on the layer mask.

Adjust the Results
There are a few adjustments we can make on this effect. Follow the tips below to tweak the final results.
Step 9
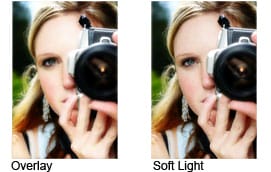
If the effect is too strong, reduce the opacity of the top layer or change the blending mode from Overlay to Soft Light.

Step 10
To adjust the saturation of the effect,activate the top layer anduse the Hue/Saturation tool (Image> Adjustments> Hue/Saturation) to modify the saturation.
3 responses to “Soft Contrast”
-
Thanks for this.
-
Step 6: Why does layer mask not change to black and white after apply image?
-
Beautiful job….


Leave a Reply