Create a Spooky Scarecrow Wallpaper Using Photoshop

Create a Spooky Scarecrow Wallpaper Using Photoshop

Create a haunting scene inspired by DC Comics. This tutorial will show you how to create a night photo manipulation using custom Photoshop brushes, 3D text effects, adjustment layers, and some matte painting techniques. You will also learn how to save time finding resources for any photo manipulation.


Preview of Final Results
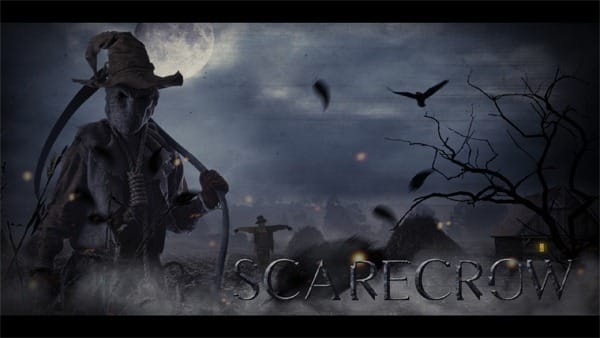
final

Download the PSD

Scarecrow.zip | 46.9 MB
Download from Website


Scarecrow Photo Manipulation Photoshop Tutorial


Resources


Step 1

Draw a rough sketch of the concept that you have in mind before proceeding for the search of the resource. Because this helps you in simplifying the search for resource. Here we are going to create a DC Comics inspired Scarecrow scene, hence we made a rough sketch of the scene in Photoshop.

step1

Step 2

After sketching the concept have a close look at it to notice the elements that are embedded in it. Now make a list of all the elements needed for the concept, this can serve as the list of key words while searching for the resource.
Once the listing is over browse through the stock providing websites like Deviantart and sxc.hu using the listed keywords and choose the most appropriate image that fits the scene perfectly.

step2

Step 3

1) Import the image of the Scarecrow into Photoshop and select a rough mask using the Magic Wand Tool(W) and select the Refine Edge option from Select>Refine Edge (MAC:command+alt+R , Windows:Ctrl+Alt+R). Then select the 'On Black' view from the View drop-down list to get a good visual of the edges.

step3-4
step3-1

2) Set the Size of the Refine Radius Tool (R) to 127 and select the Output to New Layer. Now graze the edges of the scarecrow using the Refine Radius Tool and click OK to get the detailed cut image of the scarecrow in a new layer.

step3-2
step3-3

Step 4

Now create a new canvas in Photoshop for the scene with the dimensions Width=2560pxand Height=1440px.

step4

Step 5

Import the image of the scarecrow onto the canvas and place it on the left side of the scene as shown.

step5

Step 6

In this step we will be creating the farm in the background.

- Select the image of the Corn Field and import it onto the working canvas and place it behind the scarecrow.

step6


Step 7

As we already described that this is a night scene, we need to create color correct the background to get the night effect.

1) With the Farm layer selected go to Image>Adjustment>Hue/Saturation and set the Saturation Level=-62 and Lightness=-9.

step7

2) Now by using the Curves (MAC:command+M , Windows:Ctrl+M) color correct the farm as shown.

step7-1

3) Now make the background dark using the Brightness/Contrast. Set the Brightness=-42 and Contrast=25.

step7-2

Step 8

As we can still see that the farm is filled with light, hence we are going to make the farm much darker in this step.

Using the Soft Round Brush(B) paint black color at the bottom of the scene as shown and lower its Opacity to 61% to get the following effect.

step8

Step 9

Follow the step7 to color correct the scarecrow to match the night scene that we are creating.

step9
step9-1

Step 10

Select the Burn Tool(O) and choose the grunge brush from the Brushes pallet. Then add burn to the scarecrow to make it look warn out.

step10

Step 11

Now add shadow to the bottom of the scarecrow as shown.

step11

Step 12

Using the Eraser Tool(E) erase the sky of the corn field then import the image of the Dark Sky onto the working canvas and place it in the background as shown beneath all the layers.

step12

Step 13

In this step we will be working with the Adjustment Layer to color correct the whole scene evenly.

1) Now select the Curves Adjustment layer from the bottom of the Layers Pallet and set the curves as shown to get an equally balanced color correction.

step13

2) Similarly create Adjustment layers of Hue/Saturation and Exposure to achieve a perfect night shot.
- Set the Saturation level in Hue/Saturation to -32 and set the Gamma Correction to 1.04 in Exposure.

step13-1


Step 14

In this step we will be creating a farm house in the background.

1) Select a mask around the Farm House using the Pen Tool (P) and separate the selection into a new layer and import it onto the working canvas and place it as shown.

step14
step14-1

2) Let your creative juices flow to color correct the farm house.

step14-2

3) Using the Soft Round Brush (B) paint some shadow to the farm as shown.

step14-3

Step 15

Now by using the Tree Brush paint a dry tree as shown with the black color selected.

step15

Step 16

In this step we will be creating a light glow from the window of the farm house.

1) Select a mask in the shape of window and fill in the selection with the color gradient of color combination #fabe1c and #faa41c as shown.

step16

2) To illustrate that the light is emerging from the window we need to create a glow effect. Using the Brush Tool of radius paint the color #fabe1c and reduce the Opacity to.

step16-1

Step 17

In this step we will create fog around the scarecrow.

Create a new layer and paint the fog as shown using the Fog Brushes with the white color selected.

step17

Step 18

In this step we will be concentrating on maintaining the Depth Of Field (DOF). Refer the " " tutorial for detailed information on DOF.

1) As we can observe that the farm house is located far from the scarecrow we need to add a Gaussian Blur of Radius 1.1px.

step18

2) Assume that the tree is located a bit closer to the scarecrow. The objects closer to the focused object appear slightly blurred hence add a Gaussian Blur of Radius 0.8px to the tree.

step18-1

Step 19

A spooky scene is never complete without a full moon, hence we are going to create a full moon in this step.

1) Cut the image of the Moon from its original image and import it onto the working canvas and place it as shown.

step19

2) To maintain the DOF of the scene add a Gaussian Blur of Radius 1.0px to the moon.

step19-1

3) Now color correct the moon using the Curves to blend with the scene perfectly.

step19-2

Step 20

Usually when there is a full moon we can find few clouds reflecting the light from the moon. Hence we are going to paint white clouds in this step.

-With the white color selected paint some clouds in the sky as shown using the clouds brushes.

step20


Step 21

A scarecrow scene is always incomplete without a crow. Hence in this step we are going to create a crow in the scene.

1) Select a rough mask around the Crow using the Magic Wand Tool(W), then open the Refine Edge option (Select>Refine Edge) and grace the edges of the crow using the Refine Radius Tool to get the refined and detailed edges of the crow.

step21
step21-1

2) Now place the image of the crow on the working canvas as shown.

step21-2

Step 22

In this step we will be using both Motion Blur and Gaussian Blur, because the crow is not just far from the scarecrow but also flapping its wings by some speed. Hence we need to add Motion Blur to show that the wings are in motion.

1) Create a random mask about the edges of the wings and tail as shown using the Lasso Tool (L) and select a Feather of Radius 20px.

step22

2) Now go to Filter>Blur>Motion Blur and set the angle to 10 and Distance to 19px.

step22-1

3) Now add a Gaussian Blur of Radius 1.5px to the crow to blend with the DOF.

step22-2

Step 23

To create a dramatic effect to the scene we need to create some leaves flying around in the scene. To create this effect we will be creating a custom brush to match our scene. First we need to create a shape of the leaf.
Using the Brush Tool draw a rough shape of the leaf and then create a mask around the drawing using the Pen Tool(P), and fill the selection with black color.

step23

Step 24

After creating the shape of the leaf go to Edit>Define Brush Preset.. , then name the shape as leaf in the popup box and press OK to save the shape as brush. Now open the brushes pallet and select the leaf brush we just created.

step24

Step 25

In this step we will be using the Brush Properties to multiply the leaf we created and scatter them to follow the air dynamics to create a perfect illustration of leaves flying by the force of wind.

1) Now open Brushes Properties and select the Brush Tip Shape and set the Size to 61px and change the Spacing to 626%.

step25

2) Now choose Shape Dynamics and change the levels as follows, Size Jitter=100%, Minimum Diameter=97%, Angle Jitter=84%, Roundness Jitter=5%, Minimum Roundness=25% and make sure to check the Flip X & Y Jitters to rotate the leaves in random directions.

step25-1

3) To scatter the leaves, choose the Scattering option and set the Scattering to 617%, Count=2 and Count Jitter=17%.

step25-2


Step 26

1) Now paint the leaves using the previously created leaves brush as shown with black color.

step26

2) Since we previously assumed that the leaves are flying around in the scene we need to add a Motion Blur to the leaves to create a natural depth.
With the leaves layer selected add a Motion Blur with Angle=10 and Distance=26px.

step26-1

Step 27

In this step we are going to create few wheat grass in front of the scarecrow to create an environment that he is standing in the farm. In this step we will also be covering another technique of cutting an image with very fine details.

1) Import the image of the Wheat Grass into Photoshop and select the Red layer from the Channels pallet, the go to Image>Calculations and select Red in the Channel drop-down list in both Source 1 and Source 2. Once you press OK an Alpha Layer will be created in the Channels Pallet.

step27
step27-1

2) Now go to Select>Load Selection and select Alpha 1 from the Channel drop-down list and press OK to select the mask around the wheat grass.

step27-2

3) Using the mask separate the wheat grass into a new layer and import it onto the working canvas and place it as shown.

step27-3
step27-4

Step 28

Since the grass is assumed to be closer to the scene it needs to be blurred, hence we need to add a Gaussian Blur to the grass to maintain the DOF. With the grass layer selected add a Gaussian Blur of Radius 2.2px.

step28

Step 29

In this step we are going to create a scarecrow unlike the main scarecrow we focused the scene on.

1) Mask the Scarecrow2 using the Magic Wand Tool (W) and separate the selection into a new layer.

step29

2) Usually we find scarecrows in the farms supported by a single pole or mast. Hence we are going to create the same here. Since the legs of the scarecrow are separated by some gap we need to join them together.

-Using the Lasso Tool(L) cut the bottom part of the legs into two layers.

step29-1

3) Now by using the Move Tool (V) transform them together as shown.

step29-2


Step 30

In this step we are going to create the mast to the second scarecrow.

1) Import the image of the Wood into Photoshop which represents the mast and mask out the stem into a new layer using the Pen Tool (P).

step30

2) Now place the stem to the scarecrow as shown to illustrate that the scarecrow is being supported by the stem.

step30-1

Step 31

This step covers the color correction part of the mast and the scarecrow to make them blend with the environment we are creating.

1) With the mast layer selected go to Image>Adjustments>Hue/Saturation and decrease the Saturation Level to -57.

step31

2) Create a new layer above the mast layer and paint the shadow as shown.

step31-1

3) Commonly the scarecrows are stuffed by dry grass, and we also find the dry grass popping out from the scarecrow through the sleeves and other gaps. In order to create the same effect paint the grass in the sleeves as shown using the Grass Brush with black color selected.

step31-2

4) Similarly Desaturate the Scarecrow to -42 using the Hue/Saturation. Then to blend it with night scene increase the Blue leave using the Curves.

step31-3
step31-4

5) Since we are creating a night scene the scarecrow appears dark in the night, hence create a dark shadow on the scare crow as shown and merge all the layers together and name it as "Scarecrow 2".

step31-5

Step 32

1) Now import the scarecrow2 onto the working canvas and place it as shown.

step32

2) Since the scarecrow2 is located by some distance from the main character add a Gaussian Blur of Radius 0.7px.

step32-1

3) If we observe closely we can notice the color of the wheat piles in the farm are getting faded, hence we are going to create the same effect here. With the scarecrow2 layer selected go to Image>Adjustments>Exposure and set the Exposure=-0.03, Offset=+0.0061 and Gamma Correction=1.00.

step32-2


Step 33

In this step we are going to create fire specs flying around in the scene. This adds as an additional dramatic feel to the scene.

-Import the texture of the Light Specs onto the working canvas and change the Blending Mode of the layer to Lighten. Then by using the Eraser Tool erase the excess fire specs from the scene.
Similarly repeat the step until the scene is filled with adequate amount of light specs.

step33-1
step33-2
step33-3
step33

Step 34

In this step we are going to use textures which is always a perfect garnish for scary and dramatic scenes.

1) Now import the Old Paper Texture onto the working canvas and change the Blending Mode of the layer to Multiply and lower the Opacity to 82%.

step34
step34-1

2) Similarly follow the previous step and add a Grunge Texture to the scene.

step34-2

Step 35

In this step we are going to create a 3D title for the scene using a texture and the Blending Options.

1) Type the title on the working canvas using the Scarecrow Font.

step35

2) Now import the Metal Texture onto the canvas and place it on the title text and select the mask in the shape of the font and separate the selection into a new layer and name it as 'main title'.

step35-1
step35-2

3) Now open the Blending Options of the 'main title' layer and select the Bevel and Emboss option and set the values of the option as follows, Style=Inner Bevel, Technique=Chisel Hard, Depth 368%, Direction=Up, Size=16% and leave the values in Shading as default.

step35-3

4) Now select the Contour option and choose Gaussian from the Contour drop-down list.

step35-4

5) To add texture to the title select the Texture option and set the Scale to 89% and Depth=+280%.

step35-5

6) Now select the Stain option to make the title look darker and match the theme of the scene. Now set the levels of Stain as follows, Blending Mode=Multiply, Opacity=42%, Angle=19, Distance=38px, Size=14px.

step35-6

7) As part of final detailing to the title choose the Pattern Overlay and set the Blending Mode to Lighten and leave the other values as default.

step35-7


Final Results

final[1]

Authors Comment

profileThank you for following this tutorial! I'm a freelance graphics designer and the founder of zillionarts the place where all kinds of arts are showcased together to provide inspiration to the young minds. You can know more about me from my portfolio blog and also can follow me on Twitter

- Santhosh Koneru

Create Dot Grid Art in 1 Click
Sponsored

Turn any photo into a dot grid artwork with these Photoshop actions. You'll get great results with dots that change size. They get larger in brighter areas and smaller in darker areas. Free download available.

One comment on “Create a Spooky Scarecrow Wallpaper Using Photoshop”

Leave a Reply

Your email address will not be published. Required fields are marked *

cross