How to Create a Photo Manipulation of a Wolf in Stormy Weather

How to Create a Photo Manipulation of a Wolf in Stormy Weather

Learn how to use Photoshop to create this stormy photo manipulation! This tutorial will show you how to merge images together, adjust lighting and contrast, and create effects such as a lightning bolt and rain.


Preview of Final Results
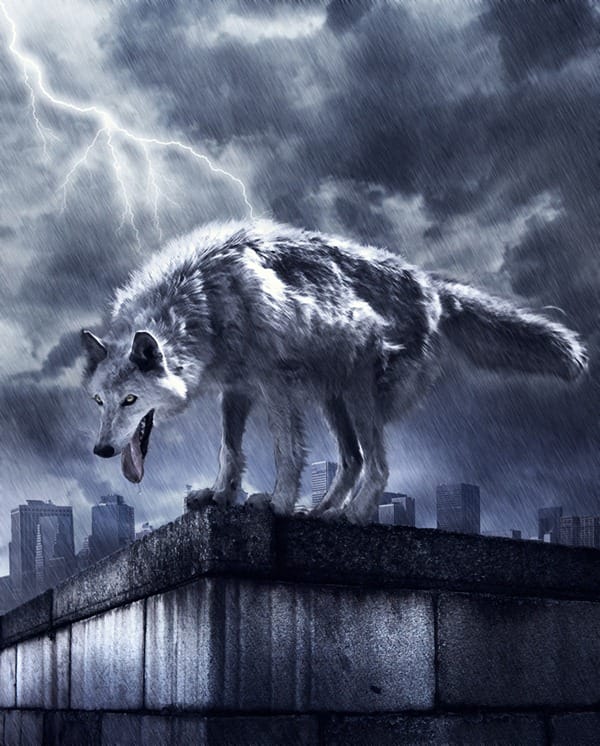
final_result

Wolf in Stormy Weather Photoshop Tutorial

Sources:


Step 1

First of all, in this work will use a specific brush, of lightning, in the link you will find it for downloading and installing it is simple, but I'll go early so that when you open it is already within PS:

After download, get the ABR file, go to My Computer > System C > Program Files > Adobe Photoshop > Presets > Brushes, and put in this folder. Now we can start the PS, the brush will be there.

Well I still use CS3... Let's start...

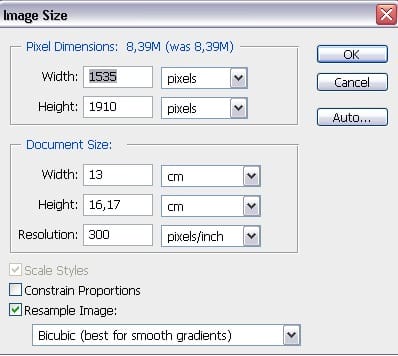
In File > New, we will open a new document:

  • Width:1535
  • Height:1910
image002

Step 2

Then open the image of the wolf and cut out.

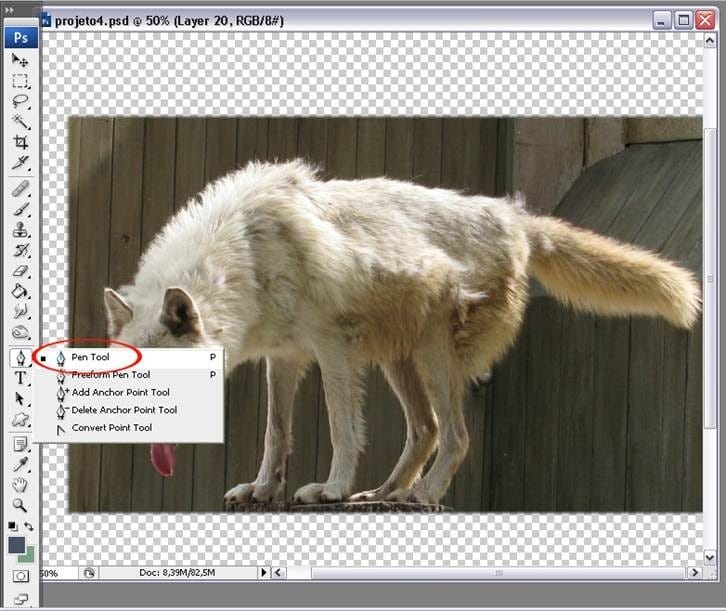
I use the Pen Tool to cut, I will show how (because not all people know):

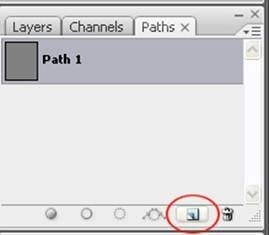
In the tools menu select the Pen Tool and the Path palette, Create a New Path.

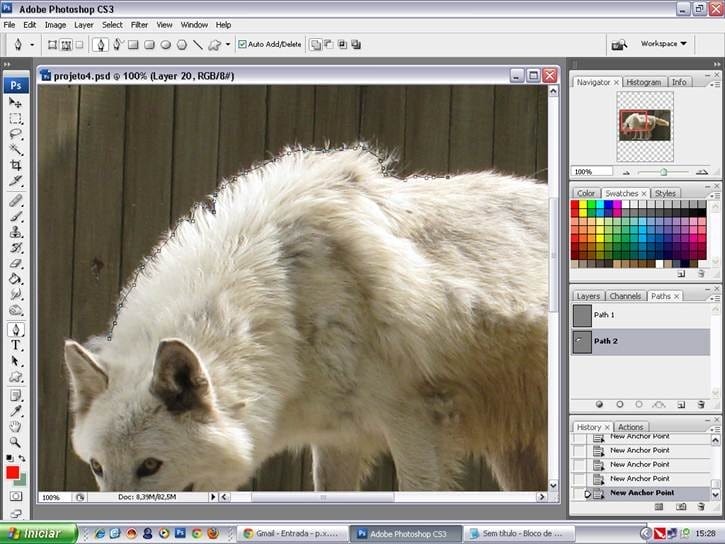
Go back to layers and the image of the wolf start to cut. You can always use the spacebar to move the image making it easier to cut. No need to cut perfectly, because soon we will work better in wolf's hair.

image003
image004
image005

Step 3

After finishing the wolf, even in the Palette Path click the Load Path Selection, you will see that the image is selected. Give a Ctrl + J so that only the wolf is cut, name this layer "wolf". Delete the Path, but keep the original copy of the wolf below so we can reproduce the hair according to the original. Name "original" and click on the "little eye" to hide it temporarily. Let's open the image of the wall, place in a layer below the wolves and cut. We use the same process was used to cut the wolf. But who may prefer to use the Polygonal Lasso Tool, depending on the affinity that each has with the tools.
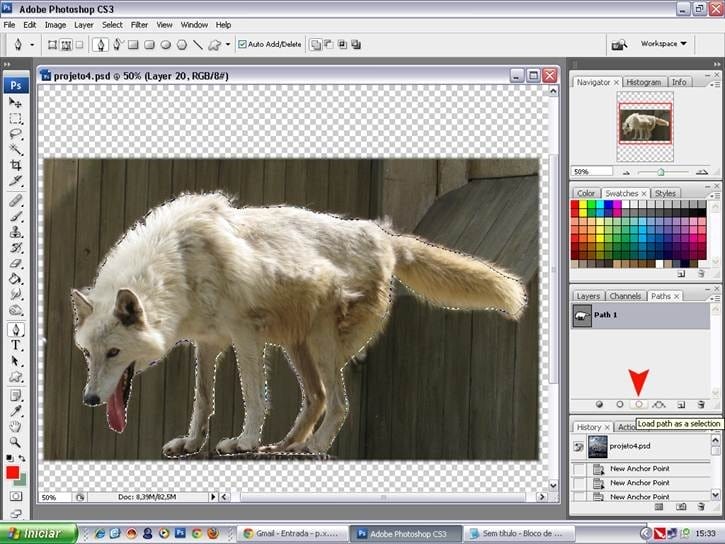
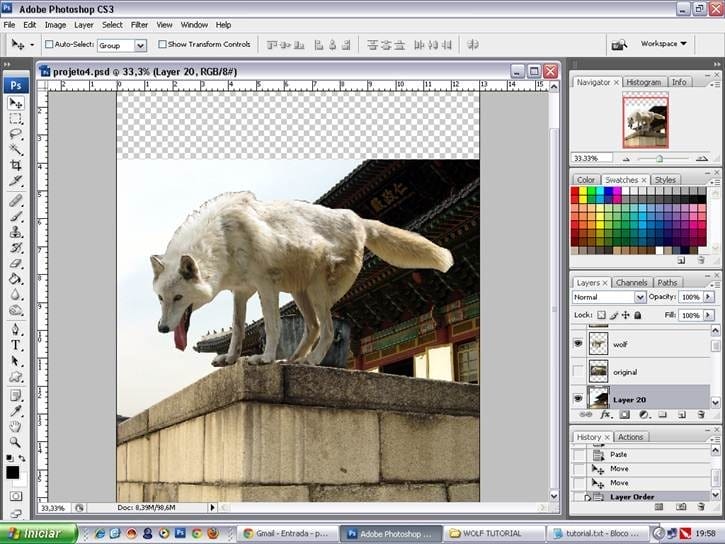
image006
image007

Step 4

After cutting, we have to hit the wolf paws on the fence. For this we use the Warp Tool. Go to Edit > Transform > Warp.
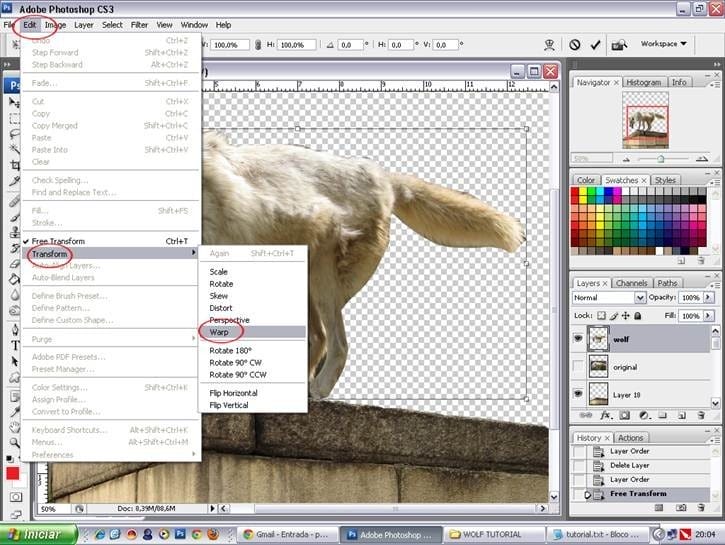
image008

Adjust the legs so that they are at the wall.

image009

Step 5

Then back to the wall, let's apply some color in it. We could use the Clipping Mask now, however, as I use the CS3 and my computer does not help me much (he's old!), I avoid letting my psd is too heavy, so in a way that I think also simple and fast. In the wall layer go to menu Image > Adjustments > Photo Filter > Cooling Filter (80) in 70%, clic in Preserve Luminosity box.

image010
image011

Step 6

After applying the filter, duplicate the layer of the wall and change the blend to Multiply 100%. Ctrl + E to merge the layers of the wall and name: wall.

image012

Step 7

On the keyboard: CTRL + U to open the Hue / Saturation box, saturation -35.

On the keyboard: Ctrl + L for Levels box, leave at 0.80.

The wall begins to darken.

image013

Step 8

Beneath all the layers we will open the city's image. On the keyboard: W to select Magic Tool > Tolerance 32, let's click in the sky, the tones are similar, it will fill the entire sky. Delete.

image014

Step 9

Open the stock of new sky, and enter the layer behind the buildings to assemble the background.

image015

Step 11

In the layer of the buildings, go to Image> Adjustments> Brightness / Contrast and leave like this:

  • Brightness: -150
  • Contrast: -50
image016

Step 12

Duplicate the layer, change the blend to Multiply 50%.

Ctrl + E to merge the layers into one.

See how the buildings should be.

image017

Step 12

Go in the sidebar and select the Dodge Tool in Highlights > Exposure 100% and give a light at the top of the buildings to brighten a little.

image018

Step 13

Go to Image> Adjustments> Photo Filter and apply the Cooling Filter (LBB) in 25%. You will see that the buildings were already in blue. Reduce the layer opacity to 70%.

image019

Step 14

In the wolf will create a clipping mask layer for saturation and contrast.

For those who do not know how to create, I will explain in detail: Go on the symbol Adjustments Layers (represented by a circle half white half black) Hue / Saturation

  • Saturation -75
image020

Step 15

After applying this step, you will see that the effect is applied to every image, but do not want that, we want the effect only in the wolf, that's where the clipping mask enters. In layer Hue / Saturation, click the right mouse button, go to "create clipping mask", and you will see that the effect will be restricted only to the layer below it, in this case, the wolf, which was the layer in which we wanted to apply the effect. Then, whenever you want to apply an effect, whatever it is, only one object, the clipping mask makes it easy for you. Let's do the same procedure now with Brightness / Contrast. Go to the symbol of Adjustments Layers again, open and choose Brightness / Contrast.

  • Brightness -50
  • Contrast -8.
image021

Step 16

Right click on the layer and create clipping mask. Can see that the layer is connected to the layer below with a small arrow. This feature allows you to change effects.

image022

Step 17

Now for most time consuming part, we work with some effects in the hair of the wolf.

On the layer of the wolf, let's start making the hair. On the side toolbar, we choose the Smudge Tool. On the keyboard "F5" to open a window with brushes, we choose the Charcoal 59 pixels, it comes in Photoshop itself, 70% strength.

image023

Step 18

Let's brush the hair of the wolf from the inside out, only at the edges.

See the picture where the strokes start. So, go all around the wolf, looking always follow the direction of the hair, and when necessary to reduce or increase the diameter of the brush, so you can control from the keyboard, with keys ] to increase, and [ to decrease. Be careful not to blur important parts around the face. Work with patience, until the hair looks natural.

image024

Step 19

When finished, you can join the layers of effects, giving a Ctrl + E in each of them. Her wolf should look like this:

image025

Step 20

Duplicate the layer of the wolf, go to Filter> Brush Strokes> Crosshatch.

image026
  • Stroke Length> 9
  • Sharpness> 6
  • Strength> 1
image027

Step 21

Allow the layer to 40% opacity, Ctrl + E to put together.

I applied this effect to give the appearance of dirty and wet.

Ctrl + J to duplicate layer.

Let's start taking care of the colors, shadows and lights of the wolf.

In the layer "wolf copy 2", Ctrl + M to open Curves box.

In RGB Channel,

  • Outup: 95
  • Input: 130

OK.

image028

Step 22

On the keyboard type E to open the Eraser Tool, type F5 to open the window of brushes and choose a smooth brush. I choose 200 px, because I found a good size to erase the parts that do not want.

F5 to close the window.

image029

Step 23

With the Eraser Tool in 100% will erase some parts we do not want it dark. The red part in the figure where we show erase.

Ctrl + E to put together.

Duplicate the layer again.

image030

Step 24

Let's go to Image > Adjustments> Photo Filter.

Select Color 100%. Click the color square and open the color graph, enter this code: 515b71 press OK in all.

image031

Step 25

Duplicate the layer, change the blend mode to Overlay 50% .

Ctrl + E to put together.

image032

Step 26

Ctrl + O to go to the Burn/Dodge tools, chose Dodge Tool > Highlights in 70% to clarify some parts of the wolf.

The painting in red shows the locations that we should apply more light.

image033

We now choose the Burn Tool >Mildtone in 30% to darken some parts of the wolf. In yellow you can see the parts.

image034

Step 27

In a wall layer, use the Burn/Dodge tools again, Dodge > Highlights in 70%, we will apply lights in some parts. In the figure, the parts in red indicate where to apply the light, and in the right side the result of this step.

image035

Step 28

Go on top of all layers: Shift + Ctrl + N to open up a new layer, name the layer "lightning." Now we get the list of brushes to chose "lightning bolts".

image036

Step 29

Ctrl + B to go in "Brush Tool".

We look at the list for set "lightning bolts"

F5 to open the window of brushes, we choose one, and the size of 700px. The color should be white, to do, give a "D" on your keyboard to reset the colors and then an "X" to flip them. With the brush in white, let's create a lightning bolt as shown in the image.

image037

Step 30

Below the layer of the wall, create a new layer: Ctrl + Shift + N.

On the tool side, in "Set Foreground Color", give a click to open the chart of colors and the value of 272e65.Ok.

Give a "G" on your keyboard to go to the "Paint Bucket Tool" and paint our new layer with blue.

The layer name: "blue."

image038

Step 31

We changed the blend to Color Dodge 70%.

Give an E to select the Eraser Tool to erase the top of this layer leaving the blue color only the level of the buildings.

image039

Step 32

After saving your work in psd, flatten image.

Right click in one of the layers and go to Flatten Image.

At the top, let's apply some Adjustaments Layers effects. Again, clic on the symbol represented by a circle half white half black.

  • Curves > Output >108/ Input >126
  • Photo Filter > Blue > 25%
  • Hue/Saturation > Saturation -35
  • Color Fill > 02002a / Change blend to Excusion in 50%.
  • Brightness/Contrast > +5 / +40
image040

Step 33

Go to Background and duplicate it. Attach all layers effects to this duplicated layer with Ctrl + E.

Let's make the rain:

Shift + Ctrl + N To create a new layer on top.

On the keyboard "D" to reset colors.

Go to Filter> Render> Clouds

image041
image042

In the same layer go to Filter> Noise> Add Noise

image043
  • Amount 300
  • Gaussian
  • Monochromatic
image044

Step 34

Filter again, Blur> Motion Blur

image045
  • Angle 62
  • Distance 30
image046

Step 35

Then change the blend to Soft Light.

image047

Step 36

Reverse the direction of the rain. Go to Edit> Transform> Flip Horizontal

image048

Step 37

In the rain layer, Ctrl + L to open Levels, let's darken a little, move the middle pointer through to 0,75 or write the value. Ctrl + E to unite the rain layer to the wolf's layer.

image049

Step 38

Ctrl + B to go in Brushes, choose the size of a wolf's eye, and with a clear yellow color in Overlay Mode, opacity 100% , paint the eyes.

We will do the same with the tongue, but switched to a darker shade of red and leave the opacity at 15%.

image050

Step 39

Let's get some more details, our work is coming to an end.

Create a new layer, Ctrl + Shift + N, with a soft white brush, let's do a few drops of water falling from the mouth. Well, the moment I do not brush drops, we'll improvise.

Start painting the tongue just as in the figure.

image051

Step 40

Then go to Layer Style, is the symbol "fx" in the Layers palette. When you open go to "Blending Options: Custom," stir in the following configurations.

  • Fill Opacity: 0

You will see that the painting "disappears", but I'll fix it ...

image052

Step 41

Check the box Bevel and Emboss and "Gloss Contour", select the "Rolling Slope - Descending" as in figure. Already you can see the result in the tongue. The more experienced who wish to modify, feel free. Ctrl + E to merge layers.

image053

Step 42

And finally, Ctrl + U to open Hue / Saturation.

  • Saturation - 15

And at the top, go back Layers Adjustments,

  • Solid Color> 4a5365
  • Change blend to Color 30%.
image054

Final Results

final_result

Hope you enjoy the tutorial and get a good result.

90% Off Cyberpunk Preset Bundle
Sponsored

Make your artwork look like they're from an alternate universe. These Cyberpunk presets work with Photoshop (via the Camera Raw filter) and Lightroom. Download all 788 presets for 90% off.

5 comments on “How to Create a Photo Manipulation of a Wolf in Stormy Weather”

Leave a Reply

Your email address will not be published. Required fields are marked *

cross