Turn any photo into a dot grid artwork with these Photoshop actions. You'll get great results with dots that change size. They get larger in brighter areas and smaller in darker areas. Free download available.

Final Results
Rollover the image to see the before and after effect.

Manual White Balance Correction
Sometimes none of the previous techniques will properly or accurately fix the white balance. For times like those, we need to manually adjust the levels of the individual color. Follow this workflow to learn how to manually adjust the white balance of an image. The tutorial may seem a bit long, but it's easy to remember and once you learn this method, it's a quick process that can be done minutes.
Step 1
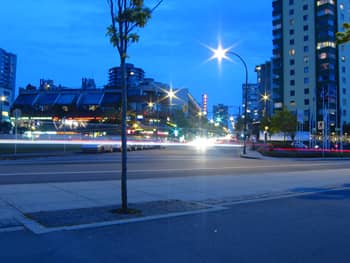
Download and save the following JPG file to your computer then open it inside Adobe Photoshop.
![]() twilight 128.67 Kb (right-mouse click> Save As)
twilight 128.67 Kb (right-mouse click> Save As)

Step 2
Inside the Channels pallet (Window> Channels), set the thumbnail size to large. To do this, right mouse click on an empty area in the pallet and select Large.
alt="Setting the Thumbnail Size" src="https://www.photoshoptutorials.ws/images/stories/Photoshop%20Tutorials/Photo%20Restoration/White%20Balance/large-thumbnails.gif" />
Step 3
Click on each channel and find the channel that seems to have the proper or best exposure. In this photo we're working on, it seems like the green channel has the best exposure. By comparing the other two channels against the green channel, we can see that the red channel is underexposed and the blue channel is overexposed. Those are the channels/colors that need to be fix.
alt="Channels Pallet" src="https://www.photoshoptutorials.ws/images/stories/Photoshop%20Tutorials/Photo%20Restoration/White%20Balance/channels.gif" />
Fix the Colors
Now that we've found out which color we need to edit, we'll proceed with the next process of fixing the channels.
Step 4
Click on the RGB channel to activate all the channels.
alt="RGB Channel Selected" src="https://www.photoshoptutorials.ws/images/stories/Photoshop%20Tutorials/Photo%20Restoration/White%20Balance/select-rgb.gif" />
Step 5
The first step is to find something gray in the photo to use as a reference. For this photo we're working on, we can use the cement sidewalk and road as a reference. Use the Magnifier tool (Z) and zoom in near the bottom right where the cement road and sidewalk is.

