
Step 7
Go to the 3D menu > New 3D Extrusion from Selected Layer. In the Window > Properties Panel, set the Extrusion Depth to 1 cm. Select the Cap tab in the Properties Panel and set the following Bevel and Inflation values: Sides: Front and Back Bevel Width: 10 % Bevel Angle: – 60 degrees Inflation Angle: 25 degrees Inflation Strength: 12%

Step 8
In order for our text to illuminate the background, we need to have both mesh items on the same 3D Layer. In the Window > Layers Panel, select both 3D Layers. Go to 3D > Merge 3D Layers command:

Step 9
Select the Move tool (V) and click on the text mesh in the document window. Using the Move handles that appear, reposition the mesh so that it’s closer to the wall and resting on the floor. Use the Rotate handles to orient the mesh so that it faces away from the wall:

Step 10
Next we’ll reposition the render camera. Click anywhere in the document outside the meshes with the Move tool – a yellow frame will appear around the edge of the document window to indicate that the camera position controls are now active. Click and drag on the Dolly and Move tools in the bottom left corner of the document window (highlighted in red in the following screenshots) to move the camera closer to the text. Click and drag on the Rotate tool to adjust the camera angle. Continue adjusting the camera angle and position until you have a nice front on view:


Step 11
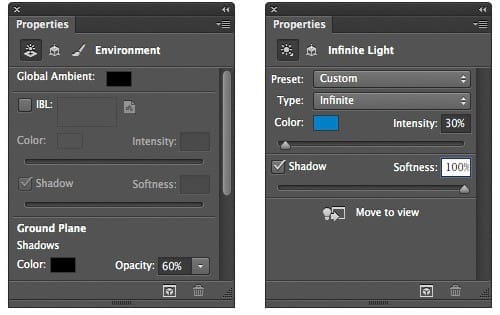
Next we’ll adjust the scene lighting to create a low key ambience. Go to the Window > 3D Panel and select the Environment item. Uncheck the Ibl tick box to disable the default image based light that comes with the scene. In the 3D panel list, click on the Infinite Light. In the document window, adjust the lighting angle so that the light direction is from above. In the Window > Properties Panel, set the following values for the illumination: Color : R0 G128 B200 Intensity value: 30% Shadow Softness: 100%


Step 12
The scene will appear quite under exposed at this point, but we’ll now adjust the material properties to create a glowing illumination effect. In the Window > 3D Panel, select the wall and background mesh and click on the Extrusion Material in the list. In the Window > Properties Panel, set the following values: Diffuse Color : R255 G255 B255 Shine: 20% Roughness: 100%
7 responses to “Create Luminous Text Using Photoshop 3D Layers”
-
you didn’t explain how to even make those lines in step 3.
-
Those lines are created from the rectangle. You should already have a selection of the rectangle. Press UP and LEFT 3 times, and then Backspace/Delete and you should get the two lines.
-
-
i cant find the 3d menu
-
nice tutorial, but you need to be more clear, when i zoon in my text gets pixelated. from step 11 to 18 i´ve followed every steps but i didn´t get the same results, hope you help me
-
It’s an OK tutorial, but you need to cover everything you do. In step 6 I had no idea how to the lighting. In step 5 you used centimeters you need to clear up for others
-
I can’t get access to the page anymore
-
I found an issue with tutorial. In my color picker settings I cannot find the intensity options (I have photoshop 6.1.1). Help would be appreciated


Leave a Reply