
Luminar AI lets you turn your ideas into reality with powerful, intelligent AI. Download the photo editor and see how you can completely transform your photos in a few clicks.
In this tutorial you will see how to create a minimal and clean blog layout using Photoshop. You will also learn some useful methods and practices for creating web layouts in Photoshop.
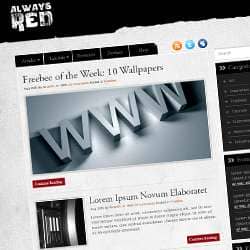
Preview of Final Results
![final-results[5]](https://cdn.photoshoptutorials.ws/images/stories/ad1d21e18172_103F1/final-results5.png?strip=all&lossy=1&quality=70&webp=70&avif=70&w=1920&ssl=1 "final-results[5]")
Download the PSD
Minimalistic Blog Layout.zip | 10.69 MB
Download from Website
Minimalist Blog Layout Photoshop Tutorial
Resources
- Social Icons - Blogperfume
- Paper Texture 1 - Bashcorpo
- Paper Texture 2 - Bashcorpo
- Paper Texture 3 - Personal
- Font - Dafont
Step 1 : Preparing the Canvas
Create a new document. The layout is going to be 950 pixels wide.
![img(1)[3]](https://cdn.photoshoptutorials.ws/images/stories/ad1d21e18172_103F1/img13.png?strip=all&lossy=1&quality=70&webp=70&avif=70&w=1920&ssl=1 "img(1)[3]")
Add guides to the right and left borders of the document.
![img(2)[3]](https://cdn.photoshoptutorials.ws/images/stories/ad1d21e18172_103F1/img23.png?strip=all&lossy=1&quality=70&webp=70&avif=70&w=1920&ssl=1 "img(2)[3]")
The layout is 950 pixels wide. But we need some extra space for us to work comfortably. So increase the width of the document using the Canvas Size dialog box. Press Ctrl+Alt+C (Image > Canvas Size) to load the dialog box and enter the value.
![img(3)[3]](https://cdn.photoshoptutorials.ws/images/stories/ad1d21e18172_103F1/img33.png?strip=all&lossy=1&quality=70&webp=70&avif=70&w=1920&ssl=1 "img(3)[3]")
Step 2 : Create and Organize Layer Groups
Often times we end up with several hundred layers scattered across the palette and hard to locate a particular item, especially when designing layouts. So plan ahead and keep things organized. I classified the layout into several groups that will contain the respective elements. Click on the "Create a New Group" button to create a group. Double click on the group the rename.
![img(4)[3]](https://cdn.photoshoptutorials.ws/images/stories/ad1d21e18172_103F1/img43.png?strip=all&lossy=1&quality=70&webp=70&avif=70&w=1920&ssl=1 "img(4)[3]")
Step 3 : Designing the Header
Let's begin from the header. We are going to use a paper texture to create the header. Open up the "Paper Texture 1". We need to isolate the paper from the background. Click on the black background with Magic Wand Tool. This will select the background, invert the selection to select the paper. Press Ctrl+Shift+I (Select > Inverse).
![img(5)[3]](https://cdn.photoshoptutorials.ws/images/stories/ad1d21e18172_103F1/img53.png?strip=all&lossy=1&quality=70&webp=70&avif=70&w=1920&ssl=1 "img(5)[3]")
Fine tune the selection using the Refine Edge command to increase the contrast and sharpness of the selection. Press Ctrl+Alt+R (Select > Refine Edge). Adjust the parameters to refine the selection.
![img(6)[3]](https://cdn.photoshoptutorials.ws/images/stories/ad1d21e18172_103F1/img63.png?strip=all&lossy=1&quality=70&webp=70&avif=70&w=1920&ssl=1 "img(6)[3]")
Press Ctrl+J (Layer > New > Layer via Copy) to separate the selection.
![img(7)[3]](https://cdn.photoshoptutorials.ws/images/stories/ad1d21e18172_103F1/img73.png?strip=all&lossy=1&quality=70&webp=70&avif=70&w=1920&ssl=1 "img(7)[3]")
Drag and drop the texture in our document. Place it in the "Header" group. Select the layer and go to Edit > Transform > 90 degree CCW. Then on the same menu choose "Flip Horizontal". Place it in the header position. I resized it a bit (about 75%). Perform all transformations in one go.
![img(8)[3]](https://cdn.photoshoptutorials.ws/images/stories/ad1d21e18172_103F1/img83.png?strip=all&lossy=1&quality=70&webp=70&avif=70&w=1920&ssl=1 "img(8)[3]")
Press Ctrl+U to load Hue/Saturation dialog box. Reduce the Lightness all the way to -100. Now we got a nice silhouette of the texture with all its edge details.
12 comments on “Create a Minimalist Blog Layout in Photoshop”
Thanks for this tutorial !
Wollte Euch einfach mal in diesem Gaestebuch einen Gruss
hinterlassen. :)
Great stuff. I used this tutorial with ExportKit to create a WordPress theme directly from the PSD. I also made another responsive design using your steps - so I made a responsive HTML5 and CSS3 website just for fun too!
Thanks for this tutorial !
i learned a lot =)
Thanx
welcom on free photoshpp online
i have no words this tutorial
Awesome thank you
for this tutorial.
how to export it html and css.. thank you
Very impressive.
Thank for your tutorial.
Can i ask something...
How to convert the psd to xml files so its can be use in
blogspot template..
http://penaycberz.blogspot.com
Thank you for a tutorial !!
It's awesome.
thanks a bunch!!!! awesome! very generous of you
thanks