
Download Lightroom presets and LUTs, absolutely free. Use the presets to add creativity and style to your photos.
- Color Levels: 0, 0, +44
- Tone Balance: Midtones
- Preserve Luminosity: Checked
The result will be similar to the image below:
![step2f_color_balance_result[4]](https://cdn.photoshoptutorials.ws/images/stories/0b8645717ee8_131FF/step2f_color_balance_result4.jpg?strip=all&lossy=1&quality=70&webp=70&avif=70&w=1920&ssl=1 "step2f_color_balance_result[4]")
Now that that's done, we will now distort the perspective of our background to give an illusion of movement for our subjects. To do that, left-click on the layers: "sky" and "sea" and then activate the Transform tool (Ctrl/Cmd + T) and then rotate and resize as shown below:
![step2g_scale[4]](https://cdn.photoshoptutorials.ws/images/stories/0b8645717ee8_131FF/step2g_scale4.jpg?strip=all&lossy=1&quality=70&webp=70&avif=70&w=1920&ssl=1 "step2g_scale[4]")
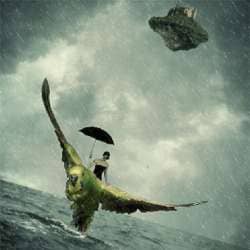
The result should be similar to this:
![step2h_result[4]](https://cdn.photoshoptutorials.ws/images/stories/0b8645717ee8_131FF/step2h_result4.jpg?strip=all&lossy=1&quality=70&webp=70&avif=70&w=1920&ssl=1 "step2h_result[4]")
Now that we're done, we're going to blur the background a little to create an illusion of movement - right-click on any of these layers and then click on Merge Layers. Then go to Filter > Blur > Gaussian Blur and input the following values:
- Radius: 4.0 pixels
![step2i_gaussian[4]](https://cdn.photoshoptutorials.ws/images/stories/0b8645717ee8_131FF/step2i_gaussian4.jpg?strip=all&lossy=1&quality=70&webp=70&avif=70&w=1920&ssl=1 "step2i_gaussian[4]")
Before continuing to the next step, let’s group the layers that we had just created. To group the layers, click on all the layers that we have made and press Ctrl/Cmd + G. After doing that, you’d notice that all the layers are now inside the group. Let’s rename this group to Background. To rename a group, simply click on the words “group 1" (etc) and a text box would appear and you may now rename it.
![step2j_group[4]](https://cdn.photoshoptutorials.ws/images/stories/0b8645717ee8_131FF/step2j_group4.jpg?strip=all&lossy=1&quality=70&webp=70&avif=70&w=1920&ssl=1 "step2j_group[4]")
Step 3 - Create the Floating Island
Now in this step, we will be creating the Floating Island. To start, open “island 1" by shelldevil. We need to separate it from its background. To do that, we will need to activate the Magnetic Lasso Tool (L).
![step3a_magnetic_lasso[4]](https://cdn.photoshoptutorials.ws/images/stories/0b8645717ee8_131FF/step3a_magnetic_lasso4.jpg?strip=all&lossy=1&quality=70&webp=70&avif=70&w=1920&ssl=1 "step3a_magnetic_lasso[4]")
Once activated, left-click your mouse anywhere on the edges of the island and drag your mouse until you reached the point where you started. This will thus create a selection area around the island.

When you're done, activate the Move tool (V) and then drag the island to the canvas that we've created and once there, rename the layer to: "island" Once the "island" layer is in the canvas, activate the Transform tool (Ctrl/Cmd + T) and right click on the canvas to bring up the Transform tool's contextual menu. Once open, click on Flip Vertical.


Then, activate the Transform tool again and this time, resize the island as seen below:

To make it blend with the rest of the images, let's adjust its Brightness/Contrast; To do that, click on the "island" layer and then go to the Menu bar, click on Image > Adjustments > Brightness/Contrast. When it opens, input the following values:
2 comments on “How to Create a Stormy Fantasy Scene in Photoshop”
OLD TUT
creative work i like it v mush