
Luminar AI lets you turn your ideas into reality with powerful, intelligent AI. Download the photo editor and see how you can completely transform your photos in a few clicks.
In this step you will move with the trees to create more space for the rocks which will be added in following steps.
Grab the Lasso Tool (L) and select the trees on the left. Click on the BACKGROUND layer and press Ctrl + C to copy the selection and Ctrl + V to paste it. Name the new layer LEFT TREES.
Then select the trees on the righ, copy and paste it and name the new layer RIGHT TREES.

Grab the Move Tool (V) and move with these two new layers up. Add adjustment layer Levels with the Input Levels set on 34;1,00; 229 above RIGHT TREES and create clipping mask from it. Do the same with LEFT TREES.

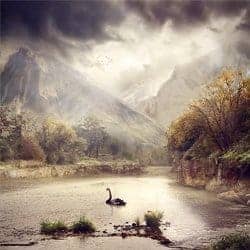
You should get something like on the following picture after this step.

Step 10 - Creating the Right Bank
It's time to create right bank. The rock needs to be added and the trees there needs to be blended. Let's start with the rock.
Open the picture with the right rock in Photoshop. Cut out the background and drag the rock into your manipulation. Press Ctrl + T and resize it on proper size. Press Enter to apply the resizing.
Name this new layer e.g. RIGHT ROCK and place it under the RIGHT TREES.

As you can surely see the rock should be darker to fit to the rest of the picture. You can easily fix it by adding new adjustment layer Levels above the RIGHT ROCK and setting the Input Levels on 0; 0,65; 255.

To blend the RIGHT TREES properly add new layer mask to the RIGHT TREES. Grab the Brush Tool (B), select some soft round brush, set the Opacity on 100% and pick black color. Now paint over the areas of the trees you want to dissapear. You can get inspiration what to hide on following picture.

Step 11 - Creating the Left Bank
Open the picture with left rock in Photoshop. Cut out the background and drag it into your manipulation. Name this new layer under the layer LEFT TREES and name it LEFT ROCK.
The rock has higher contrast than the rest of the image and also is darker. To fix it you'll use Levels adjustment layer again.
Set the Input Levels on 0; 0,69; 255 to make the rock lighter. To lower the contrast set the Output Levels on 0; 156.

Don't forget to create clipping mask from this adjustment layer to adjust only LEFT ROCK and not all layers under it.
9 comments on “Serene Fantasy Photo Manipulation”
👏
I enjoyed this and my pic turned out great. Thank you!!!
I enjoyed this and my pic turned out great thank you!!
thanks a lot..................
Sorry guys figured it out. I pressed the mask button while i was still in the channels tab. Clicking layers and clicking on the image followed by pressing masks fixed it ;)
When removing the sky the sky turns darker, it doesn't disappear. I tried using a white brush to see if it changes but it doesn't. I am using CS6, can someone help. Thanks
Wow, I can't thank you enough for making this tutorial of which I just completed. I made a couple of mistakes but I still love the final result. I have been using Photoshop and following many tutorials for over a year and did not learn as much as I did today with your one tutorial. Thank you, thank you, thank you : )
Very Nice!
very very good