Explore high dynamic range imaging in Photoshop. This Photoshop guide will show you how to photograph for HDR, view 32-bits/channel HDR images, and compress them into 8- or 16-bpc images. More about HDR and Photoshop after the click.
High dynamic range
In the real world, the dynamic range far exceeds what our eyes are capable of seeing and what our monitors and printers are capable of displaying. With high dynamic range (HDR) images, you can create images that can store a larger dynamic range.
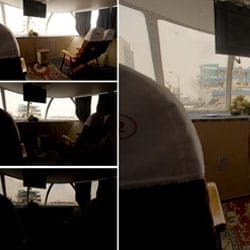
In the example below, a single exposure photograph doesn’t capture enough dynamic range to display all the details; no exposure setting could display the correct dynamic range. Photoshop was used to merge three exposures to capture more dynamic range.

Unlike 8 bits/channel or 16 bits/channel images, HDR images in Photoshop contain 32 bits of data per channel; more than what can be displayed on your monitor. In the latest version of Photoshop, you can create layered documents and several tools, filters, and commands for 32 bits/channel. Many of those tools, filters, and commands you normally see when working on 8-bits/channel images will be unavailable.
Most likely, your camera cannot capture 32 bits/channel images. However, with Photoshop, you can use the Merge to HDR command to combine photos with different dynamic range into a single HDR photo. For example, you can shoot a landscape three times with three different exposure to capture a wider dynamic range and merge them into Photoshop to create a single HDR photo.
Photograph for HDR
If you want to shoot photos and use the Merge to HDR command in Photoshop to create a HDR photo, remember the following tips:
- The images must be of the same scene. Place the camera on a tripod before shooting.
- Shoot at different exposure settings to capture the full dynamic range in the scene. You will need at least three photos to use the Merge to HDR command but we recommend at least five for best results.
- Set your camera to Manual mode and adjust the shutter speed to create images with different exposure. You can sometimes get away with using the auto-bracket in your camera but the exposure changes are usually too small. Do not adjust the aperture or ISO because those will alter the depth of field, noise, or vignette in the photo.
- The exposure difference between the photos should be at least one or two EV steps apart. If you are using a camera with low dynamic range, such as a point and shoot camera with a small sensor size, the photos should be one EV step apart. On higher quality cameras such as DSLR’s with larger sensors and wider dynamic range, the images can be two EV steps apart. There is usually no benefit to using smaller EV steps.
- The scene in all the images should be identical. Do not photograph moving objects such as cars, people, or landscapes on a windy day. If you use flash, make sure that you use the same flash output for all the images.
- Shoot in RAW mode instead of JPEG for better dynamic range.
Merge to HDR command
The Merge to HDR command in Photoshop lets you combine several of the same scene with different exposures into a single HDR 32-bpc (bits-per-channel) image. First, you’ll need to have three images taken at different exposures. Run Photoshop and choose File > Automate > Merge to HDR.
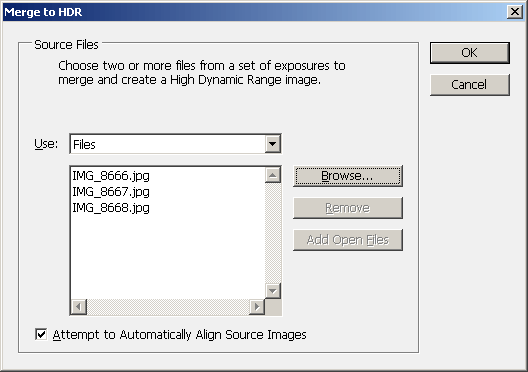
In the Merge to HDR window, click the Browse button and browse for the the three images with the same exposure. If the Attempt to Automatically Align Source Images option is enabled, Photoshop will try to align the image in case the images are not perfectly aligned. Usually, you would leave this option enabled and only disable it if misaligns or causes artifacts. Click OK when you are ready.
One response to “HDR Photos and Photoshop”
-

Im starting learn on photoshop, can you share your source so we can learn better :).
Regard, seoitc.com.
Leave a Reply to seoitcCancel reply