Make your artwork look like they're from an alternate universe. These Cyberpunk presets work with Photoshop (via the Camera Raw filter) and Lightroom. Download all 788 presets for 90% off.
First, make sure that you have a 32-bpc image opened then choose Image > Mode > 16 Bits/Channel or 8 Bits/Channel.
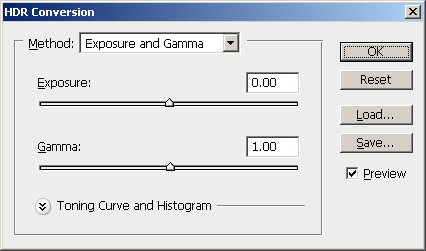
In the HDR Conversion window, you can choose one of four different methods to convert the image into a lower bit depth:
- Exposure and Gamma lets you adjust the brightness and contrast. To use Exposure and Gamma, adjust the Exposure slider to get the correct brightness then adjust the Gamma slider to get the correct contrast.

- Highlight Compression will compress the highlights to prevent overexposed areas. For example, if you had a bright sky that looked white on your monitor, the Highlight Compression method will make the sky darker to reveal the details. There are no settings to adjust in this method.

- Equalize Histogram compresses the entire image (both highlights and shadows) to reveal the maximum details. There are no settings to adjust in this method.

- Local Adaptation is the most popular method to use to reveal hidden details in high-contrast images. This method uses a special algorithm to adjust the tonal values so that the most details can be seen. To use Local Adaptation, adjust the Radius slider to adjust the size of the local brightness regions to get the correct contrast between the edges. Then, adjust the Threshold slider to specify the sensitivity of the Radius setting. You can also expand the Toning Curve and Histogram area to adjust the toning curve.

Click OK and your image will be converted to the bit depth that you chose earlier.
Other HDR tone mapping methods
Another method of converting a 32-bpc image into an 8- or 16-bpc image is to use third party software such as Photomatix or using a layered HDR tone mapping Photoshop technique.

One comment on “HDR Photos and Photoshop”
Im starting learn on photoshop, can you share your source so we can learn better :).
Regard, seoitc.com.