
Learn step by step how this painting was created. You will get a good understanding of how to create anime images with beautiful lighting and learn techniques that will help you in many types of drawings.
Preview of Final Results

How to Create an Anime Artwork in Photoshop
Step 1 – The Outline
Most people draw the outline on paper then use a scanner to load the outline into Photoshop. Begin by opening the outline image into Photoshop.

- Use the Levels tool (Image > Adjustments > Levels) to correct the contrast of the outline. You can do this with the Levels tool by moving the black and white input sliders towards the center of the histogram. Make sure that the background is 100% white and the outline is 100% black with smooth edges.
- To begin, you’ll need to unlock the Backgroundlayer. To do this, double-click on the Backgroundlayer in the Layers palette and click OK in the New Layer window.
- Now that the layer is unlocked, you can change the blending mode to Multiply. This will make the white background in the layer transparent.
Tip: Ensure that there are no broken lines. You will be using the Magic Wand tool often and broken lines will slow you down.
Step 2 – Separating the Outline
In this step, you’ll learn how to separate the outline and the background into two layers. This will also make the outline slightly thinner. You’ll also learn how to dissect the outline without any jagged edges using the Load Selection from Layercommand.
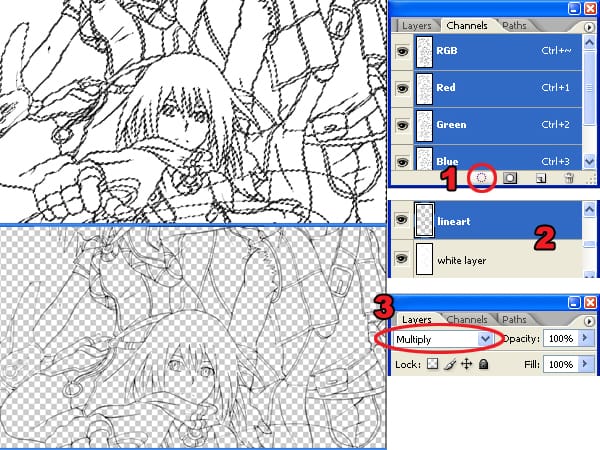
In the above image, you can see the difference between using the Magic Wand tool and the Load Selection from Layer command. The Magic Wand tool produces jagged edges that become apparent when placed on a colored background. Instead of using the Magic Wand tool, use the Load Selection from Layer command to produce smoother outlines that blend well with any background.
- In the Channels palette (Window > Channels), click on the
 button. This will create a selection using the tonal information from the layer. Press the Delete button on your keyboard to delete the white background.
 - Add a new layer below the outline layer and fill the layer with white.
- Change the blending mode of the layer to Multiply.
Step 3 – Base Color
Now that we have the outline and white background separated, we can add the base color.

- Add a new layer below the white layer.
- Select the Magic Wand tool and, in the option bar, set the Tolerance to 50.
- In the option bar, checkmark the Contiguous and Sample All Layers options.
- With the Magic Wand tool selected, click where you want to add color.
- Expand the selection by 3 pixels using the Expand command (Select > Modify > Expand). If you are using Windows, you can press Alt, S, M, E on your keyboard to quickly access this menu item.
- Use the Paint Bucket tool to fill the selection with a color of your choice. Use the same technique (Create a selection with the Magic Wand tool then fill with the Paint Bucket tool) for the entire image.
Step 4 – Adding Shadows
In this part, you’ll learn how to add shadows to the image. One important technique from this step is how to select the correct color.

- Create a new layer and position it between the white layer and the base color layer.
- Select the Magic Wand tool and set the tolerance to 1 (so that it will only pick one color) and uncheck the Contiguous and Sample All Layers options.
- Select the Brush tool and set the hardness to 100%. This will give the brush a sharp edge.
- In the Tools palette, click on the foreground color. This will bring up the Color Picker window. Select the base color from where you want to start. This will give us the hue of the color. Move the slightly off the area to change the saturation and brightness of the color.
- Paint the shadows. Be sure to pay attention to where the light is coming from to get proper looking shadows.
Step 5 – Dodge and Burn
The Dodge and Burn tool will be used to give a gradient tone effect to the solid colors.

- Duplicate the layers with the base color and shadow then position them above the original base color and shadow layers. The new layers will be used for dodging and burning while the old layers will be used to load selection with the Magic Wand tool. Select the layer with the base color and use the Magic Wand tool to create a selection of an area that you want to edit. In the image above, we created a selection of the hair.
- When using the Dodge or Burn tool, turn on the “Other Dynamics” option in the Brushes palette (Window > Brushes).
- Also, in the Dodge or Burn tool options, set the range option to Midtones.
- When using the Dodge or Burn tool, set the hardness to 0%.
- Select the top shadow layer (shade 2 in the screenshot). You will be using the Dodge and Burn tool to create a gradient in the shadows. Start with the Burn tool to darken the areas in a smooth motion on the lower part of the shadow.
- On the same layer, select the Dodge tool and lighten the upper part of the shadow.
- Select the duplicated layer with the base color. Use the Dodge tool to lighten the upper area of the base color.
- Use the Burn tool to burn the lower area of the base color.
Step 6 – Adding Reflected Light
In this step, you’ll learn how to add light reflected from the ambient light.

- Use the same setting as previously used for the Magic Wand tool.
- Turn on the “Other Dynamics” setting in the Brush palette (Window > Brushes).
- Set the Brush hardness to 0%.
- For this image, a dark purple color was used to shade the area with no reflected light. The light source is from the left of the image so the right side of the characters were painted with dark purple.
- A light yellow color was used to shade the areas facing the ambient light.
Step 7 – Coloring the Outline
Coloring the outline will add more detail to the final image and it’s easy to do.

- Leave the brush presets on.
- In the Layers palette, select the layer with the outline then lock the transparent pixels by clicking on the
 button.
 - Use the Brush tool to color the outline using a color that is close to the outline.
- Keep using the Eye Dropper tool to select the color beside the outline.
Step 8 – Creating the Smokes
Now you’ll learn how the smoke swirling around the characters were created.


- Create a new layer for the clouds. Use the Brush tool with a hardness of 100% and paint some zigzag shapes for the smoke.
- Use the Smudge tool to smudge it in the motion shown above.
- Use the Dodge and Burn tools to create volume on the smoke so that it looks 3D.
- Load the selection (Select > Load Selection) of your smoke layer. Choose Select > Modify > Contract and enter an amount that will make the selection half its size. You may have to undo and try this several times to get the correct amount.
- Create a new layer for the smoke highlights. Use the Brush tool and paint inside the smoke with yellow orange.
- Select the Move tool and nudge the layer up by pressing the up arrow on your keyboard.
Step 9 – Creating the Cloudy Sky
Creating the cloudy sky uses a similar process as the previous step.


- Create a new layer for the sky and name the layer “sky”. Use the Gradient Tool to create a gradient like the image above (#1).
- Create a new layer above the skylayer and name this “clouds”. Use the Brush tool and paint some lines to create the shape of the cloud.
- Use the Smudge tool to smudge the cloudlayer in the motion shown (#3).
- Load the selection of the cloudslayer (Select > Load Selection). Choose Select > Modify > Contract and contract the selection like you did when you were creating the smoke. The selection should be close to half of what it was. You may have to try this more than once to get the right value.
- Create a new layer and mane this layer “clouds 2”. Position it above the cloudslayer. Select a color that it slightly darker than the color you used to create the clouds. It should still have the same hue and saturation. Paint the selected area with this color.
- Use the Dodge and Burn tools to add volume to the clouds so that they look 3D.
- Duplicate the clouds layer then use the Free Transform tool (Edit > Free Transform) and enlarge the cloud. Set the opacity of this new layer to 75%.
- Use the Dodge and Burn tools on the skylayer to create a light source.
Step 10 – Adding Light

- Create a new layer and name this layer “light”. Move the layer to the very top so that it is above all the other layers.
- Select the Brush tool. In the Brushes palette (Window > Brushes), checkmark the Other Dynamicsoption.
- Set the brush hardness to 0% for soft edges.
- Select white as the foreground color then paint the areas where you want the light to appear. The image above shows the areas that were painted.
Step 11 – Tinting With a Gradient
This step will show you how to create more realistic colors by warming the areas closest to the light source and cooling the areas away from it.


- Create a new layer and position it above all the other layers.
- Load the selection of the characters then use the Gradient tool to create a orange to blue gradient. Because the light source of the drawing used for this tutorial is from the left side, I will draw a gradient from the left to right. This will make the left side warmer and the right side cooler.
- Change the blending mode of the current layer to Color.
- Lower the opacity to about 10-20%.
Final Results
The image above was created by Adimas Soekidin. You can view more of his work at his deviantART gallery.
31 responses to “How to Create an Anime Artwork in Photoshop”
-

How to choose colors in Photoshop for anime illustration?
-
Color selection in Photoshop for anime
-
Thanks for this kind of very helpful info. Keep it up!
-
GREAT! Thanks
-
How do i download the Photoshop app? Please reply. I need to create many Anime pictures!
-
TOP !!! 👍👍👍👍👍❤😊
-
TOP !!! 👍👍👍👍👍👍❤😊
-
Thank you so much. Thanks to this, you will be the start a new artline. If my group ever gets famous, you’ll be mentioned. THANK YOUUH
-
Great tutorial I did not seen never like it before
thank you so so much -
ummmm….
-
thanks for tips,i like drawing manga
-
Good artist anime real peopl!:)
-
awesome….tnx…. it helps a lot…..
-
hahhahahahahahahahah walang ______ ano ba naman yan!!!!!!!!!
-
Oh Gosh!!!
ThanQ thanQ thanQ!!! I’ve been looking for something like this forever!
You have no idea how much it has helped me!
Your the Best!
Keep up the amazing job! ^_^ -
Useful tutorial, thank a lot! But one thing I cannot understand: why should we checkmark the Other Dynamics option, if we do not any changes in this palette? It seems to me the result is the same, with checked option or without it?
-
One question. What if the image was drawn in pencil, can that still work?
-
ummm wouldnt it be better to use the gradient tool instead of the dodge and burn? its waaay easier, i tried dodge and burn, it didn’t work as well and was hard to make it smooth. The gradient tool does it all for you. gradient is better
-
Thanks A Big Help I Can Proceed now with my Manga
-
This is awesome thanks you so much!
-
Does anyone know how to perform the same function in Photoshop CS6? That is the newest version, and I cannot find the button mentioned.
-
Which button?
-
The button that I need to find in Photoshop CS6 is the tonal information thingy
-
-
I love my boobs because this big! I wanna to make a daugther or son.. Who want? With me? (•)(c•–
-
me me
-
I’ll take you on anytime …..
-
pervs
-
is this anime not sex website
-
-
Awesome!
-
thank you, i’ve been looking for a tutorial for this
-
is there a way that u can show how to draw the characters too with more detail with a video or somthing?
Leave a Reply