Step 22
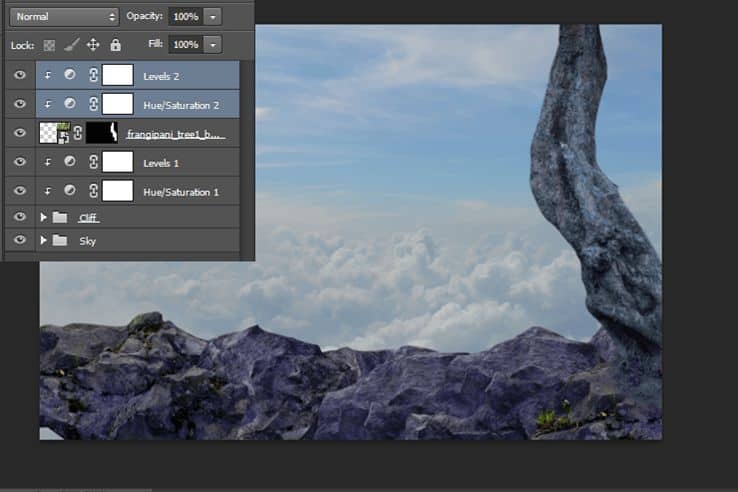
Create a new Levels adjustment layer (Layer > New Adjustment Layer > Levels), set the parameters like as shown image below.
Step 23
Select Levels adjustment layer and hue/saturation adjustment layers then right click choose Create Clipping Mask. It will make the effect only apply into group folder “stone”
Step 24
Add the photos “tree1”. Go to File > Place and select the photos.
Step 25
Use the Pen tool (P) to selection the image, and mask it (repeat step 11). then use transform tool (Ctrl/cmd+T) right click choose flip horizontal to reflect the image.
Step 26
with selected the layer mask, Use Brush tool (B) then set the brush to soft, size to 175 pixels. Paint over the bottom part of tree like as shown in the image below.
Step 27
Create a new Hue/Saturation adjustment layer (Layer > New Adjustment Layer > Hue/Saturation), set the parameters like as shown image below.
Step 28
Create a new Levels adjustment layer (Layer > New Adjustment Layer > Levels), set the parameters like as shown image below.
Step 29
Select Levels adjustment layer and hue/saturation adjustment layers then right click choose Create Clipping Mask. It will make the effect only apply into tree layer.
Step 30
Add more a new Levels adjustment layer (Layer > New Adjustment Layer > Levels), set the parameters like as shown image below.
Step 31
With selected the layer mask, Use Brush tool (B) then set the brush to soft, size to 300 pixels. Paint over the left part of tree like as shown in the image below.
Step 32
If done, the right part of the tree will darker than left.
Step 33
Add the photos “tree2”. Go to File > Place and select the photos.
Step 34
Use the Pen tool (P) to selection the image, and mask it (repeat step 11). then use transform tool (Ctrl/cmd+T) to put the image like as shown image below. then repeat step 27+28 to create adjustment layer so we get the same effect with “tree1”.
Step 35
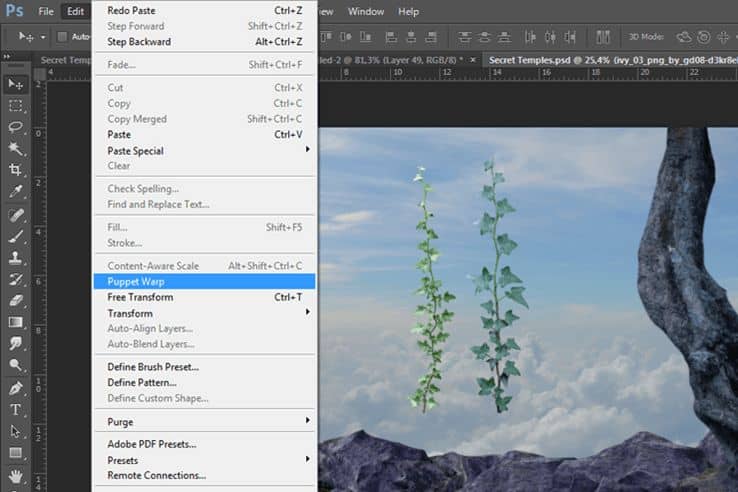
Add the photos “Ivy”. Go to File > Place and select the photos.
Step 36
Go to Edit > Puppet Warp
Step 37
You will see like as shown image below.
Step 38
This will open the tool and allow us to manipulate and warp the object. Placing points systematically around the image, will create bending/warping points. Place them on your object in the best arrangement to create joints to bend as shown below.14 responses to “How to Create This Stunningly Surreal Artwork of a Secret Temple Above the Sky”
-
Cool tutorial! Instructions are easy to follow. Good job
-
most helpful post.thanks for sharing.
-
Great work…!
-
Awesome resources.Huge collection.Great job.Very useful post.
-
Awesome tutorial! I’m going to print the final result, frame it and gift it to a friend ^^
I couldn’t help but notice there are many grammatical errors and such. If you want, I could rewrite your tutorial with correct grammar and syntax and make it “cleaner”.
-
Forgot the tutorials are only bought and posted on the site.
I am sure the people behind the site can proof read tutorial and correct it themselves, so please do so. Or at least let me do it, it really is a pity a good tutorial to be hindered by a language barrier.
-
-
ni buatan orang Indonesia ya??
-
This is so amazing!!!!
-
that flying boat reminds me of final fantasy ^_^
-
Great tutorial. Your website is main learning source for me. We search the web every week and compile some really good tutorials out there for our readers. So, we have feature it
-
how did u clip the ‘clipper’ ?
-
AMAZING!!!
-
idea’s ok, just doesn’t do it for me !!!
-
This is a really neat tutorial. The puppet warp on the vines is very clever but I would make it wrap around the tree. The boat and tower have too much contrast and objects that are far away should have some haze to it. Pretend that you are on a mountain and looking far away….. everything fades away in the haze if they are far enough.


Leave a Reply