Create a Surreal, Emotional Underground Scene Photo Manipulation

Create a Surreal, Emotional Underground Scene Photo Manipulation

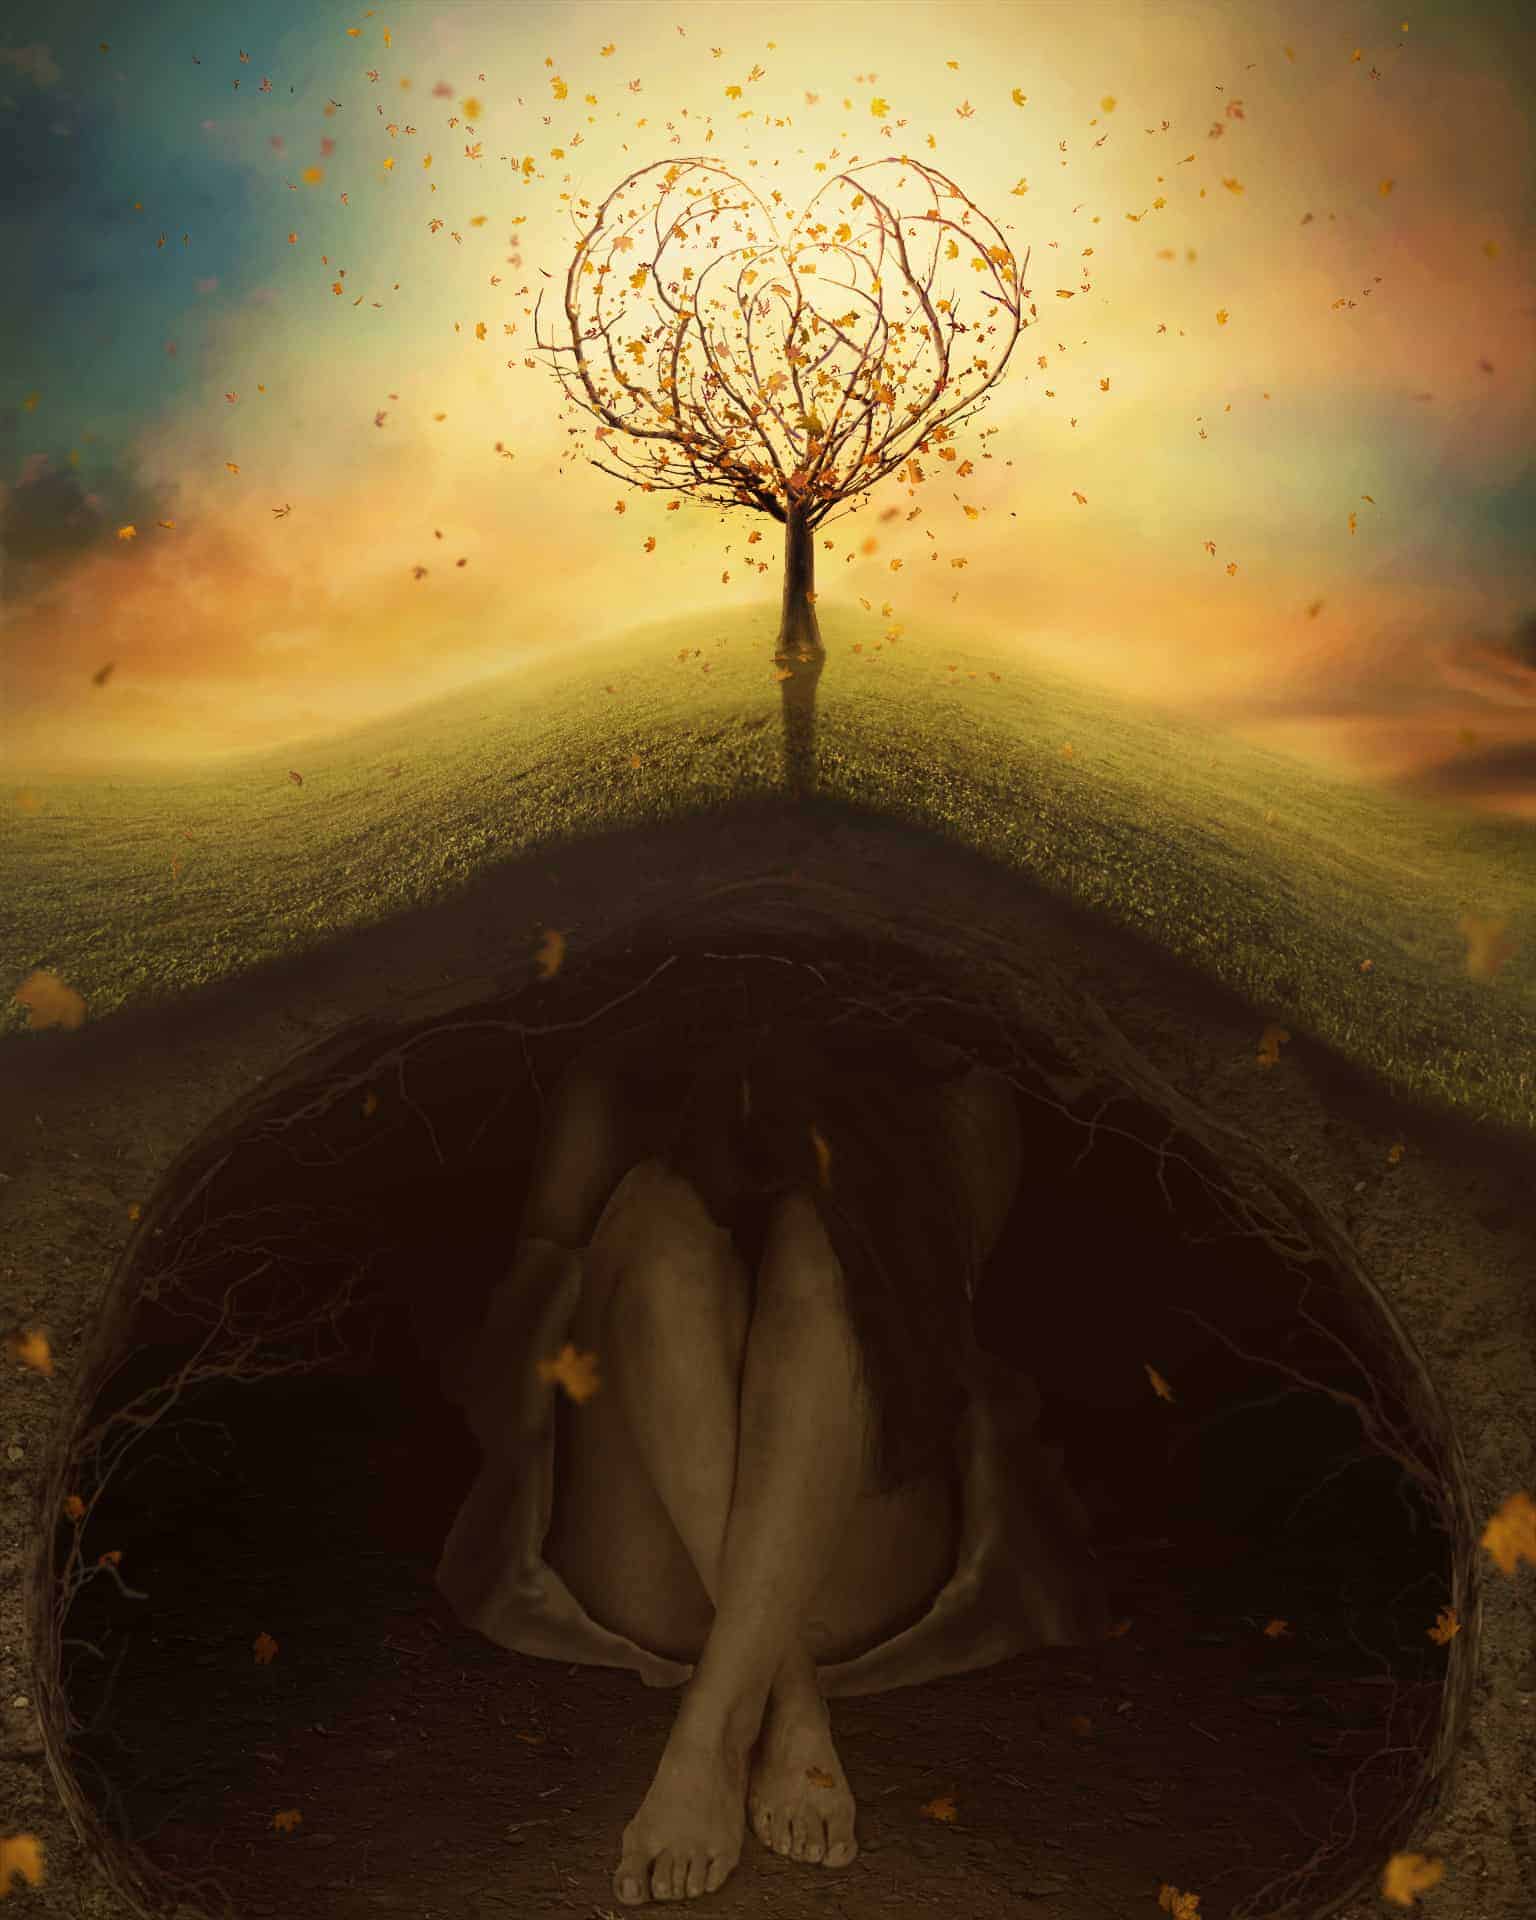
Learn how to create this amazing surreal underground scene with a heart created from branches and scattering leaves! This photo manipulation tutorial will teach you various techniques such as blending, complex masking, painting, working with groups, and more.

Preview of Final Results
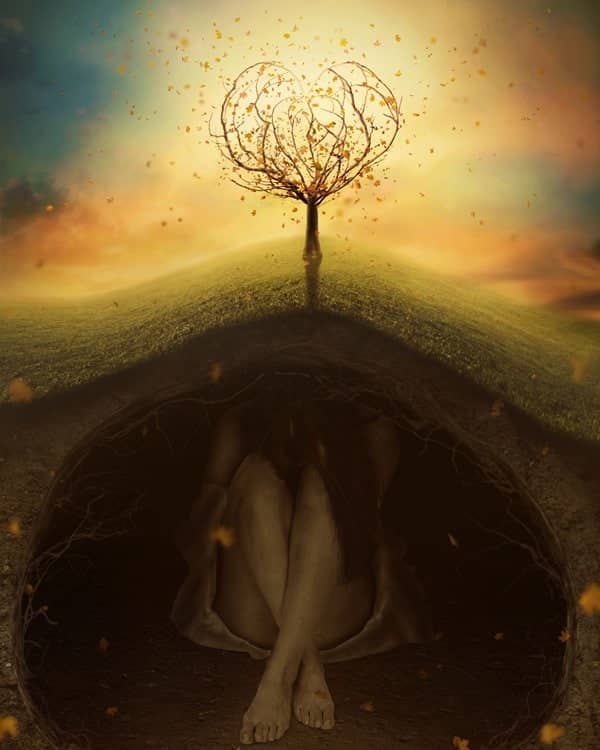
depression99-final

Tutorial Resources

Step 1

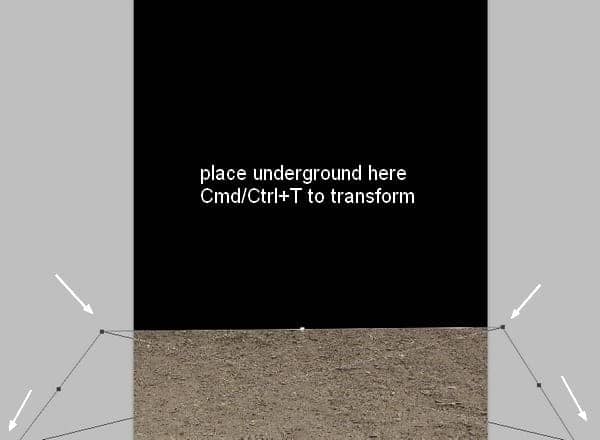
Create a new document with size of 900x1125 px and fill it with black. Open soil 1 image. Use Move Tool (V) to drag it into our black canvas, choose Cmd/Ctrl+T to transform it as shown below:
depression1

Step 2

Click the second button at the bottom of Layer Panel to add mask to this one. Use soft black brush with opacity about 60-70% to erase some parts of the underground. You can see the result on layer mask and result on picture:
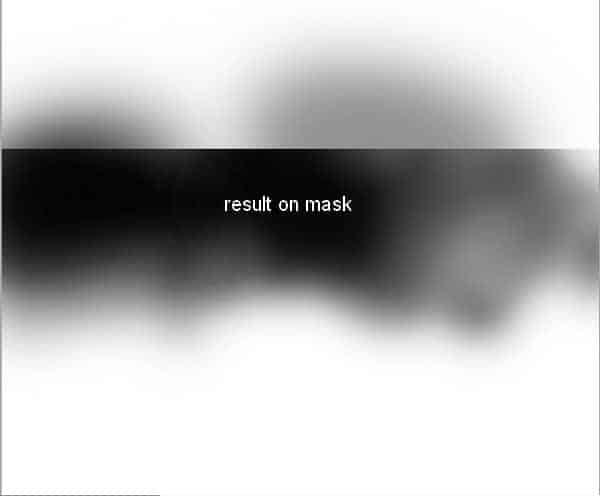
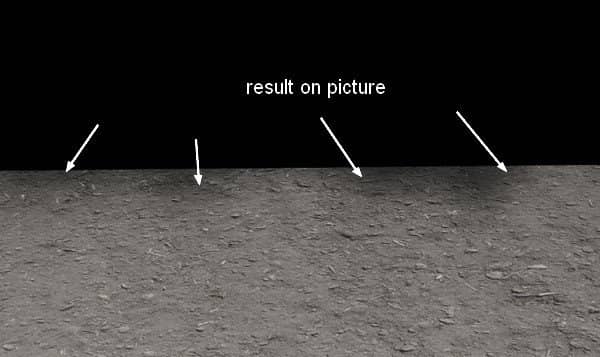
depression2
depression2a

Step 3

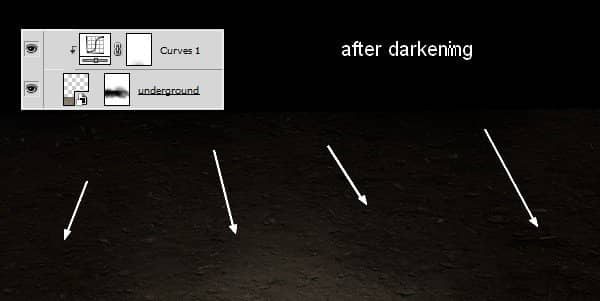
To darken this underground, I used a Curves layer with Clipping Mask. On underground layer, choose Layer-New Adjustment Layer-Curves:
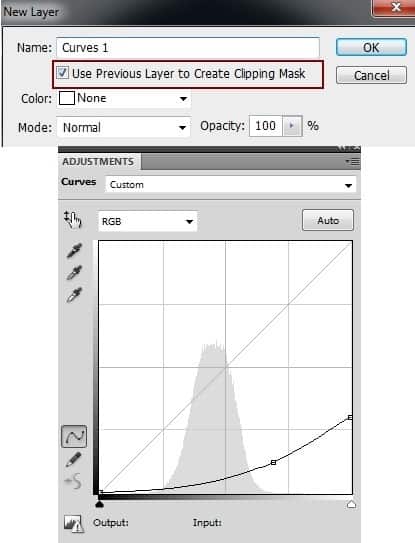
depression3

On Curves layer mask use black brush with opacity about 10-15% to reduce the lightness on the part near foreground:
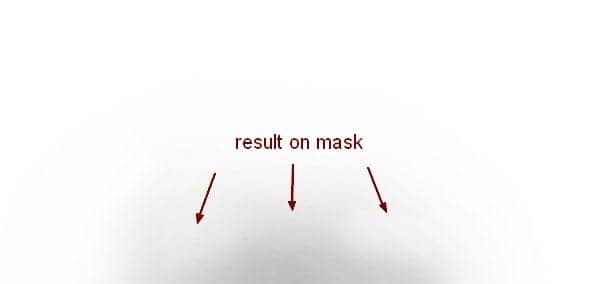
depression3a
depression3b

Step 4

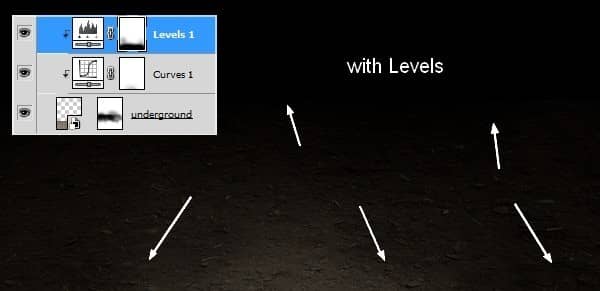
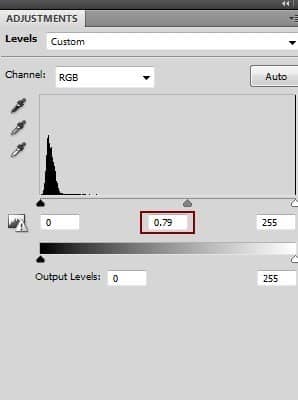
I added a Levels layer to change the contrast a little:
depression4

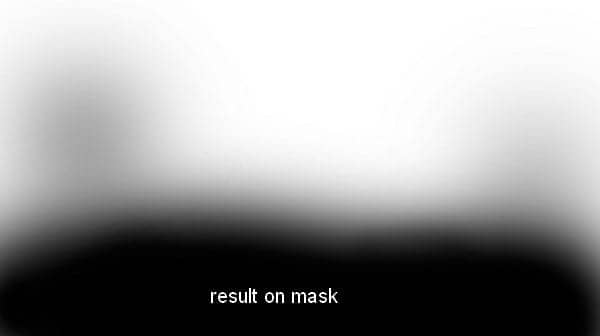
I used black brush to erase the foreground:
depression4a
depression4b

Step 5

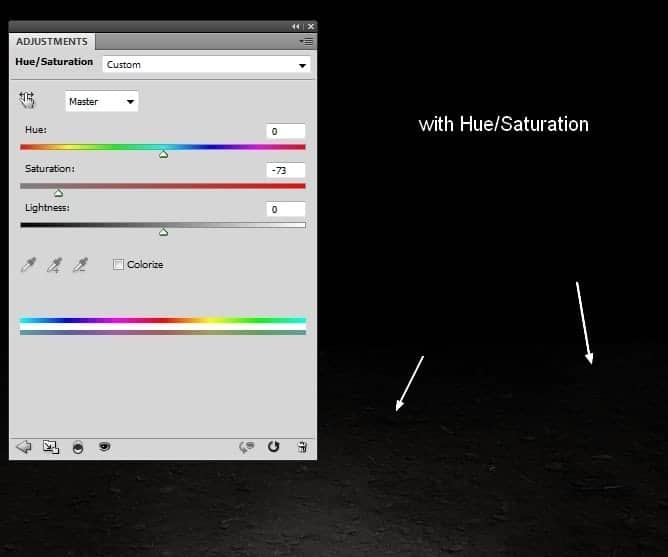
I made a Hue/Saturation layer to reduce saturation of the underground:
depression5

Step 6

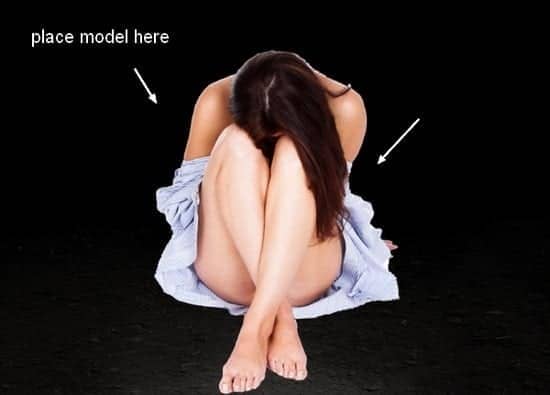
Isolate model from background and place her on the underground (feel free use your own stock).
depression6

Step 7

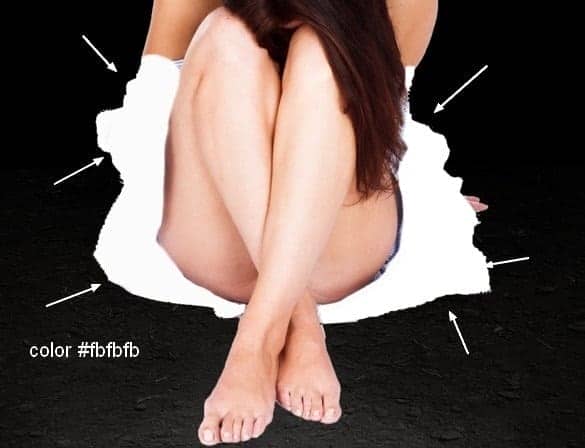
I don't like the shirt model wearing so I'll repaint it. Make a new layer (Clipping Mask), use hard brush with color #fbfbfb to fill the shirt:
depression7

I named this layer "clothes base". We'll be adding more details to it later.

Step 8

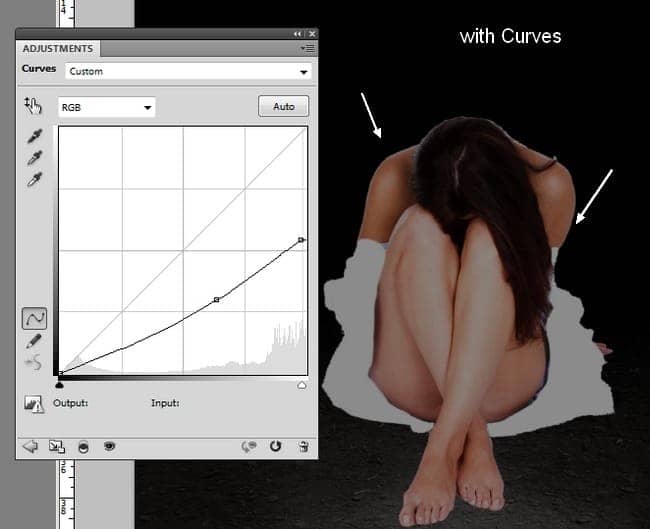
Use Curves to darken the model :
depression8

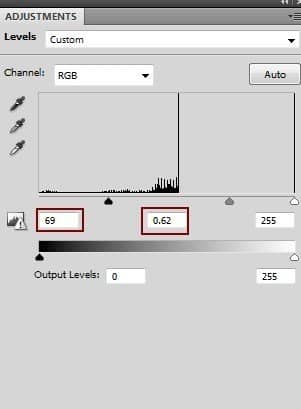
I added a Levels layer to fix the contrast there:
depression8a

On Levels layer mask use brush to erase on some part of the model to get proper light and shadow:
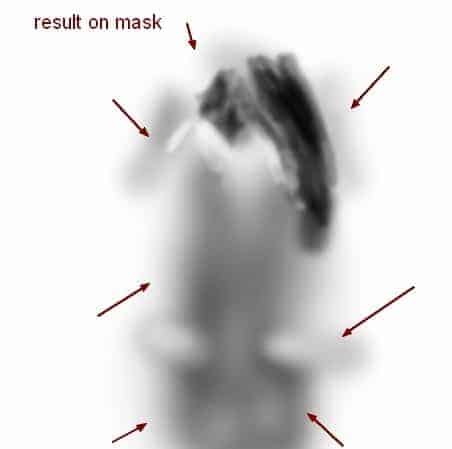
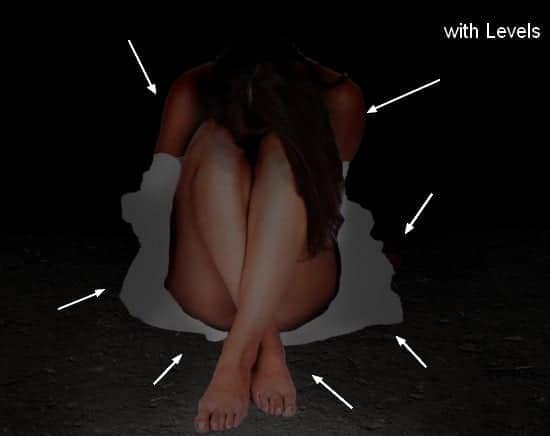
depression8b
depression8c

Step 9

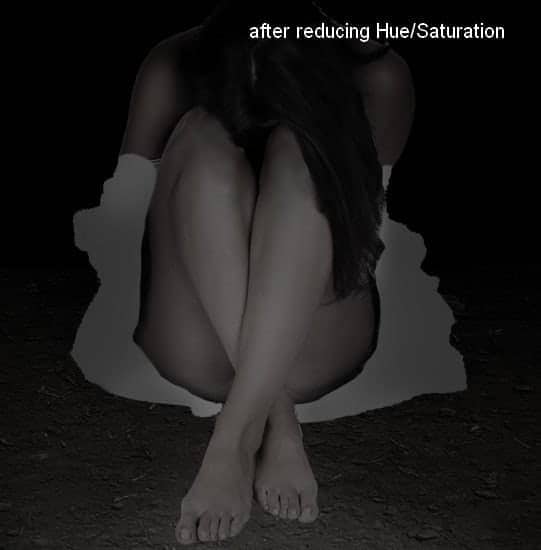
Apply Hue/Saturation to match her with the scene:
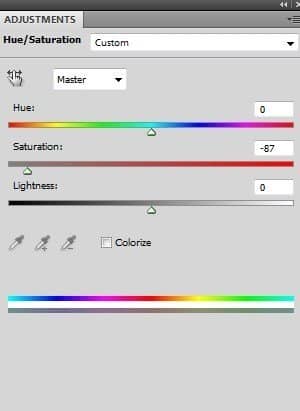
depression9
depression9a

Step 10

Now we'll pay attention to the clothes. Create a new layer, fill with 50% gray and change the mode to Overlay:
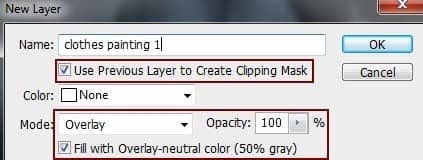
depression10

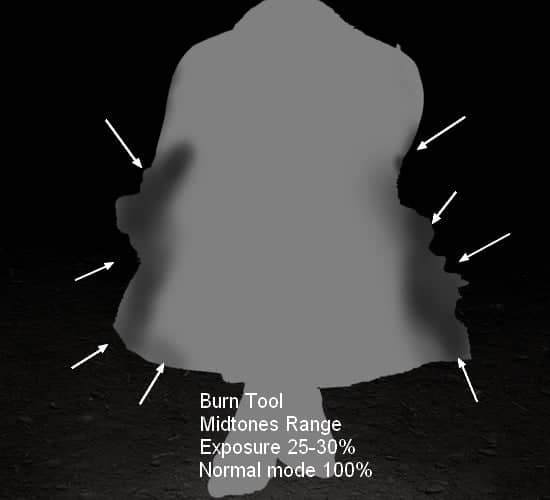
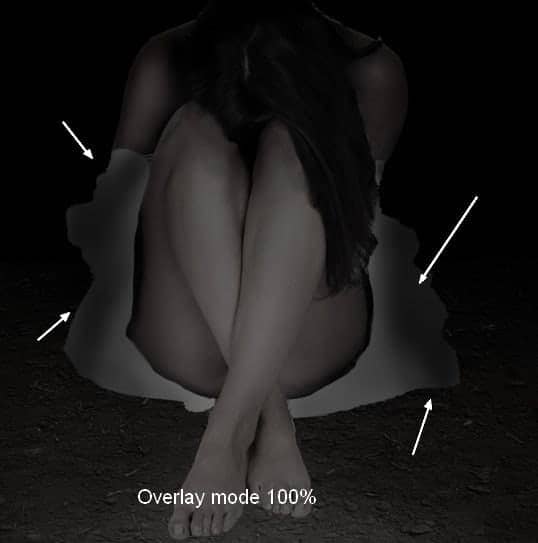
Take Burn Tool (O) with Midtones Range, Exposure about 25-30% to darken the clothes. You can see how I did it with Normal mode and result with Overlay mode:
depression10a
depression10b

Step 11

Make a new layer with same settings, use Dodge and Burn Tool to create details of the wrinkles for the clothes. I've tried to achieve a silky, soiled look (as she is sitting on the underground ) and you can see my results as a reference:
depression11
depression11a

Step 12

Make a new layer under model one. Use soft black brush with opacity about 30% to create shadow for model clothes, legs on the ground:

depression12

Step 13

To give the model more "dirty" look, choose wood texture, use Rectangular Marquee Tool (M) to make a selection :

depression13

Place this part on the model and use Warp Tool (Edit-Transform-Warp) to bend this part a little:

depression13a

Change the mode of this layer to Soft Light 100%:

depression13b

Step 14

From brush menu, choose Reset Brushes to change brush preset to default. Now on brush menu, click to choose one of Spatter brushes (mine is Spatter 24):

depression14

Press F5 to change settings for this brush:

depression14a

Add layer mask to this wood texture layer. Use indicated brush to remove hard edges and create a subtle effect on the model:

depression14b
depression14c

Step 15

I darkened the effect with a Curves layer:

depression15

On its layer mask, reduce the dark with soft brush with very low opacity (10-15%) on model feet:

depression15a
depression15b

Step 16

After darkening, the model hair became very solid and unnatural. To correct it, I made a new layer on the top, used brush with color #080707, 5 px to paint some soft parts and tiny hair strands:

depression16

Step 17

Open soil 2 stock. Take a part from it and position it above the model:

depression17
depression17a

Use layer mask to get the look below:

depression17b

Step 18

Drag the soil again into our pic:

depression18
depression18a

Add layer mask to this one. Use black brush with hardness about 70-75% to paint inside this part to create a form of a cave.

depression18b

Step 19

I wanted to fix something of the cave so active Clone Tool (S) and make a new layer:

depression19

Use this tool to remove these details:

depression19a

Step 20

Make all the cave layers and clone one selected then press Cmd/Ctrl+G to make group for them. Change the mode of this group from Pass Through (default group mode) to Normal 100%. I named the cave layers "part 1" and "part 2". Create a Hue/Saturation layer within this group:

depression20
depression20a

Step 21

Use Curves to darken the cave:

depression21

On Curves layer mask use brush with very low opacity (10-15%) to reduce the dark on some parts a little:

depression21a
depression21b

Step 22

Open branches 1 stock. Use Lasso Tool (L) to choose one part from this image then drag it into our image. Use Warp Tool to tweak this part as shown below:

depression22
depression22a

Remember to place this layer under cave group.

Step 23

Continue to add more branches to the cave using different parts of the stock, transform, warp it...if needed. I used 12 layers and here is my result:

depression23

Some branches are hard to see as they're dark but we'll brighten them to make them more visible.

Step 24

Make group for these branches as done with the cave. I named this group "branches 1" and I applied Hue/Saturation for them:

depression24
depression24a

Step 25

Use Curves to brighten the branches:

depression25

On Curves layer mask use brush to reduce the lightness on some branches below:

depression25a
depression25b

Step 26

Open branches 2 stock. Take a part from the trunk and locate it on the top of the cave, set this layer above the cave group. I used Warp Tool to bend it a little:

depression26
depression26a

Go to Edit-Puppet Warp to tweak this branch more:

depression26b

Step 27

Add layer mask to blend this branch with the cave a bit:

depression27

Step 28

Duplicate this layer five times and arrange them around the cave. Double click the Puppet Warp filter of each layer to edit their curve. Here is my result:

depression28

Step 29

Group these layers and name it "branches 2". Use a Curves layer within this group to darken these branches:

depression29

Apply erasing job on Curves layer mask:

depression29a
depression29b

Step 30

Add a Hue/Saturation layer for the branches 2:

depression30
depression30a

Step 31

Open grass stock. I took grass part and put it above the cave after tweaking it a little with Warp Tool:

depression31
depression31a

Apply Puppet Warp to create a hill from the grass part:

depression31b

I named this layer "hill".

Step 32

Add layer mask to this one and use brush with hardness about 10-15% to remove hard edges and create a soft, smooth look for the hill:

depression32

Step 33

Make a new layer under the hill one. Use soft black brush with opacity about 70% to paint under the hill to make shadow for it on the cave:

depression33

Step 34

To fix some parts on the hill I used Clone Tool on a new layer with Clipping Mask:

depression34
depression34a

After cloning I found them a bit blurred. To correct it, go to Filter-Sharpen-Unsharp Mask and fill the following values:

depression34b
depression34c

Step 35

Use Curves to darken the hill:

depression35

As you see on the final result preview, the main light comes from top center . So on Curves layer mask I erased the higher part of the hill that's nearer the sky (to keep it brighter) and keep the lower part darker (don't erase or just erase with lower brush opacity ).

depression35a
depression35b

Step 36

Apply Photo Filter to change color of the hill a little:

depression36
depression36a

Step 37

Open sky 1 stock. Choose sky part and place it on the top (the black part), set this layer above the background and under underground group. I rotated it and tweaked it a little:

depression37
depression37a

Use layer mask to remove unnecessary edges:

depression37b

Step 38

To make sky look smoother, go to Filter-Noise-Dust & Scratches:

depression38

I named this layer "main part".

Step 39

Copy a part from sky stock and put it at the left side of the main part, resize to be smaller:

depression39
depression39a

Remove hard edges of this part with layer mask:

depression39b

I called this layer "part 2".

Step 40

Add another part from sky stock to our picture. I placed it at the top right, used layer mask, applied Dust & Scratches filter with same settings in step 38:

depression40
depression40a
depression40b

Step 41

Continue adding another sky part. Move it to the right corner of the sky, apply Dust & Scratches filter and layer mask:

depression41
depression41a
depression41b

Step 42

Make group for these sky parts, name it "sky 1" or whatever you want. Use Curves to change color of sky 1:

depression42

Apply erasing job on Curves layer mask:

depression42a

Step 43

Make a Color Balance layer within this group:

depression43

Erase on Color Balance layer mask again with brush with opacity about 45%:

depression43a
depression43b

Step 44

To add more details to the sky, I used sky 2 stock. Place it over sky 1 and change the mode to Soft Light 100%:

depression44
depression44a

Name this layer "sky 2".

Use layer mask to reduce some details of the sky 2:

depression44b
depression44c

Step 45

Apply Dust & Scratches filter with radius 2 px:

depression45

Step 46

I used a Color Balance layer for sky 2:

depression46
depression46a

Step 47

Continue with a Selective Color layer:

depression47
depression47a

Step 48

Darken the sky a little with Curves:

depression48
depression48a

Step 49

I used a Levels layer to darken the sky 2 again. Then I erased the top center of the sky to keep it brighter than the sides:

depression49
depression49a
depression49b

Step 50

Make a new layer on the top of layers. Use soft white brush with 50% opacity to paint on the top center of the sky. Change the mode of this layer to Soft Light 100%:

depression50
depression50a

Step 51

New layer and use soft brush with color #f7d17f to paint on the top center of sky again. Lower opacity of this layer to 30%:

depression51
depression51a

Step 52

Open tree stock. Take its trunk and put it on the top of the hill after scaling:

depression52
depression52a

Use layer mask to blend the tree with the grass:

depression52b

Step 53

To make shadow for the tree on the hill, I created a layer under the tree one. Hold Cmd/Ctrl while clicking tree thumbnail layer to load its selection:

depression53

Fill this selection with black (Shift+F5). Then choose Edit-Transform-Flip Vertical and move this shadow under the tree bottom.

depression53a

Step 54

Lower opacity to 60% then apply Gaussian Blur with 3 px (Filter-Blur-Gaussian Blur):

depression54

On Filter layer mask use soft black brush to remove blur effect at the part near the tree bottom to keep the hard look for it:

depression54a

Step 55

Add layer mask to shadow layer and remove the top of it:

depression55

Step 56

I used Curves to brighten the tree:

depression56

Step 57

Add a Color Balance layer to give the tree some yellow:

depression57

Step 58

To add more light to the tree, I used a new layer and take brush with color #fab3b3, opacity and flow 25-35%. Paint along the tree sides as I did below:

depression58

Step 59

Make a new layer with same settings in step 10. Use Dodge and Burn Tool to create more contrast on the tree:

depression59

Step 60

It's time for most interesting parts of the tutorial - making a heart from branches. Open branches 3 stock. First use your own method to cut out the branches from background:

depression60

Use Lasso Tool to take a part from isolated branches and put it above the tree. I used Warp Tool to bend it:

depression60a
depression60b

Step 61

Use different parts from branches stock to put on the tree following a heart shape, use Warp Tool or Puppet Warp Tool if needed . I used layer mask to remove any unwanted parts. You don't need to create exactly like mine but can take it as a reference:

depression61

I used 15 layers for this branches heart.

Step 62

Group all heart branches layers and name them (I called them from 1 to 15). I used Dodge Tool with same way in previous steps to brighten some parts that are too dark:

depression62
depression62a

Step 63

Make a new layer on the top of these branches layers (within this group). Use hard black brush, 1 px and color #1a142d to make some branches parts more visible:

depression63
depression63a

Step 64

Add a Curves layer within this group to brighten this heart:

depression64

I used brush on Curves layer mask to clear some parts below:

depression64a
depression64b

Step 65

Use Color Balance to give some yellow to the branches:

depression65

Step 66

Right click branches heart group, choose Duplicate Group. Right click it again, choose Merge Group. Now we have a selection of these branches that will be useful in next steps. Turn off this layer.

depression66

Step 67

Open leaves stock pack. Choose the leaves you like and put them between the heart:

depression67
depression67a

I used layer mask to remove some big leaves:

depression67b

Step 68

Add more leaves to inside, around the heart and to the sky, hill to create a scattering effect, try to achieve a random look:

depression68

Step 69

To create some depth to this effect, I added more leaves to the sky part, around the branches heart. I applied Gaussian Blur with 3 px and 1.5 px for them. In the screenshots, you can see some leaves are blurrier (Blur 3 px) and some others less (1.5 px).

depression69
depression69a

I used 59 layers for the leaves in sky. Group all of them and name it "sky".

Step 70

I used 11 layers to add falling leaves on the hill:

depression70

Group them and call it "hill".

Step 71

Make a layer inside the "hill" group, and place it at the bottom. Use black brush with very small size (2-3 px) to paint under the leaves lying on the hill to make shadow for them:

depression71
depression71a

Step 72

Take another leaves and arrange them around model, cave, underground. I applied Gaussian Blur with 3 px for some bigger leaves to create depth to the scene.

depression72

Step 73

To the leaf on model feet, I made shadow for it with Drop Shadow effect. Double click this leaf layer, choose Blending Options:

depression73
depression73a

Step 74

I used Curves with Clipping Mask to darken and brighten some separate leaves (darken the one inside and brighten the ones outside the cave).

depression74
depression74a
depression74b

Step 75

Group all the leaves layers around the cave, name it "cave". Create a Curves layer to darken all of these leaves:

depression75

On this Curves layer mask use brush to change lightness of them. I meant to keep the ones inside the cave darker and the ones outside brighter:

depression75a
depression75b

Step 76

I added a Curves layer with same purpose:

depression76
depression76a
depression76b

Step 77

Group all groups "sky", "hill", "cave" and change the mode to Normal 100%. Make a Hue/Saturation layer to change color of all the leaves in these groups:

depression77
depression77a

Step 78

Add another Curves to darken more some leaves at the lower positions:

depression78

Apply masking job with leaves around the hill, sky:

depression78a
depression78b

Step 79

Use Levels to brighten leaves at the higher positions:

depression79

Apply layer mask brushing :

depression79a
depression79b

Step 80

Make leaves selection as done with branches heart (step 66).

depression80

Step 81

Make a new layer on the top. Load leaves selection (as done in step 53) and click Add layer mask button. We have result on its layer mask:

depression81

On this layer use a light yellow brush color ( I chose #ebb356), opacity about 50-55% to give some light to the leaves in the sky part. You can see the parts I painted below:

depression81a
depression81b

Step 82

Create a Gradient Map layer on the top:

depression82

Change the mode of this Gradient Map layer to Soft Light 100%:

depression82a

Step 83

Add a Color Balance layer:

depression83

Erase the left of sky on layer mask:

depression83a

Step 84

Make a new layer on the top. Hit G to active Gradient Tool. Choose Radial Gradient with default colors (black and white). Drag a line from the top to bottom to get this result:

depression84

Change the mode to Soft Light 100%. On layer mask I erased the parts below as they should not be too dark:

depression84a
depression84b

Step 85

Continue with a new layer and soft black brush. I lowered opacity and flow to about 10-25% and painted on some parts below. Change the mode of this layer to Soft Light 100%:

depression85
depression85a

Step 86

On a new layer, use brush with color #faa560 to paint on the top center of the sky. I altered the mode to Overlay 100%:

depression86
depression86a

Step 87

Add a Photo Filter on the top:

depression87
depression87a

Step 88

More with Gradient Map:

depression88

Put the mode of this Gradient Map to Soft Light 50%. Erase all the bottom half of the pic:

depression88a

Step 89

I used Color Balance again :

depression89

Erase the top of the pic:

depression89a

Step 90

Create a Curves layer to increase contrast of the pic:

depression90

Then do apply brush masking:

depression90a

Step 91

On a new layer, use brush with color #fff8be to paint over the hill to make it brighter with yellow light. Set the mode to Soft Light 80%:

depression91

Step 92

With same brush, I painted on a small part to make it a bit brighter. Change the mode to Soft Light 50%:

depression92

Step 93

New layer with brush color is #ebb356. Paint over the hill to give some light red there. I put the mode of it to Color 40%:

depression93

Step 94

Add a new Gradient Map layer with Normal mode 60%:

depression94

Here is result with layer mask:

depression94a

Step 95

I used two Curves layer to increase the mood of the pic. The first is for sky light , the second for the lower parts:

depression95

Here are results of the pic after adding Curves:

depression95a
depression95b

Step 96

Choose Layer-New Fill Layer-Solid Color:

Put the mode to Overlay 80% and apply masking job again. I loaded branches heart and leaves selection before brushing to keep some parts of them not to be affected by this Color Fill layer. You can see that only sky color and some leaves changed after this step:

depression96
depression96a

Step 97

Final adjustment layer - Vibrance:

depression97

Erase the bottom half of the pic:

depression97a

Step 98

Give some misty effect on the hill with a new layer, brush color is #fff8be. I lowered opacity of it to 15%:

depression98

Step 99

I used new layer and same brush. Make the top of sky brighter with it and change the mode to Soft Light 50%:

depression99

Finally it's done!

Final Results

depression99-final[1]

Download the PSD

Download

Tutorial by Jenny Le

Thank you for reading this tutorial, I hope that you enjoyed it. If you want to view my other arts and tutorials you can follow me on Facebook or visit my website . Enjoy photoshopping!

- Jenny

Loading Preview...
Powered by Creative Market
Loading Preview...
Powered by Creative Market
Loading Preview...
Powered by Creative Market

28 comments on “Create a Surreal, Emotional Underground Scene Photo Manipulation”

  1. Unfortunately, the resources are no longer available. There's a double edge to free stock photos; they're free, but they tend to disappear. It is still possible to follow the tutorial using alternative photos. You can download the PSD and find the stock photos there as well.

  2. gooooooooooooooooooooooooooooooooooooooooooooooooooooooooooooooooooooooooooooooooooooooooooooodddddddddddddddddd

  3. Great tutorial, All are path instruction for a model very teachable. Thanks for sharing great experience.

  4. Great! all Photoshop tutorials are unique. Thanks for sharing your good effective knowledge.

  5. Hi, I think the link for the "Branches 1" is not working. Could you give me the alternative link instead? Thank You

  6. Please re uploaded PSD file because when i click on download showing 404 error, this is best work for me i want check how did you do this

  7. This is a pro job.
    I'm a fan of photoshop and I see that you give real professional lessons.
    I admire your work

  8. I a beginner in photoshop, I know only make the cut: (
    Seeing such advanced tutorials I wonder how people are to learn all that

  9. I will follow this tutorial to see the results.
    I am looking for a long time this kind of lesson

Leave a Reply

Your email address will not be published. Required fields are marked *

cross