How to Create a Mystical Father and Son Scene in Photoshop

How to Create a Mystical Father and Son Scene in Photoshop

Learn how to create this beautiful and emotional photo manipulation! This tutorial will show you photo manipulation techniques, photo retouching, how to work with layer masks, and apply lighting effects.

Preview of Final Results

final-results

Mystical Father and Son Scene Photoshop Tutorial


Tutorial Resources


Step 1: Create a New Image File

Create a new file with a width of 3500 px and a height of 3500 px at 300 dpi (Dots per Inch). Background Contents should be White.

1

Step 2: Create the Background

First off, let's open the field in Photoshop. We will be using field from this stock image so we will need to transfer it to our main canvas.

2

Step 3

Now, go to select and click color range

3

Step 4

Next, open color range and pick the color sample from highlighted area as shown below:

4

The result should be similar to this:

5

Step 5

Now activate the magic pen tool (R):

6

Fill these settings :

7

Press Shift and click on the highlighted area to make them selected :
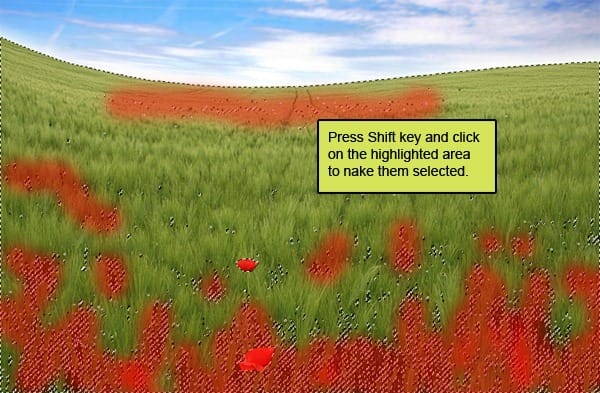
8

The result should be similar to this.
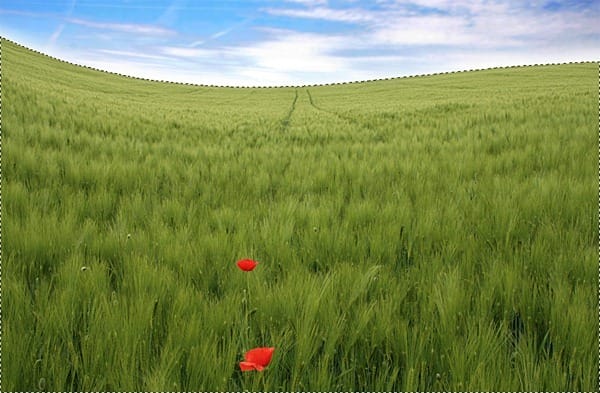
9

Step 6

Press V to activate the Move Tool. Left-click the image and drag the image to the main canvas and change layer name to "Ground". The result should be similar to this:

10

Step 7

Activate transform tool (Ctrl+t) as see below:

11

The result should be similar to this:

12

Step 8

Once again activate Transform tool (Ctrl/Cmd+T) and rotate the encircled squares in the direction of the red arrow.

13

The result should be similar to this:

14

Step 9

Now activate transform tool as see below:

15

The result should be similar to this:

16

Step 10: Fix Sky

Now, let's open the desert sunset stock in Photoshop. We will be using the sky from this stock image so we will need to transfer it to our main canvas.
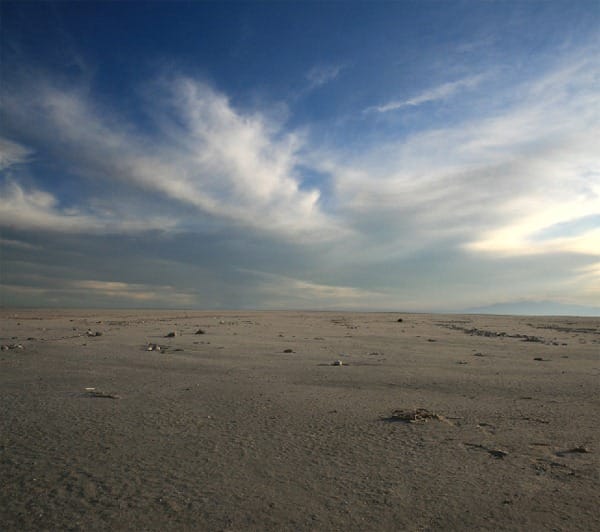
17

Step 11

Click the desert sunset and press M to Rectangular marquee tool and then make a selection around the sky and then click V to activate the Move Tool. Left-click the image and drag the image to the main canvas
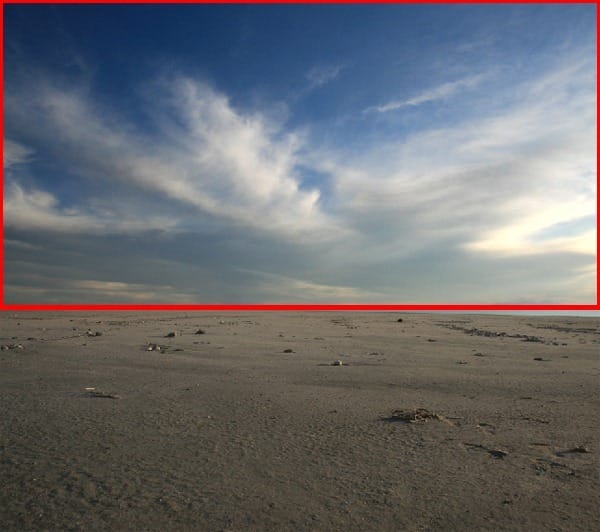
18

The result should be similar to this:

19

Step 12

Now activate transform tool by using activate transform tool fixed sky properly as see below:

20

Step 13

Again Activate transform tool (Ctrl/Cmd+T) and rotate the encircled square in the direction of the red arrow .

22

The result should be similar to this:

23

Step 14

Now create a new color balance adjustment layer from the bottom of layers palette .
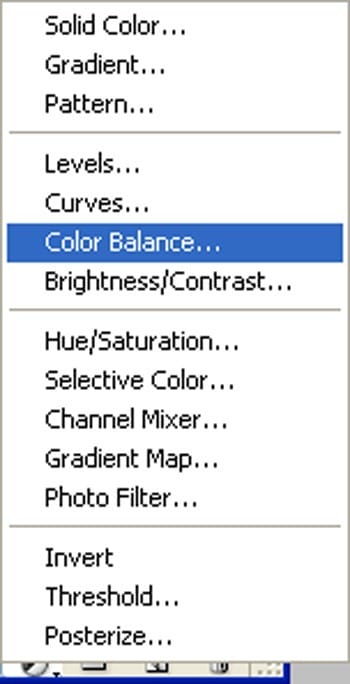
24

Fill values see as below :

25

Step 15

Now Press Alt+left click in between 2 layer's (ground layer and Brightness/Contrast) to make a mask.

26

The result should be similar to this:

27

Step 16

Activate Ground layer. Create a new color balance adjustment layer from the bottom of layers palette .

28

Fill values see as below :

29

Step 17

Now Press Alt+left click in between 2 layer's (ground layer and Brightness/Contrast) to make a mask.

30

The result should be similar to this:

31

Step 18

Activate a new layer and name it "Source light". Activate Brush tool (B) with these settings :

  • Brush size: 400px
  • Hardness: 0%
  • Opacity: 25%
  • Flow: 100%
  • Color: #000000
32

Fill values see as below :

33

Now paint over the highlighted area.

34

The result should be similar to this:

35

Step 19: Fix father and son

First off, let's open Father and Son I stock in Photoshop. We will be using the Father and Son from this stock image so we will need to transfer it to our main canvas.

36

Step 20

Click the Father and Son I stock and press P to activate pen tool and then make a selection around the Father and Son and then click V to activate the Move Tool. Left-click the image and drag the image to the main canvas and change layer name to "Father and Son"

37

The result should be similar to this:

38

Step 21

Next, activate the Transform tool (Ctrl/Cmd +T), then while the "Father and Son" layer is selected and then resize it as shown below:

39

The result should be similar to this:

40

Step 22

Next, activate the Transform tool (Ctrl/Cmd +T), then while the "Father and Son" layer is selected and then resize it as shown below:

41

The result should be similar to this:

42

Step 23

Now Press Alt+left click in between 2 layer's to add vector mask .

43

Step 24

Activate the brush tool (B) then right click on the canvas while the Brush tool (B) is active and then pick this brush:

44

Step 25

Activate Erase tool (E) with these settings:

  • Brush size: 400px
  • Hardness: 0%
  • Opacity: 40%
  • Flow: 100%

Erase like shown in the image below.

45

The result should be similar to this:

46

Step 26

Create a new color balance adjustment layer from the bottom of layers palette .

47

Fill values see as below :

48

Step 27

Now Press Alt+left click in between 2 layer's (father and son layer and Color balance) to make a mask.

49

The result should be similar to this:

50

Step 28

Now create a new Hue/Saturation adjustment layer from the bottom of layers palette .Press Alt+left click in between 2 layer's (father and son layer and Hue/Saturation) to make a mask.

51

When the Hue/Saturation box opens, input the following:

52

The result should be similar to this:

53

Step 29: Fix windmill

First off, let's paper windmill stock in Photoshop. We will be using the paper windmill stock from this stock image so we will need to transfer it to our main canvas.:

54

Step 30

Click the paper windmill stock and press P to activate pen tool and then make a selection around the paper windmill and then click V to activate the Move Tool. Left-click the image and drag the image to the main canvas and change layer name to "paper windmill". :

55

The result should be similar to this:

56

Step 31

Next, activate the Transform tool (Ctrl/Cmd +T), then while the "paper windmill" layer is selected and then resize it as shown below: :

57

The result should be similar to this:

58

Step 32

Activate the Transform tool (Ctrl/Cmd +T), then while the "paper windmill" layer is selected and then resize it as shown below:

59

The result should be similar to this.

60

Step 33

Create a new Curves adjustment layer from the bottom of layers palette:

61

Step 34

Press Alt+left click in between 2 layer's (paper windmill layer and Curve) to make a mask.:

63

The result should be similar to this:

64

Step 35: Fix paper plane

First off, let's paper plane stock in Photoshop. We will be using the paper plane stock from this stock image so we will need to transfer it to our main canvas.:

65

Step 36

Click paper plane and press P to activate pen tool and then make a selection around the paper plane and then click V to activate the Move Tool. Left-click the image and drag the image to the main canvas and change layer name to "paper plane".

66

The result should be similar to this:

67

Step 37

Next, activate the Transform tool (Ctrl/Cmd +T), then while the "paper plane" layer is selected and then resize it as shown below:

68

The result should be similar to this:

69

Step 38

Add a vector mask to paper plane layer from bottom of layer window :

70

Step 39

Activate the brush tool (B) then right click on the canvas while the Brush tool (B) is active and then pick this brush:

71

Now use grass brush and paint over the highlighted area.

72

The result should be similar to this.

73

Step 40

Now go back to "paper plane" layer and then creat a Color Balance adjustment layer which can be found by pressing on the Create New Fill/Adjustment layer button shown on the layer window::

74

When the Color Balance box opens, input the following::

75

Step 41

Press Alt+left click in between 2 layer's (paper plane layer and Color Balance) to make a mask..

76

The result should be similar to this:

77

Step 42

Create a new Curves adjustment layer from the bottom of layers palette. Press Alt+left click in between 2 layer's (paper plane layer and Curves) to make a mask.

78

When the Curves box opens, input the following: .

79

The result should be similar to this :

80

Step 43

Create a new Brightness/Contrast adjustment layer from the bottom of layers palette.Press Alt+left click in between 2 layer's (paper plane layer and Brightness/Contrast) to make a mask.

81

When the Brightness/Contrast box opens, input the following:

82

The result should be similar to this.

83

Step 44

Now activate the Blur tool (R):

84

Fill these settings :

85

Now we are going to use blur tool on the hard edges to make them smooth:

86

The result should be similar to this. :

87

Step 45: Fix Birds

First off, let's open the Sea bird 29 - EquineStockImages stock in Photoshop. We will be using the Sea bird from this stock image so we will need to transfer it to our main canvas.:

88

Step 46

Click the Sea bird and press P to activate pen tool and then make a selection around the Sea bird and then click V to activate the Move Tool. Left-click the image and drag the image to the main canvas and change layer name to "Sea bird 1"..

89

The result should be similar to this:

90

Step 47

Next, activate the Transform tool (Ctrl/Cmd +T), then while the " Sea bird 1" layer is selected and then resize it as shown below:

91

The result should be similar to this:

92

Step 48

Now Crate new Color Balance adjustment layer from the bottom of layers palette .Press Alt+left click in between 2 layer's (sea bird 1 layer and Color Balance) to make a mask.:

93

When the Color Balance box opens, input the following:

94

The result should be similar to this :

95

Step 49

First off, let's open the Sea bird 99 - EquineStockImages stock in Photoshop. We will be using the Sea bird from this stock image so we will need to transfer it to our main canvas and name it "Sea bird 2" :

96

Step 50

Next, activate the Transform tool (Ctrl/Cmd +T), then while the " Sea bird 99" layer is selected and then resize it as shown below:"

97

Step 51

Click the Sea bird and press P to activate pen tool and then make a selection around the Sea bird 100 and then click V to activate the Move Tool. Left-click the image and drag the image to the main canvas and change layer name to "Sea bird 3".:

98

The result should be similar to this:

99

Step 52

Next, activate the Transform tool (Ctrl/Cmd +T), then while the "Sea bird 100" layer is selected and then resize it as shown below:"

100

The result should be similar to this:

101

Step 53: Enhance the Color of the Image

Now Crate new solid color adjustment layer from the bottom of layers palette :

102

When the solid color box opens, input the following:

103

Step 54

Reduce the opacity of the color fill layer to 60% and change the layer mode to "Exclusion" .

104

The result should be similar to this:

105

Step 55

Create a new solid color adjustment layer from the bottom of layers palette .

106

When the solid color box opens, input the following:

107

Step 56

Reduce the opacity of the color fill layer to 5% and change the layer mode to "Soft light" :

108

The result should be similar to this:

109

Step 57

Create a Gradient Map adjustment layer which can be found by pressing on the Create New Fill/Adjustment layer button shown on the layer window:

110

When the Gradient Map box opens, input the following:

111

Step 58

Change the layer mode to "Luminosity" and the opacity to 100% :

112

The result should be similar to this:

113

Step 59

Create a new Color Balance adjustment layer from the bottom of layers palette .

114

When the Color Balance box opens, input the following:

115

Step 60

Reduce the opacity on the color balance to 65%:

116

The result should be similar to this:

117

Step 61

Create a new Curves adjustment layer from the bottom of layers palette .

118

When the Curves box opens, input the following:

119

The result should be similar to this:

120

Step 62 : Create a Vignette

In this step, we will learn how to create a vignette which will help enhance the focus on our subject. First make a new layer and name it "Vignette". Fill it with white (#000000):

121

Step 63

Go to Filters > Distort > Lens Correction:

122

When the Lens Correction box opens, input the following:

123

The result should be similar to this:

124

Step 64

Now change the layer mode to "Multiply" and the opacity to 100%:

125

The result should be similar to this:

126

Step 65

Now make a duplicate (Ctrl+j) of "Vignette 1" layer and change the layer mode to "Multiply" and the opacity to 25%:

127

The result should be similar to this:

128

Step 66: Fix Lighthouse

First off, let's open the Cape May Lighthouse 8 stock in Photoshop. We will be using the Lighthouse from this stock image so we will need to transfer it to our main canvas.:

129

Step 67

Click the lighthouse and press P to activate pen tool and then make a selection around the balloons and then click V to activate the Move Tool. Left-click the image and drag the image to the main canvas and change layer name to "Lighthouse ":

130

The result should be similar to this:

131

Step 68

Next, activate the Transform tool (Ctrl/Cmd +T), then while the "lighthouse" layer is selected and then resize it as shown below:

132

The result should be similar to this:

133

Step 69

Next, activate the Transform tool (Ctrl/Cmd +T), then while the "lighthouse" layer is selected and then resize it as shown below:

134

The result should be similar to this:

135

Step 70

Right click on the canvas while the Brush tool (B) is active and then pick this brush:

136

Activate Erase tool (E) with these settings:

  • Brush size: 400px
  • Hardness: 0%
  • Opacity: 40%
  • Flow: 100%

Now let's erase :

137

The result should be similar to this:

138

Step 71

Create a new Color Balance adjustment layer from the bottom of layers palette.

139

When the Color Balance box opens, input the following:

140

Step 72

Press Alt+left click in between 2 layer's (Lighthouse layer and Color/Balance) to make a mask.

141

The result should be similar to this:

142

Step 73

Create a new Curves adjustment layer from the bottom of layers palette .Press Alt+left click in between 2 layer's (Light house layer and Curves) to make a mask.

143

When the Curves box opens, input the following:

144

The result should be similar to this:

145

Step 74

Now let's make a shadow. Activate a layer and name it shadow. Activate the brush tool (B) then right click on the canvas while the Brush tool (B) is active and then pick this brush:

146

Activate Brush tool (B) with these settings:

  • Brush size: 400px
  • Hardness: 0%
  • Opacity: 40%
  • Color:#000000
  • Flow: 100%

Now let's erase.

147

The result should be similar to this:

148

Step 75: Add texture

Open the soft bokeh texture in Photoshop. We will be using the texture from this stock image so we will need to transfer it to our main canvas.

149

Step 76

Click the Bokeh Texture and press V to activate the Move Tool. Left-click the image and drag the image to the main canvas and change layer name to "Texture". The result should be similar to this:

150

Step 77

Next, activate the Transform tool (Ctrl/Cmd +T), then while the "texture" layer is selected and then resize it as shown below:

151

Step 78

Make 3 duplicates (Ctrl/Cmd+J) of the texture layer and arange them see as below :

152\


Step 79

Select all layers and marge (Ctrl+e) them and name it "texture" :

153

change the layer mode to "soft light" :

154

The result should be similar to this:

155

Step 80

Activate the Eraser tool

  • Brush size: 2000px
  • Hardness: 0%
  • Opacity: 40%
  • Flow: 100%
156

The result should be similar to this:

157

Final Results

final-results[1]

Finally, when you save in the JPEG format, it is advisable to save it in the highest quality which is 12. Through this tutorial we have learned so many advance tips of doing a art work.always go with Adjustments from layer palette. Always try to avoid using erase tool in spite of erase tool use layer mask. Hope you all like my tutorial and learn something from this.

Tutorial by Vik Aadi

profileI'm a freelance visual artist from india.I am a fan of Surreal artworks, and I would like to share the process on how I do mine. I hope you'd enjoy creating this tutorial and I hope this would help you in whatever you're doing. Anyway, thank you for visiting this page and using my tutorial, if you want to see more of my art works,and if you have any kind of project for me or any kind of art colobration in your mind give me a shout at my Deviantart and Facebook.

- Vikas Singh Adhikari (Vik aadi)

24 comments on “How to Create a Mystical Father and Son Scene in Photoshop”

  1. Loved the tut and I posted it in my digital network for others to use.
    Great tutorial and very easy to follow.

    Thank You

  2. It's an interesting finished picture but I really think that individually color correcting everything is very time consuming.
    Group certain elements then run an adjustment layer.

  3. muito obrigado pelos seus tutoriais, tenho feito grandes trabalhos e aprendido muito.... continua com o excelente trabalho  e dedicação que ten tido..... nota 10

    1. @ArwaMohammad  Go to Filter, Lens correction, or just press Shift + Ctrl + R on your keyboard :)

  4. Thanks for this tutorial it inspired me to use some of my own photos including my Daughter inlaw and Granddaughter, And for all those peeps here saying image has been deleted etc, just use your imagination, theres not a lot of point following this tutorial down to a t, as i said before learn from it and use your imagination. here is my version, [IMG]http://i569.photobucket.com/albums/ss134/chukkamental/amieevie.jpg[/IMG]

  5. What's a f&^%$#$ lighthouse doing in the middle of a field... on hills. Should've used a windmill.

Leave a Reply

Your email address will not be published. Required fields are marked *

cross